

How to Create a Form in WordPress: A Step-by-Step Guide
-
- Tips and Tricks AI-Form Builder Form Builder WordPress Plugins
- 22 mins read
Forms are the backbone of communication on any WordPress website. Whether you’re collecting customer feedback, processing job applications, or simply letting visitors reach out — a well-built WordPress form makes it happen. Without one, you’re basically leaving your audience with no way to talk to you.
But here’s the thing: WordPress doesn’t come with a built-in form builder. You need a form plugin to get the job done. That’s where most beginners freeze up. The options are overwhelming, the settings feel complicated, and nobody wants to break their website just to add a contact form.
So let’s cut to the chase — this guide will show you exactly how to create a form in WordPress using FormGent, one of the best WordPress form plugins available today. It has a clean, easy-to-use editor and even an AI option that builds the form for you based on a short description you write.
By the end of this guide, you’ll know how to:
- Set up FormGent on your WordPress site
- Build a form from scratch or with AI assistance
- Customize fields, configure settings, and design your form
- Publish a form and start collecting responses right away
No coding. No guesswork. Just a straightforward process that actually works.
Why Use a Form Plugin in WordPress?
WordPress is a powerful platform, but it doesn’t do everything out of the box. Building a form is one of those things it simply won’t do for you. There’s no native form builder tucked away in the dashboard — you have to bring in a form plugin to handle it.
That’s not a flaw. It’s actually how WordPress is designed to work. You install what you need, and nothing more.
So why does a WordPress form plugin matter so much? Because forms do a lot of heavy lifting on your website. They’re how visitors contact you, how customers request a quote, how job applicants send in their information, and how readers sign up for your newsletter. A missing or broken form means missed opportunities — plain and simple.
Here’s what a good free WordPress form builder gives you:
- No coding required. You don’t need to write a single line of HTML or PHP. Everything works through a visual editor.
- Better data management. Responses are stored directly in your dashboard as form entries, so you can review submissions anytime without digging through emails.
- Time savings. Building a custom form WordPress users would need to code from scratch takes hours. A plugin cuts that down to minutes.
- Validation and error handling. A plugin automatically checks that users fill out required fields correctly before submitting — things like valid email formats or mandatory fields.
Now, there are lots of form plugins available for WordPress. Some are bloated with features you’ll never use. Others are restricted with heavy pricing plan offering basic features and leave you wanting more. FormGent hits the right balance. It’s built for people who want to get a form up quickly, without biting the bullet on a steep learning curve or paying for just basic features.
It also comes with an AI-powered form builder — which we’ll get into shortly. That alone sets it apart from most options in the market.
Prerequisites Before You Begin
Before you start building your form, there are a few things you need to have in place. Nothing complicated — just the basics to make sure everything runs smoothly.
1. A Working WordPress Website
First, you need an active WordPress website. This WordPress form tutorial covers WordPress.org — the self-hosted version — not WordPress.com. If you’re on WordPress.com, your access to plugins depends on your plan. Make sure you’re on the right platform before going any further.
2. FormGent Plugin Installed and Activated
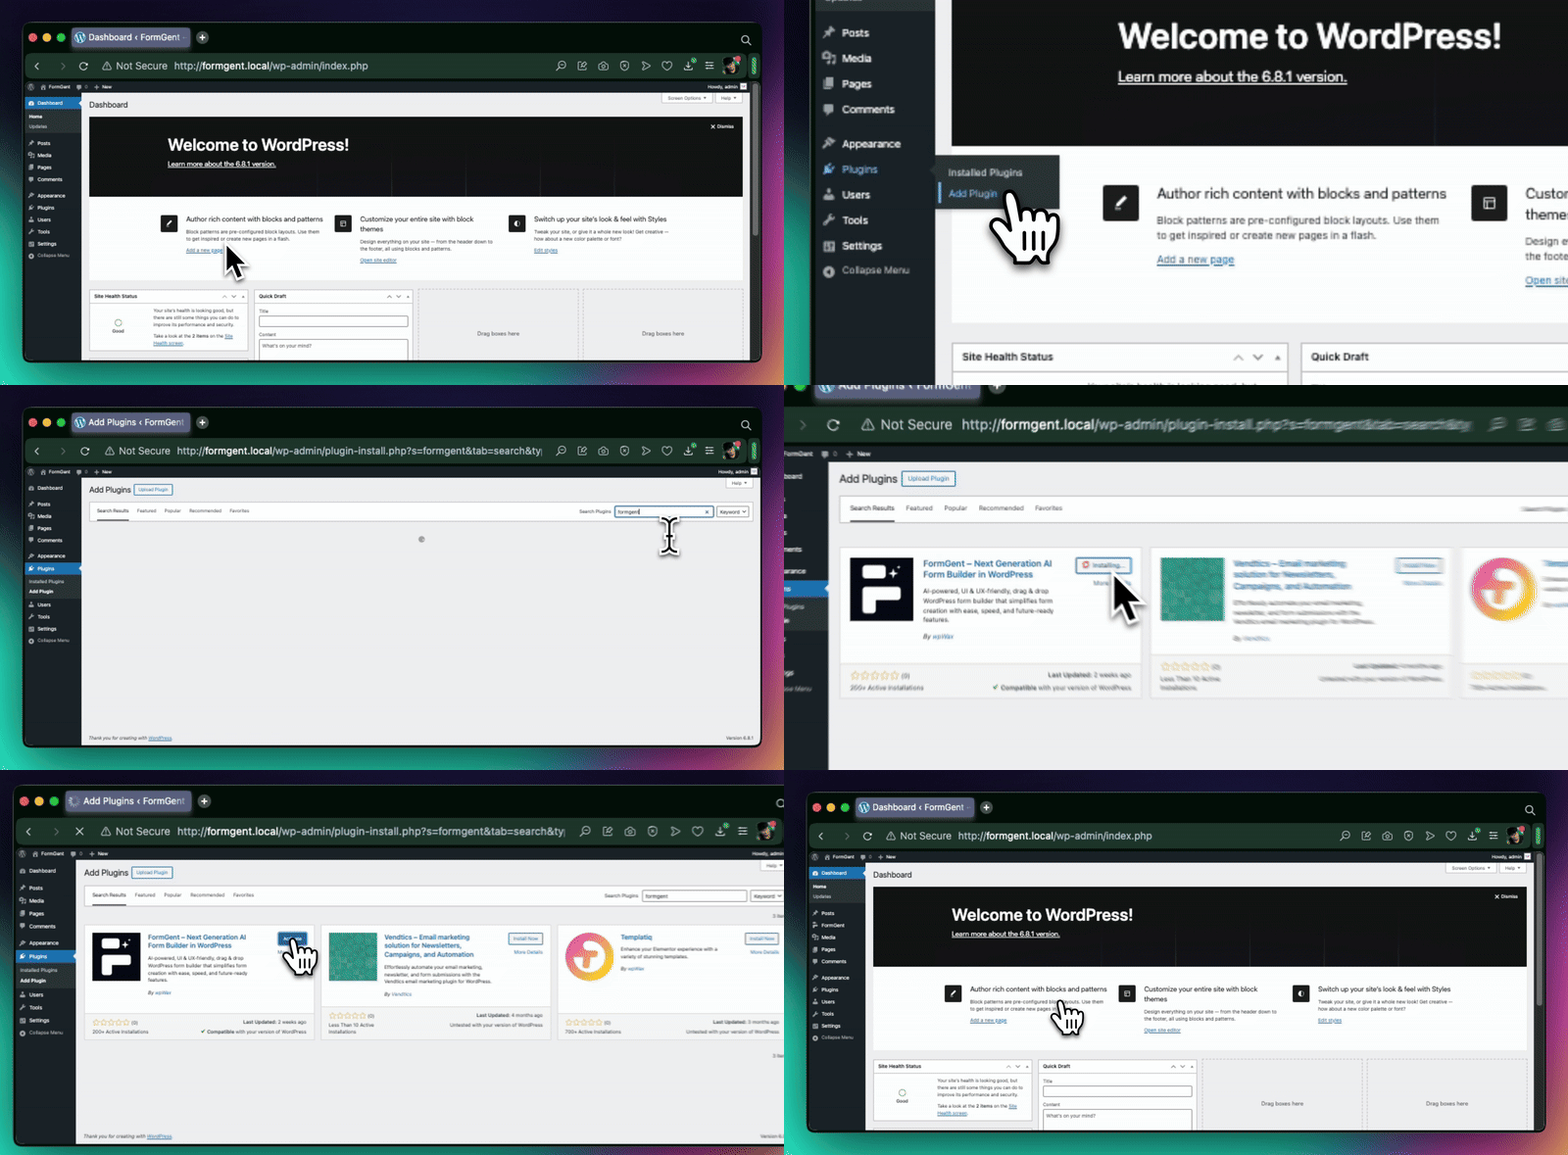
Second, you need the FormGent plugin installed on your site. Here’s how to do it quickly:
- Go to your WordPress Admin Dashboard
- Click on Plugins → Add New
- Type “FormGent” in the search bar
- Click Install Now, then hit Activate
That’s it. FormGent is a free WordPress form builder available directly in the WordPress plugin directory, so you don’t need a credit card to get started. The free plan covers the core form-building features — more than enough to follow along with this guide.
3. A Clear Goal for Your Form
This one’s easy to overlook. Before you build anything, know what your form needs to do. Is it a contact form? A feedback survey? A job application? Having a clear purpose saves you time when picking fields and writing labels. It keeps the whole process focused.
Once these three things are in order, you’re ready to go. Let’s get into the actual building process.
Step-by-Step: How to Create a Form in WordPress Using FormGent
Alright, let’s get into the real work. Follow each step carefully, and you’ll have a fully functional form live on your website by the end.
✅ Step 1: Access the FormGent Dashboard
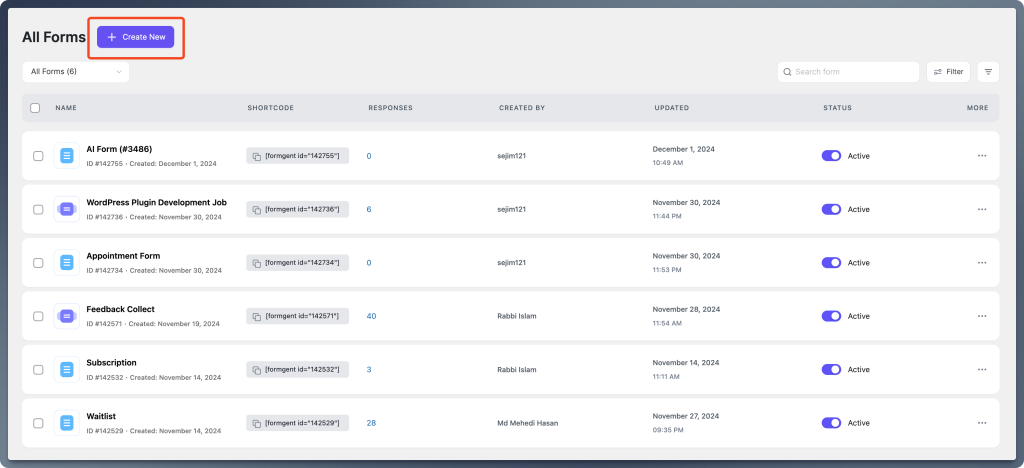
Once FormGent is installed and activated, it shows up in your WordPress left-side menu.
Here’s what to do:
- Log in to your WordPress Admin Dashboard
- Click on FormGent in the left menu, then select All Forms
- Click the “Create New” button at the top of the screen
That opens the form creation process. Simple enough — now it’s time to choose how you want to build your form.
✅ Step 2: Choose How to Build Your Form
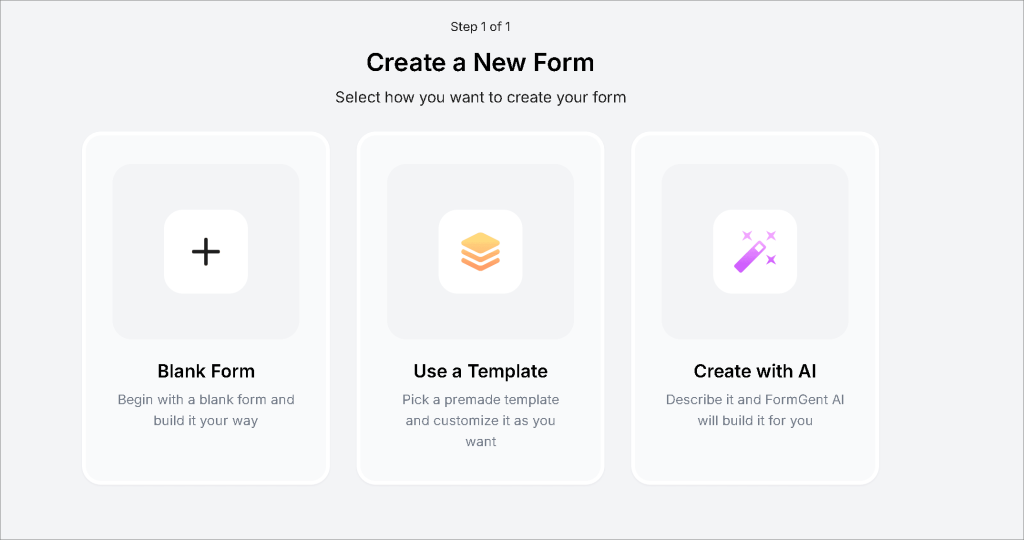
FormGent gives you two ways to create a form in WordPress. Each one suits a different type of user.
Option A — Start from Scratch With Blank Form
This gives you a blank canvas. You add every field manually, arrange them however you like, and have full control over the structure from the very beginning. It’s the best choice if you already know exactly what your custom form needs to look like.
Option B — Use a Template
Pick a premade template from the form template library and customize with your preference.
Option C — Create with AI
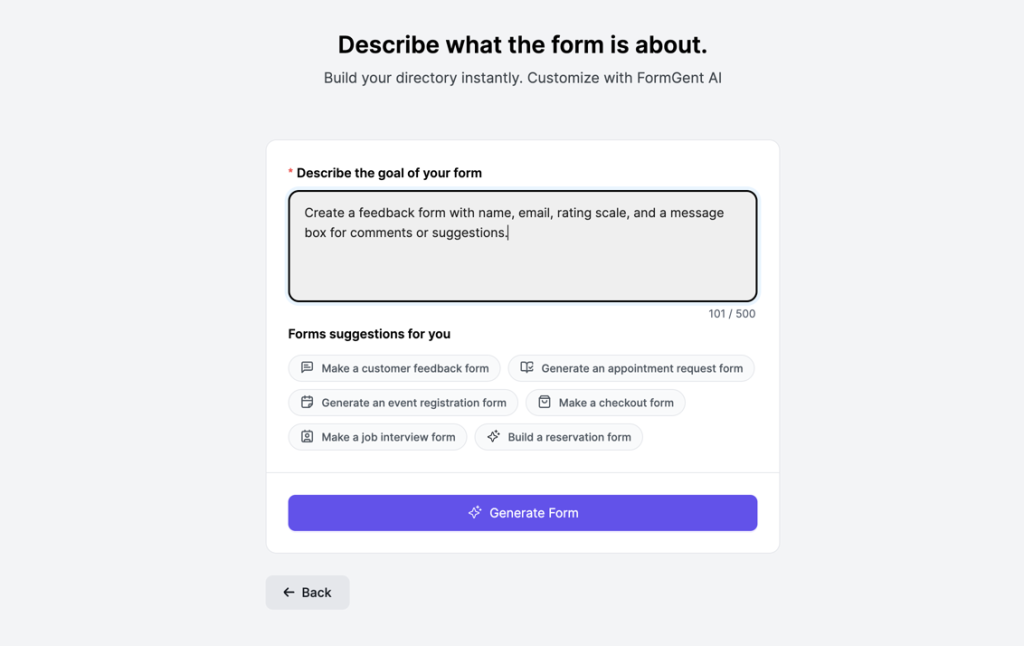
This is where FormGent pulls ahead of most form plugins. Instead of building field by field, you simply describe what you need. Type something like “Create a job application form” or “Build a customer feedback survey” — and the AI generates a ready-made form based on your description.
It’s a real time-saver, especially if you’re not sure where to start. You can always tweak the result afterward, so don’t worry about getting the description perfect.
✅ Step 3: Customize Your Form Fields
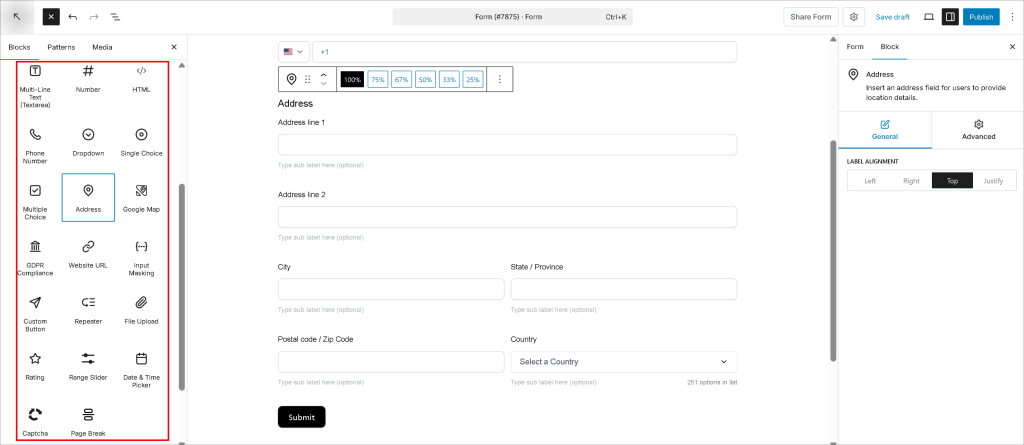
Whether you used AI or started from scratch, this step is where you shape the form to fit your exact needs.
On the right-side panel, you’ll find a full list of available field types, including:
- Text field
- Email field
- Phone Number
- Dropdown menu
- Radio button
- Checkbox
- Date Picker
- File upload
- And more
To add a field, drag it from the panel and drop it into your form. To remove one, simply select it and delete it. You can reorder fields by dragging them up or down.
For each input field, you can set:
- Label — the question or instruction the user sees
- Placeholder text — the hint that appears inside the field before the user types
- Validation rules — e.g., marking a field as a required field, or ensuring an email address is formatted correctly
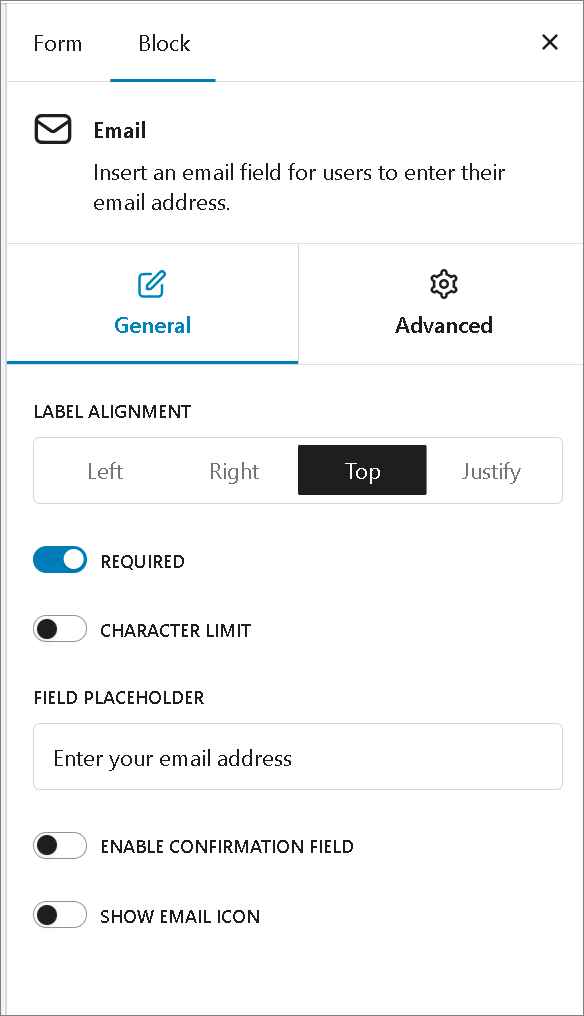
Take your time here. The fields you choose and the way you label them directly affect how users experience your form. Clear labels reduce confusion and improve completion rates.
You can also use conditional logic to make the form more personalized for the user. This will increase the form completion rate surprisingly. You learn how to use conditional logic in a form by following this guide – Mastering Conditional Logic in Forms: A Guide to Personalized User Experiences
✅ Step 4: Rename Your Form
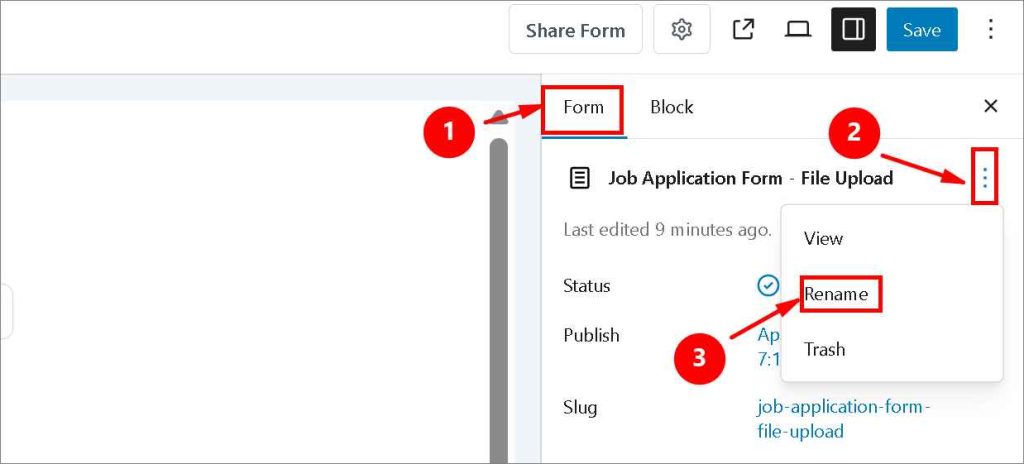
Once your fields are set, give your form a proper name. By default, FormGent assigns a generic title — something you’ll want to change before publishing.
Here’s how:
- Look at the Form tab on the right-hand side of the editor
- Click the three-dot menu next to the current form name
- Select Rename from the dropdown
- Type in a clear, descriptive name — e.g., “Customer Feedback Form” or “Workshop Registration Form”
- Click Save
This might seem like a small detail, but it matters. A proper name keeps your forms organized in the dashboard, especially once you have several of them running on your site.
✅ Step 5: Configure Form Settings
Now let’s set up what happens behind the scenes when someone submits your form. Head to the Form Options tab in the editor. You’ll find:
- Form Confirmation
- Email Notifications
- Save & Resume (Pro)
- PDF Generation
- Quiz
- Post/ CPT Submission
- OTP Verification (Pro)
- Embed
- Google Sheet Integration
- Webhooks (Pro)
- Custom CSS/JS
1. Form Confirmation
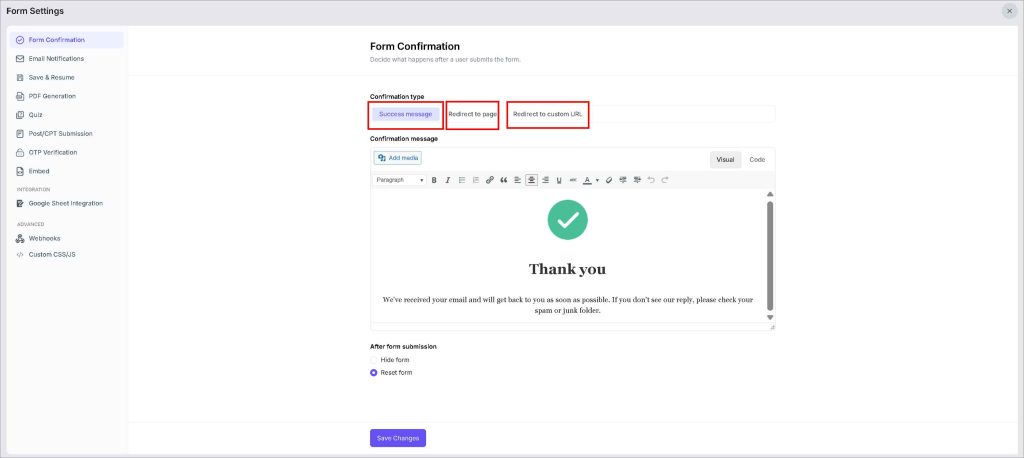
This controls what a user sees immediately after a form submission. You have three choices:
- Success Message — Show a custom thank-you message on the same page
- Redirect to Page — Send the user to a specific WordPress page on your website
- Redirect to Custom URL — Forward the user to any external link
Pick the option that makes the most sense for your workflow. A simple “Thank you, we’ll be in touch!” message works fine for most forms. A conditional confirmation setting is also available in PRO version that will show different messages based on user responses.
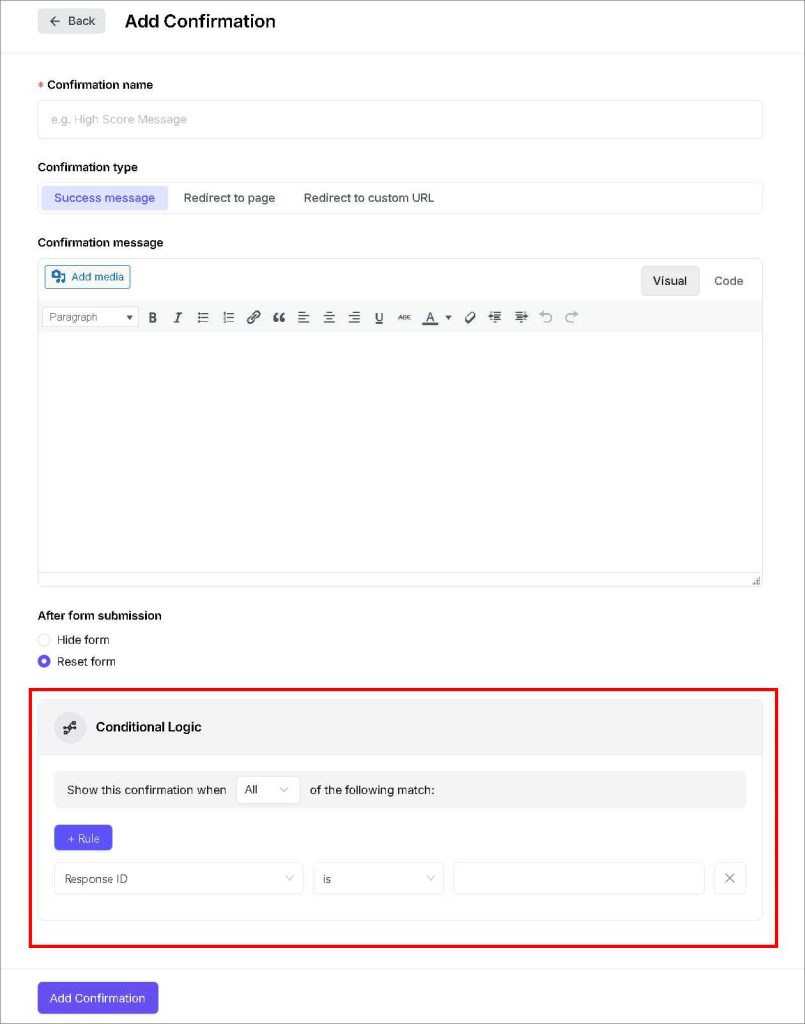
2. Email Notifications
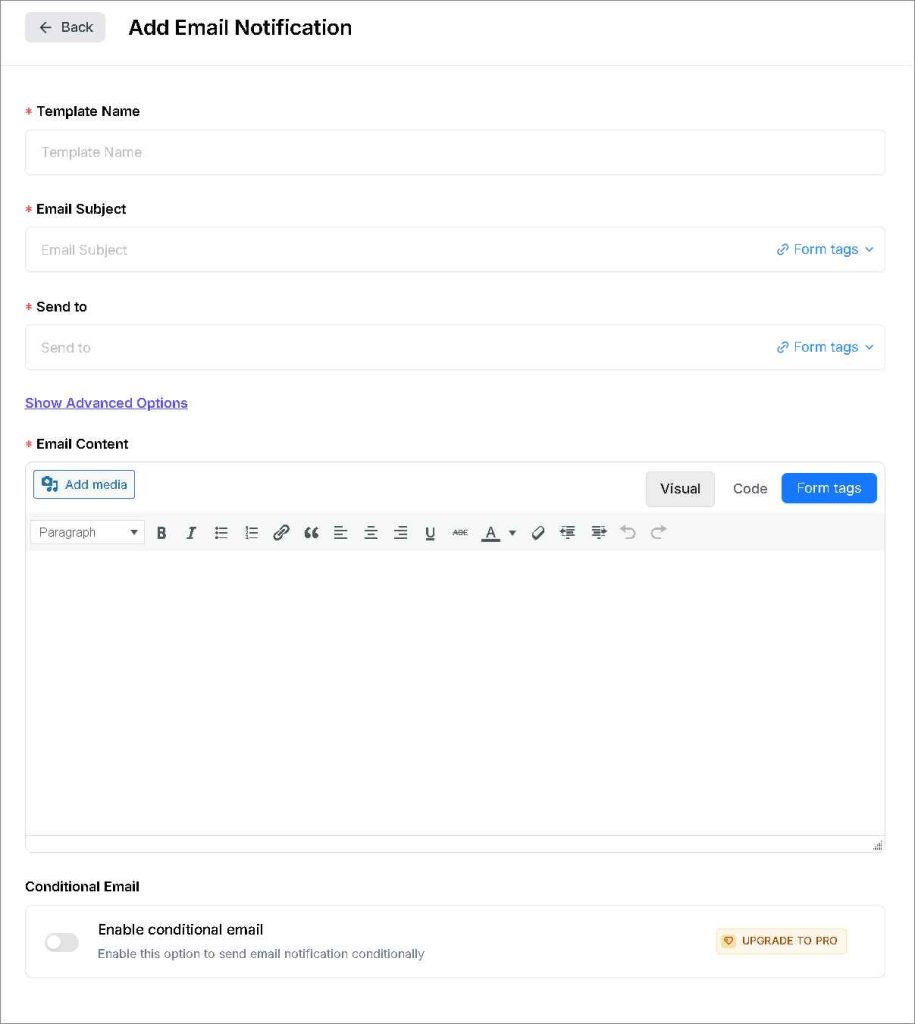
This setting sends you an email notification every time someone submits the form. You can customize:
- The recipient email address
- The subject line
- The email content
Turn this on. Missing a form submission because notifications were off is the kind of thing that throws a customer under the bus without you even realizing it. You can also set up an autoresponder to automatically send a confirmation email back to the person who filled out the form. If you want to set up a heavy customization on email setting, you can do it by “Conditional Email” option which require PRO version of Formgent.
3. Save & Resume (Pro)
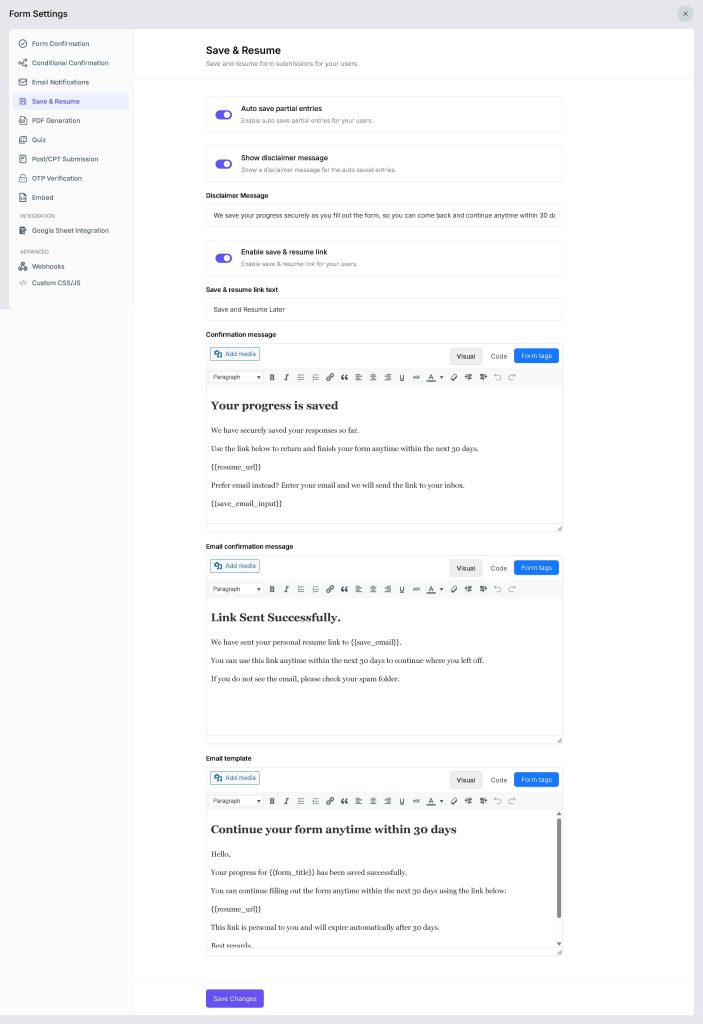
Not every user fills out a form in one sitting. Sometimes they get interrupted, close the tab, or simply need more time to gather information before completing a submission. That’s exactly what the Save & Resume feature is built for — it lets users save their progress mid-way and come back to finish the form later.
4. PDF Generation
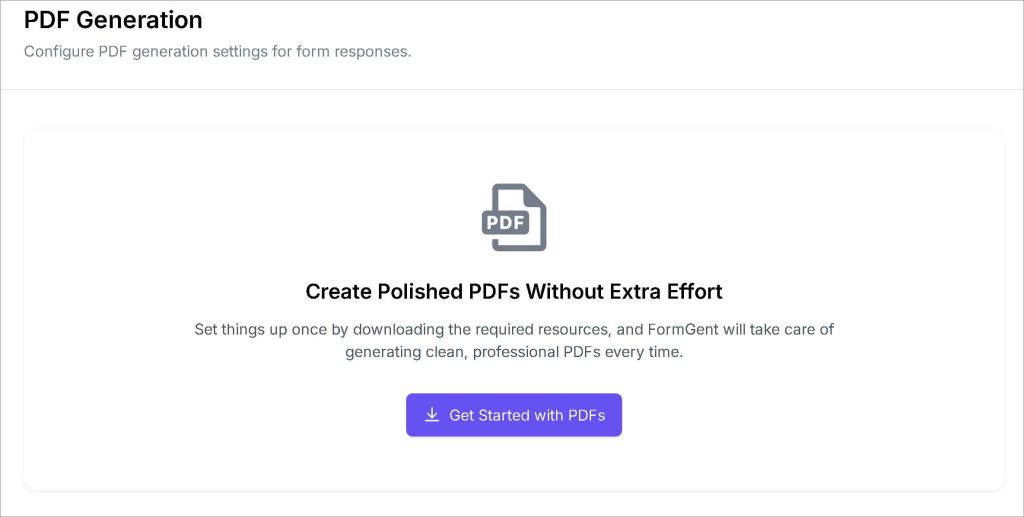
Every time someone submits your WordPress form, their response data gets stored in your dashboard. That works fine for internal tracking. But what if you need to share those responses as a document — with a client, a hiring manager, or a team member who doesn’t have access to your WordPress backend? That’s where PDF Generation comes in.
FormGent can automatically generate a clean, professional PDF for every form submission. No extra tools. No copy-pasting data into a separate document. It all happens inside the plugin.
5. Quiz
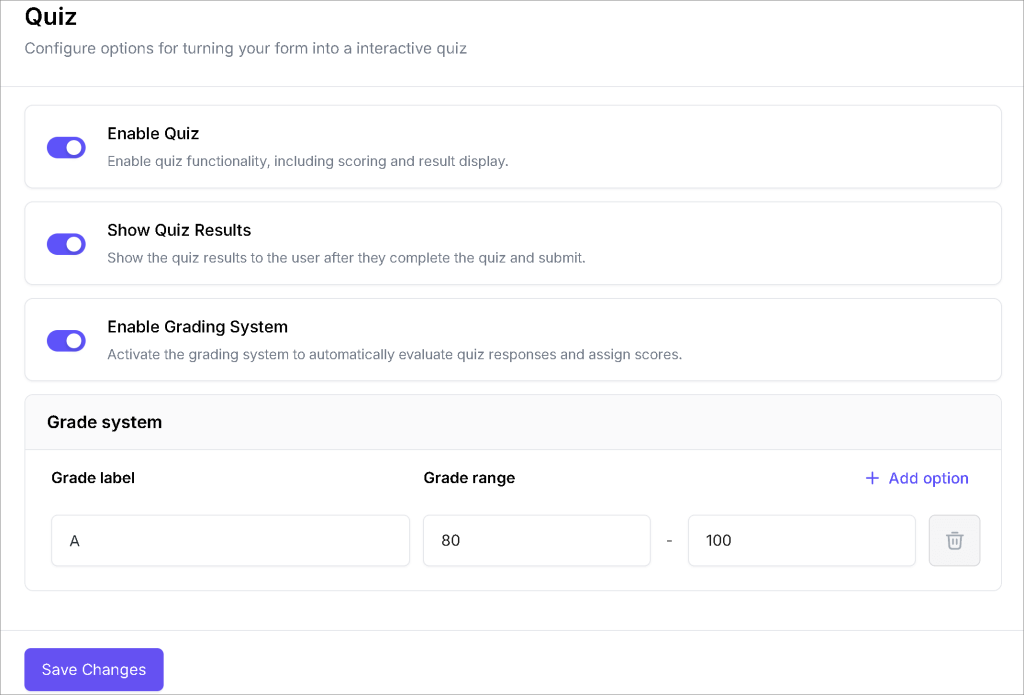
Most people think of forms as tools for collecting information. But with FormGent, you can take it a step further and turn any WordPress form into a fully interactive quiz — complete with scoring, grading, and instant results. It’s a feature that most WordPress form plugins simply don’t offer out of the box.
6. Post/ CPT Submission
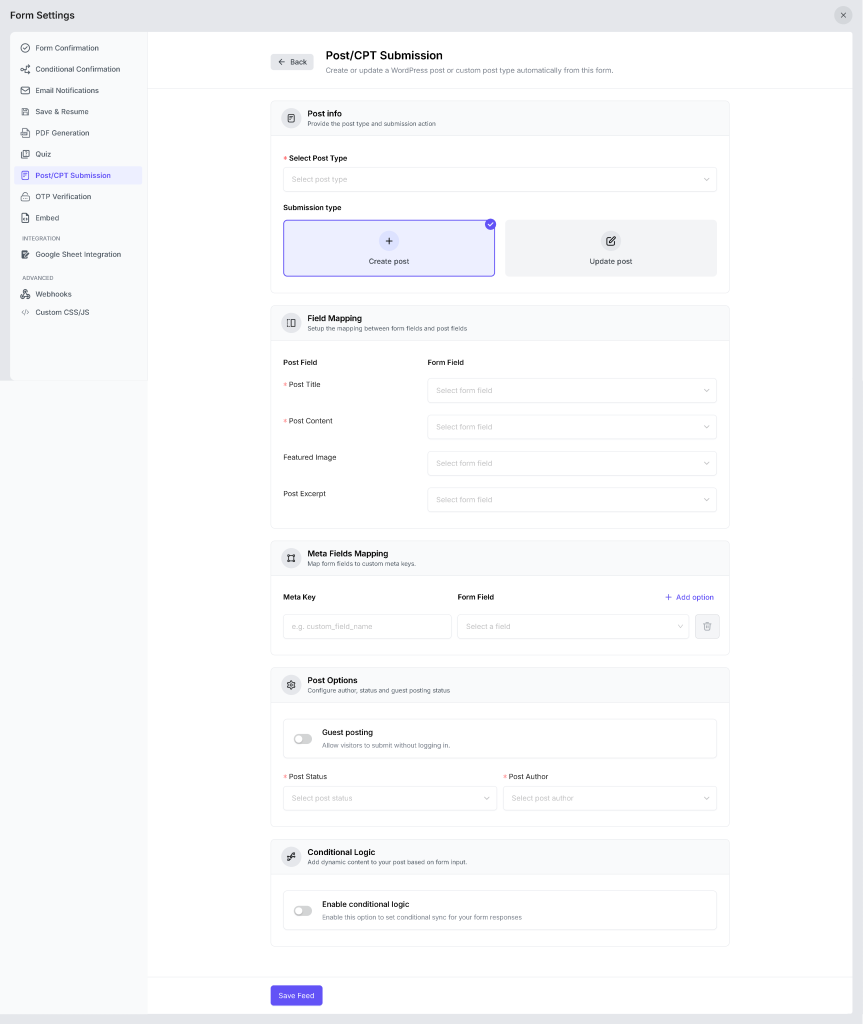
This feature lets you automatically create or update a WordPress post — or any custom post type — directly from a form submission. Instead of manually publishing content yourself, the form does it for you the moment someone hits the submit button.
7. OTP Verification (Pro)
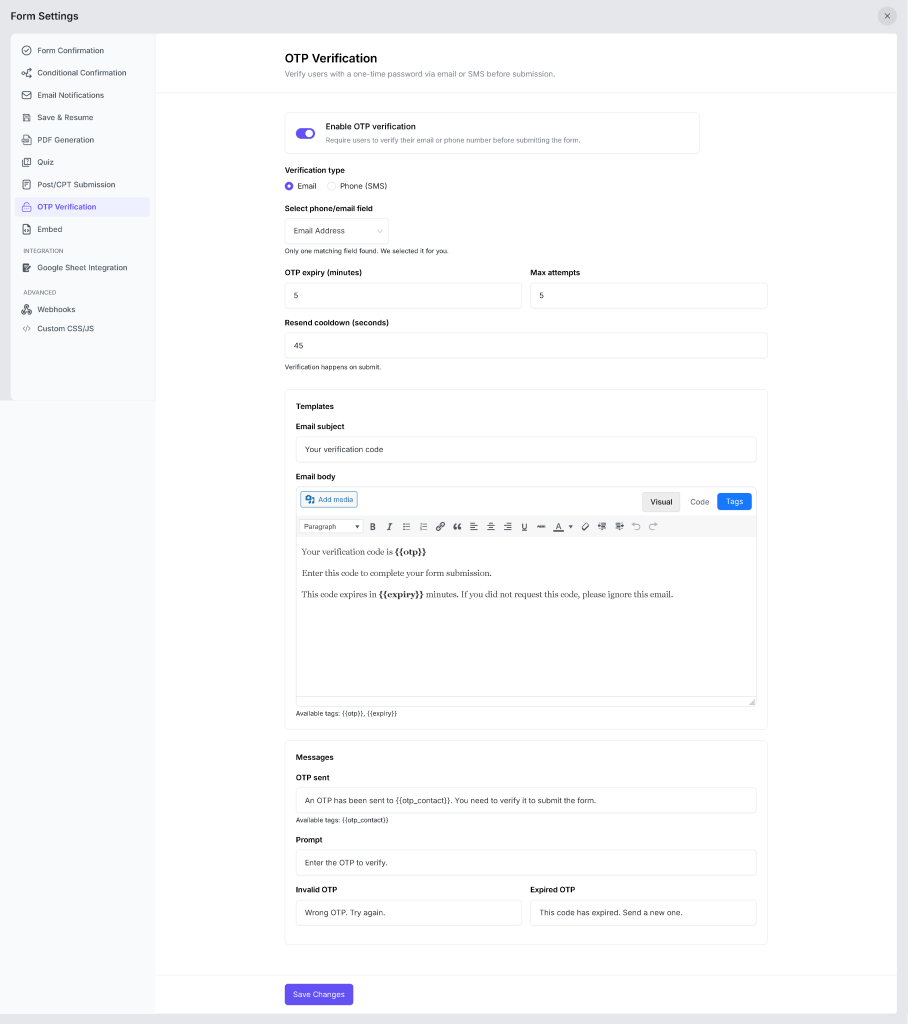
Fake submissions and bot entries are a real problem for any WordPress form. OTP Verification solves that by requiring users to verify their identity with a one-time password before their form submission goes through. It’s one of the most effective anti-spam measures you can add to a form. If your form collects sensitive information or handles user registrations, turning on OTP Verification is a no-brainer. It keeps your form entries clean and your data trustworthy.
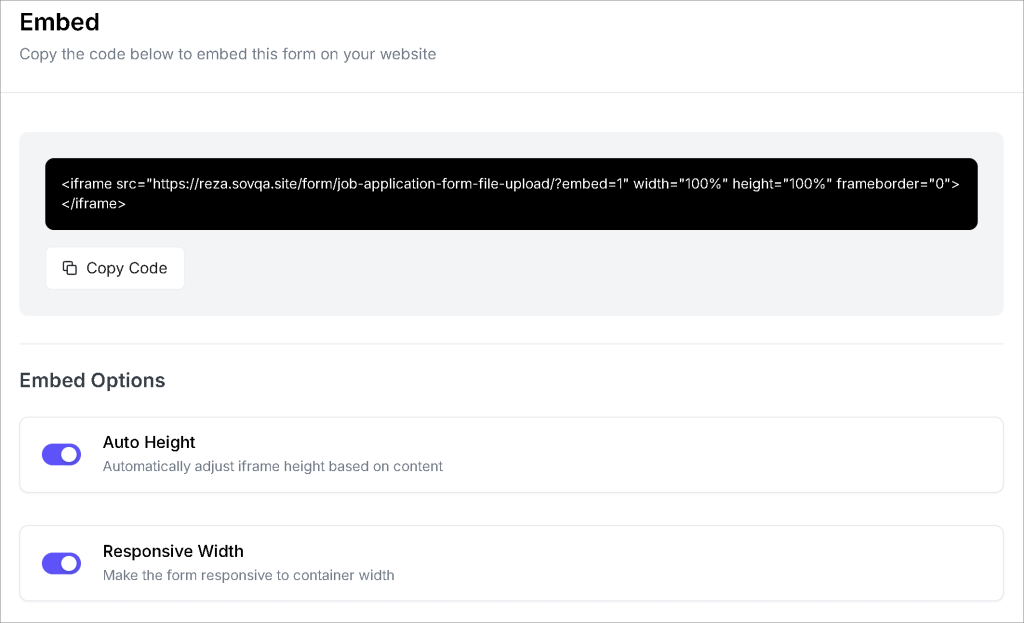
8. Embed
9. Google Sheet Integration
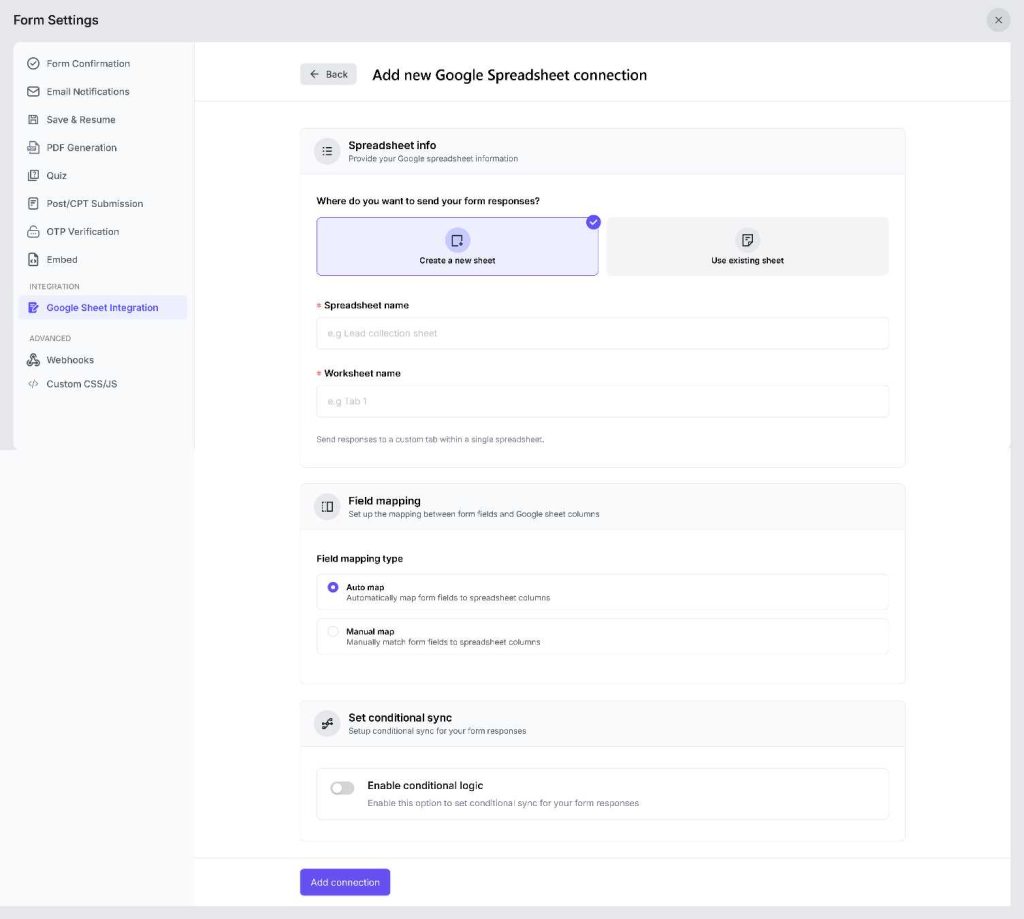
If you want your form entries to flow directly into a spreadsheet without any manual exporting, Google Sheet Integration is what you need. Every time someone submits your WordPress form, their responses get sent to a Google Sheet automatically — keeping your data organized and accessible in one place.
With FormGent, you can enjoy google integration feature for FREE. Also, It doesn’t require any complex API setup or 3rd party tools like Zapier. We have explain the full process step-by-step in here: How to Connect WordPress Forms to Google Sheets Without Zapier or API Setup
10. Webhooks (Pro Feature)
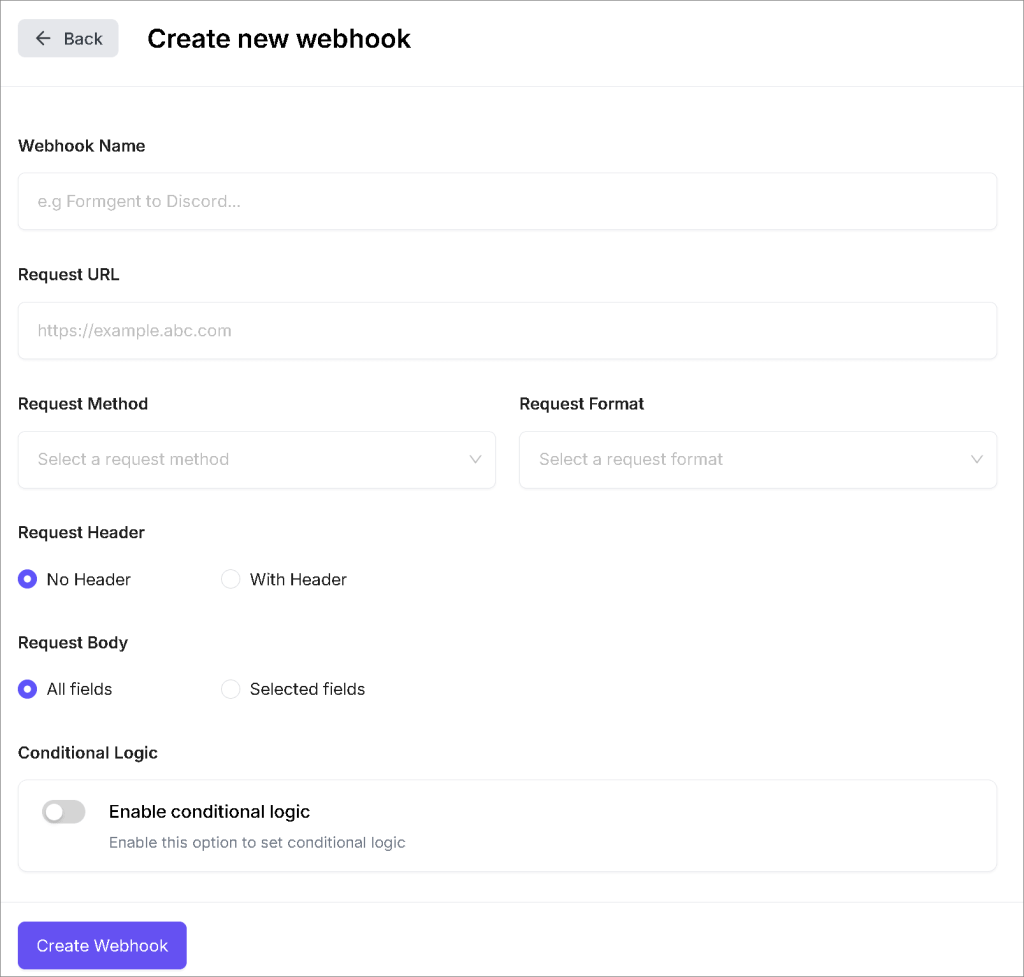
If you’re on the Pro plan, webhooks let you connect your form to third-party tools automatically — things like Google Sheets, Mailchimp, or CRM integration platforms. Every time someone submits the form, their data gets pushed to the connected tool and saved in database storage without any manual work on your end. This is an advanced feature. If you’re just starting out, you can skip it for now and come back to it later.
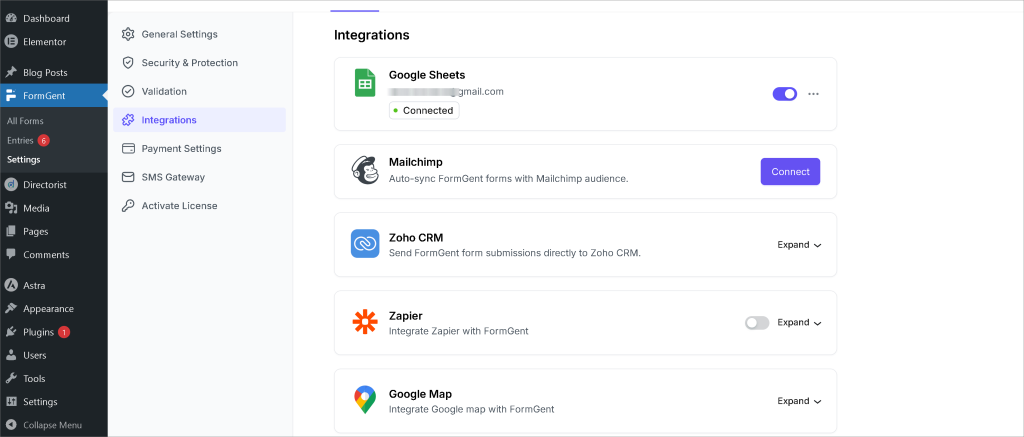
However, FormGent by default offer integrations with all your popular workspace tools and platforms to automate your form submission tasks. So that you can enjoy the integration more easily. You’ll get the option FormGent > Setting > Integrations.
11. Custom CSS/JS
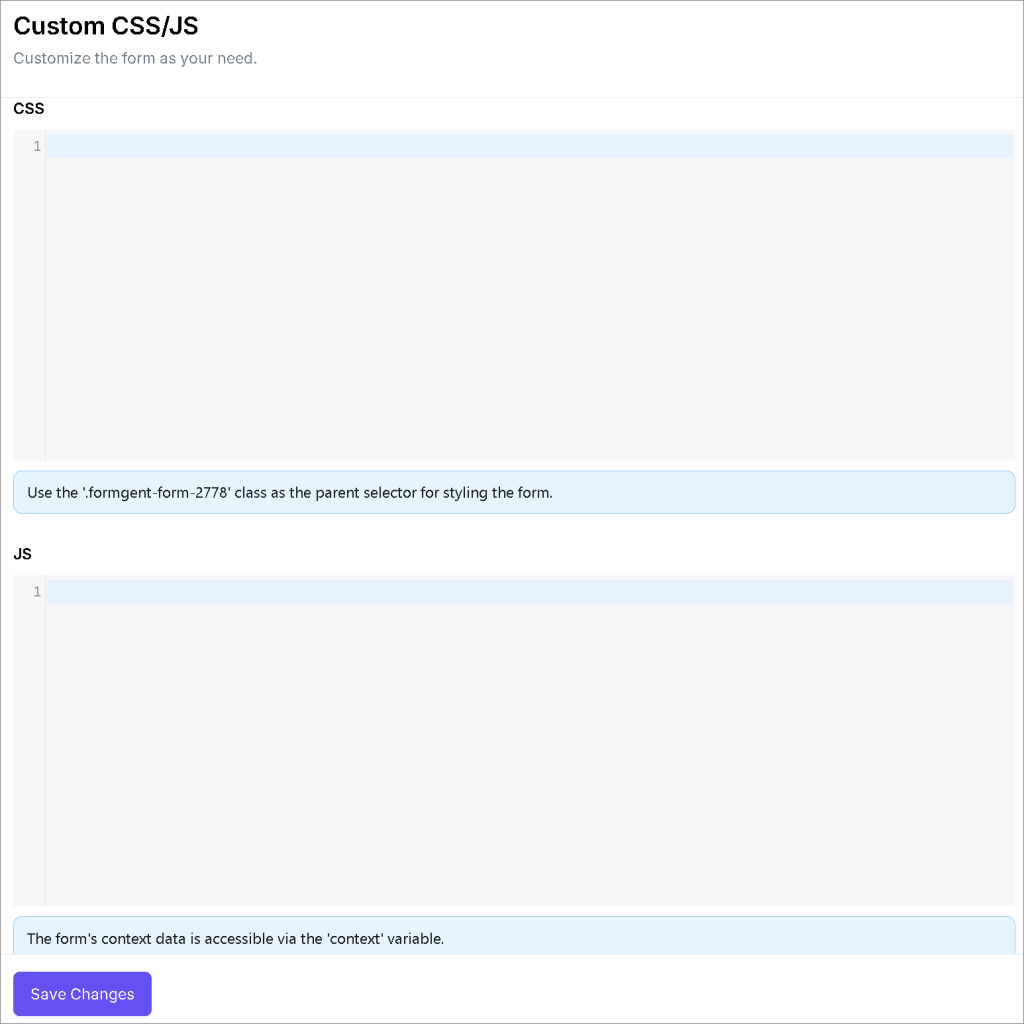
FormGent’s built-in design settings cover most styling needs. But if you want to go beyond the defaults and fine-tune exactly how your custom form in WordPress looks and behaves, the Custom CSS/JS panel gives you direct access to do just that.
This feature is aimed at developers or technically comfortable users who need that extra level of control. If you’re happy with FormGent’s default styling options, you’ll likely never need to touch this panel. But it’s good to know it’s there — especially when a client asks for something specific that the standard settings can’t quite deliver.
✅ Step 6: Design Your Form
Your form works — now let’s make it look good. Click on the Share Form tab in the editor.

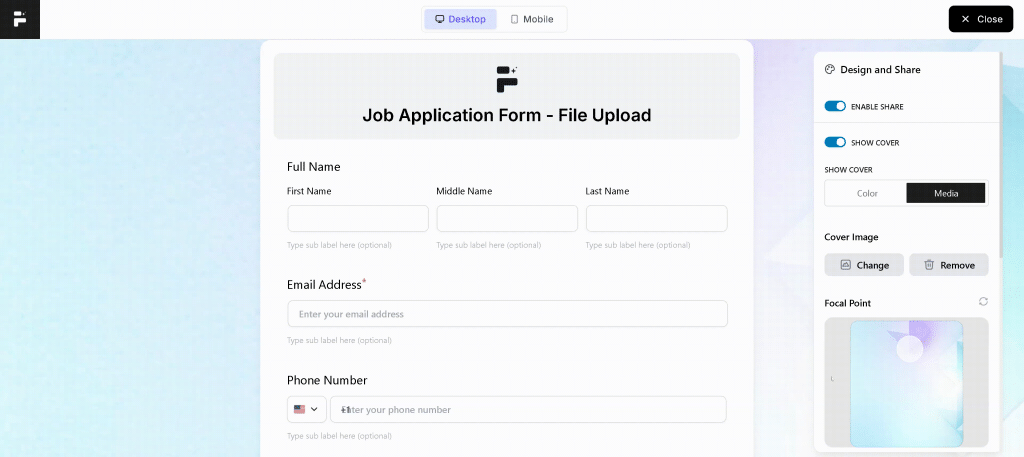
Here’s what you can control:
- Enable Share — Toggle this on to generate a unique, shareable link for your form. You can send this link directly to people without embedding the form on a WordPress page.
- Show Cover — Add a visual header to your form. Choose a solid color, a gradient, or upload a custom image.
- Show Logo — Display your brand logo at the top of the form.
- Show Title — Choose whether the form title appears at the top or stays hidden.
- Form Width — Drag the slider or type in a specific value (e.g., 1000px) to control how wide your form appears on screen.
After making your changes, use the preview option to check how the form looks on both desktop and mobile. Don’t skip this step. A form that looks great on a laptop but breaks on a phone will frustrate a good chunk of your visitors.
✅ Step 7: Publish Your Form
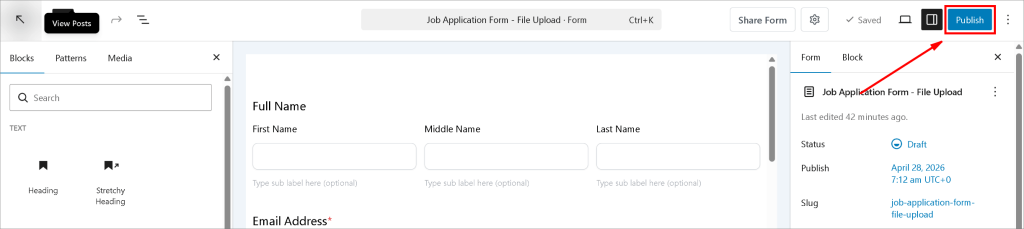
You’ve built it, customized it, and designed it. Now it’s time to put it in front of people.
Click the Publish button in the top-right corner of the editor. Your form is now live.
To display the form on your website, you have two options:
Shortcode
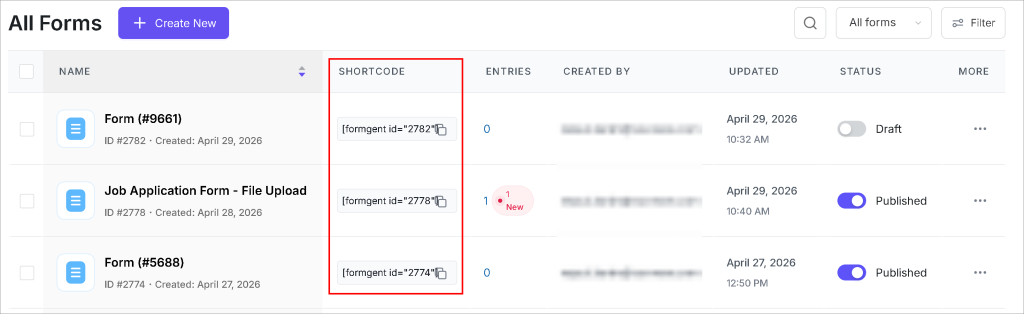
FormGent gives you a shortcode that looks something like this:
Live Link
If you enabled the share option back in Step 8, you already have a direct URL for your form. You can share it via email, social media, or on a landing page — no page embedding required.
And that’s it. Your form is live, collecting form entries, and sending you notifications. You did the hard part. Now time to test the forms how it works!
✅ Step 8: Make a Test Submission & Check Reports
Your form is live. But before you start sharing it with real users, take five minutes to test it yourself. This one step can save you from a lot of embarrassment later.
Make a Test Submission
Open your published form — either through the live link or on the WordPress page where you embedded it — and fill it out exactly like a real user would. Enter a name, a valid email address, test text in each text field, select options from any dropdown menu or radio button, and hit the submit button.
If everything works as expected, you’re good to go. If something feels off — fix it now, not after real submissions start coming in.
Check Your Reports
Once a test submission goes through, head to FormGent → All Forms, click on your form, and open the Entries section. You’ll see two reporting tabs: Summary and Analytics.
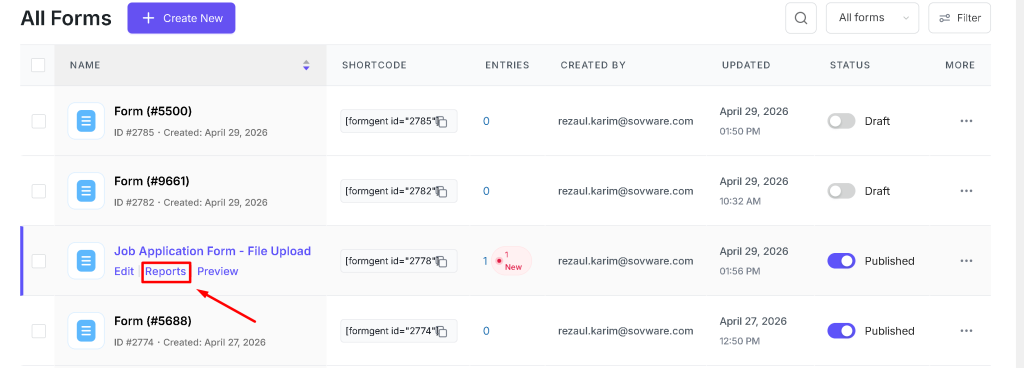
Summary (Free)
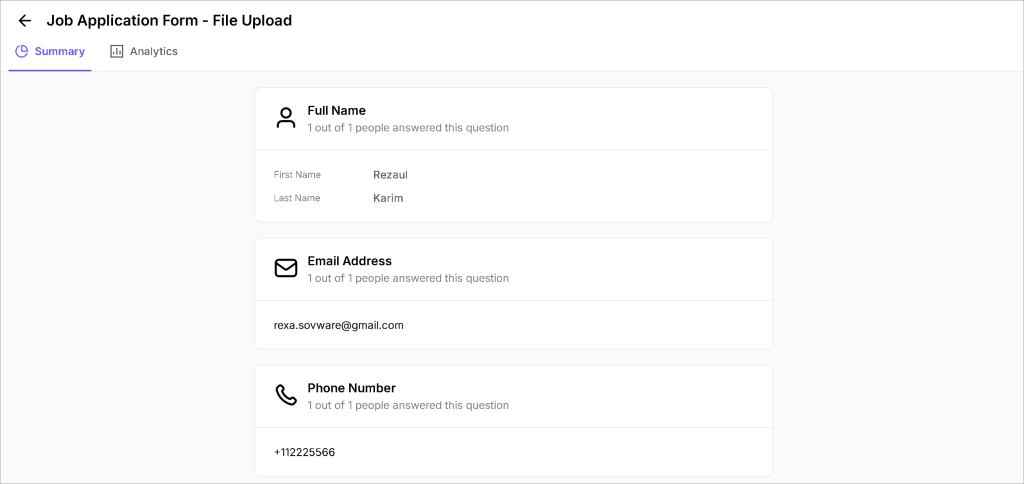
The Summary tab gives you a clean, question-by-question breakdown of all responses. Each field shows how many people answered it, along with the actual responses submitted. For dropdown menu and radio button fields, responses are grouped and displayed with percentage breakdowns — so you can see at a glance which options people chose most. For file upload fields, you get a direct download link for every uploaded file right inside the dashboard.
Analytics (Pro)
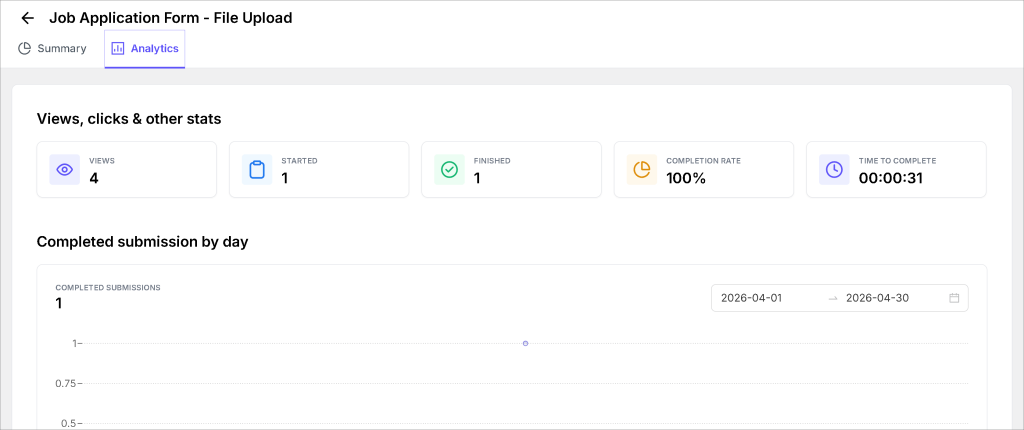
The Analytics tab goes deeper. It tracks the full performance of your form with some key metrics displayed at the top:
- Views — How many times the form was seen
- Started — How many people began filling it out
- Finished — How many actually completed and submitted it
- Completion Rate — The percentage of people who finished after starting
- Time to Complete — The average time it took users to submit the form
Along those metrics, you get chart, Question Drop-Off table that shows views, submissions, and drop-off rate for every individual field.
Together, Summary and Analytics give you a complete picture of how your WordPress form is performing — and what you can do to improve it.
Pro Tips for Better Forms
Building a form is one thing. Building a form that people actually complete is another. Most visitors won’t bite the bullet and push through a form that feels long, confusing, or poorly designed. These tips will help you avoid the most common mistakes and get better results from every form you publish.
1. Keep It Short — Ask Only What You Need
Every extra field you add is another reason for someone to abandon your form. Before publishing, go through each field and ask yourself: “Do I actually need this information right now?” If the answer is no, cut it.
A contact form doesn’t need a phone number, a mailing address, and a company name. It needs a name, an email field, and a message. That’s it. You can always follow up and collect more details later.
2. Write Clear, Human Labels
Avoid stiff, corporate-sounding labels. Instead of “Please input your electronic mail address,” just write “Email.” Instead of “Provide a detailed description of your inquiry,” write “What’s on your mind?”
People respond better to forms that sound like a real person wrote them. Short, plain labels reduce hesitation and make the experience feel approachable.
3. Use Conversational Forms for Longer Surveys
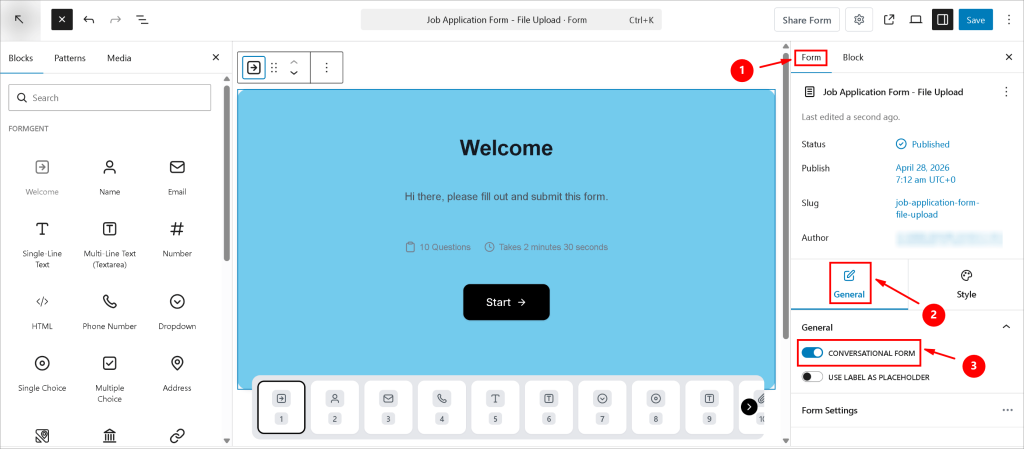
If your form has more than five or six fields, consider switching to the conversational format. Showing one question at a time makes a long form feel much less intimidating. Users focus on a single answer instead of staring at a wall of input fields. Completion rates go up noticeably with this approach.
With FormGent, You can turn your long form into a conversational form in just one click. See the image to turn on the feature.
4. Always Test Before You Go Live
This one sounds obvious, but a surprising number of people skip it. Before sharing your form with anyone, submit a test entry yourself. Check that:
- All fields work correctly
- Required field validation triggers properly
- Form submission fires the confirmation message or redirect
- You receive the email notification
Catching a broken form after it’s been live for three days — with zero submissions to show for it — is a painful lesson. Test first, publish second.
5. Set Up Email Notifications From Day One
Don’t wait until you “get around to it.” Set up your admin email notification the moment you configure your form. Response time matters, especially for contact forms and quote requests. If a potential customer fills out your form and hears nothing back for two days, they’ve already moved on to someone else.
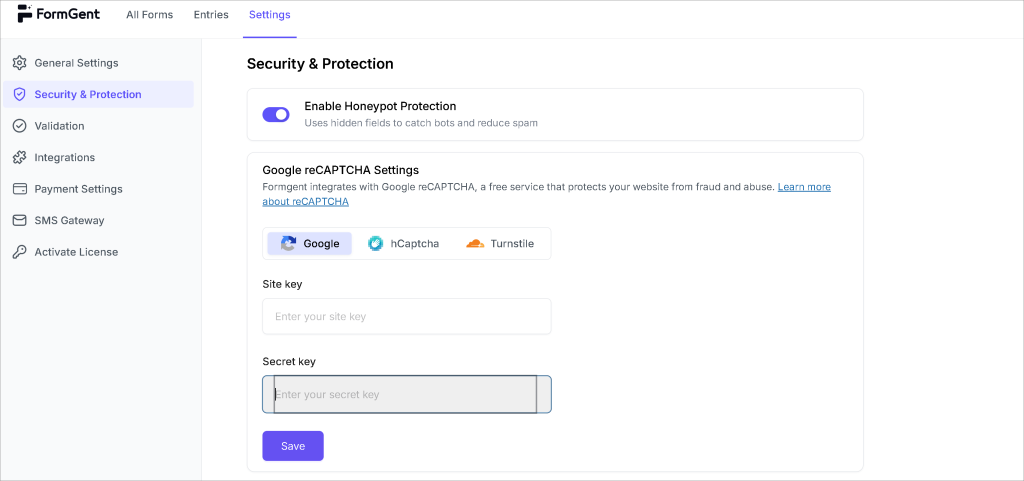
6. Consider Adding Spam Protection
If your form is publicly accessible, you’ll want to protect it from bots. Adding spam protection like CAPTCHA or reCAPTCHA keeps fake submissions out of your form entries. Most quality form plugins offer built-in anti-spam options. With FormGent, you can use multiple security options like Honeypot Protection, Google reCAPTCHA, hCaptcha and Cloudflare Turnstile.
7. Match the Form Design to Your Website
A form that looks completely different from the rest of your site creates a jarring experience. Use FormGent’s design settings to match your brand colors, adjust the form width, and add your logo if needed. Small visual details build trust, and trust is what gets people to hit that submit button.
8. Review Your Submissions Regularly
FormGent stores every submission in your dashboard under the form entries section. Make it a habit to check it regularly — not just when you get an email notification. Sometimes notifications end up in spam, and you don’t want to miss a lead because of a misfiring email filter.
These tips won’t just improve your forms — they’ll improve your results. A cleaner form, a faster response, and a better user experience all add up over time.
Common Use Cases You Can Build with FormGent
FormGent isn’t a one-trick pony. Once you get comfortable with the basics, you’ll start seeing opportunities to add a form all over your website. Here are the most common — and most useful — form types you can build with it.
1. Contact Form
This is the most straightforward use case. Every website needs one. A basic contact form — name, email field, and message — gives visitors a direct line to reach you without exposing your email address publicly. It’s clean, professional, and keeps communication organized in one place. You can insert a form like this on your contact page in just a few minutes.
2. Customer Feedback Form
Want to know what your customers actually think? Ask them. A feedback form lets you collect honest opinions about your product, service, or overall experience. Keep it short — three to five questions at most. People are more likely to respond when it doesn’t feel like homework.
Use the conversational form style here. It feels less like filling out a report and more like answering a few quick questions from a friend.
3. Job Application Form
Hiring doesn’t have to mean managing a flood of emails with attached resumes scattered across your inbox. A job application form brings everything into one place. You can collect the applicant’s name, contact details, work experience, and even use the file upload field to accept resumes — all through a single, structured form.
This keeps your hiring process organized and makes it much easier to compare candidates side by side.
4. Event Registration Form
Running a webinar, workshop, or in-person event? A registration form handles sign-ups without the back-and-forth. Collect attendee names, email addresses, and any other details you need — like meal preferences for an in-person event or time zone for a virtual one.
Pair it with an email notification so you get an alert every time someone registers. That way, you always know exactly how many people are coming.
5. Newsletter Sign-Up Form
Growing an email list is one of the smartest things you can do for your website. A simple sign-up form — just a name and email field — is all you need to get started. Place it on your homepage, at the bottom of blog posts, or on a dedicated landing page.
FormGent’s webhook feature (Pro) lets you connect the form directly to Mailchimp or your preferred email marketing tool, so new subscribers land in your list automatically via CRM integration. No manual exporting, no copying and pasting.
6. Quote Request Form
If you run a service-based business, a quote request form does a lot of the early work for you. Instead of going back and forth over email trying to understand what a potential client needs, the form collects all the key details upfront — project type, budget range, timeline, and specific requirements.
You walk into every conversation already knowing what the client wants. That saves time on both sides and makes you look sharp and prepared.
7. Survey Form
Whether you’re researching your audience, testing a new product idea, or gathering data for a report — a survey form gets the job done. Use radio buttons, dropdown menus, and checkboxes to make it easy for respondents to answer quickly.
Keep the survey focused on one topic. A scattered survey with questions jumping all over the place loses people halfway through.
These are just the starting points. Once you understand how FormGent works, you can mix and match field types, form styles, and settings to build practically any WordPress form your website needs.
You can learn more different types of forms from our guide – Types of Forms: The Only Guide You Need to Pick & Build the Right One
To Wrap Things Up
Creating a form in WordPress doesn’t have to be a complicated process. As you’ve seen throughout this guide, FormGent makes it straightforward — from picking a build method to customizing fields, configuring settings, and publishing your form in just a few clicks.
Let’s do a quick recap of what you covered:
- Why WordPress needs a form plugin and what FormGent brings to the table
- How to install and set up this free WordPress form builder on your site
- How to create a form in WordPress from scratch or let AI generate one for you
- How to customize fields, rename your form, and configure form submission settings
- How to design your form to match your brand and publish it on your site
- Pro tips — including spam protection with CAPTCHA and reCAPTCHA — to improve completion rates and get better results
- The most common form types you can build and when to use each one
The hardest part is usually getting started. Once you break the ice and build your first form, the second and third ones come much faster. You’ll get familiar with the editor quickly, and before long, setting up a new WordPress form will take you less than ten minutes.
FormGent’s free version gives you everything you need to get off the ground. If you grow into needing advanced features — like webhooks, OTP verification, or payment integrations — the Pro plan is worth for your every penny.
So don’t sit on it. Head to your WordPress dashboard, install FormGent, and create a form in WordPress today. Your visitors have questions, feedback, and requests waiting to be heard. A good form is how you make sure none of that slips through the cracks.
Frequently Asked Questions (FAQs)
Q1. Do I need coding skills to create a form in WordPress?
No. You don’t need to write a single line of code to create a form in WordPress. A form plugin like FormGent gives you a visual drag-and-drop editor where you simply add fields, configure settings, and publish. The AI form builder takes it even further — just describe what you need in plain English and it builds the form for you automatically.
Q2. What is the best WordPress form plugin for beginners?
FormGent is one of the best WordPress form plugins for beginners because it combines a clean, easy-to-use interface with powerful features like AI form generation, conversational forms, and a free plan that covers all the essentials. Other popular options include WPForms, Gravity Forms, and Contact Form 7 — but most beginners find FormGent’s setup process the most straightforward.
Q3. Is FormGent free to use?
Yes. FormGent has a free version available directly in the WordPress plugin directory. The free plan includes the core form builder, classic and conversational form types, basic form settings, email notifications, and the Summary report. Advanced features like Analytics, PDF Generation, OTP Verification, webhooks, and Google Sheet Integration are available on the Pro plan.
Q4. How do I embed a form on a WordPress page or post?
Once you publish your form in FormGent, you get a shortcode that looks like
. Copy it and paste it into any WordPress page or post using the block editor. The form appears exactly where you place the shortcode. You can also use the direct live link to share the form without embedding it on a page at all.
Q5. How do I stop spam submissions on my WordPress form?
FormGent’s OTP Verification feature is one of the most effective ways to block spam and fake form submissions. It requires users to verify their email address or phone number with a one-time password before the form goes through. This acts as a strong anti-spam measure without the friction of traditional CAPTCHA or reCAPTCHA puzzles. For lighter protection, enabling required fields and email field validation also helps filter out low-quality submissions.
Q6. Can I use a WordPress form to create or update posts automatically?
Yes. FormGent’s Post/CPT Submission feature lets you create or update a WordPress post — or any custom post type — directly from a form submission. You map your form fields to the corresponding post fields, set the post status and author, and every time someone submits the form, the content gets published automatically. This is particularly useful for job boards, directory listings, and community-driven websites.
Q7. What happens to my form data after someone submits it?
Every form submission is stored as an entry in your FormGent dashboard under the Entries section. You can review all responses there at any time. Depending on your settings, submissions can also trigger an email notification, get sent to a Google Sheet, generate a PDF, push data to a third-party tool via webhook, or automatically create a WordPress post. Your data stays in your WordPress database — FormGent doesn’t send it anywhere without your configuration.
Q8. Can users save a partially filled form and come back to it later?
Yes. FormGent’s Save & Resume feature lets users save their progress mid-way through a form and return to finish it later using a personal resume link. You can set the link expiry window, customize the confirmation message, and even send the resume link to the user’s email. This is especially useful for longer forms like job applications or detailed surveys where users might need extra time to gather information.
Q9. What is the difference between a Classic Form and a Conversational Form?
A Classic Form displays all fields on a single page — users fill everything out at once and hit submit. A Conversational Form shows one question at a time, creating a more personal, chat-like experience. Classic forms work best for short, simple forms like contact forms and sign-ups. Conversational forms tend to perform better for longer forms — like surveys, quizzes, and applications — because they feel less overwhelming and typically result in higher completion rates.
Q10. Can I turn my WordPress form into a quiz with scoring?
Yes. FormGent has a built-in Quiz feature that lets you turn any form into an interactive quiz. You can enable scoring, show results immediately after submission, and set up a grading system with custom grade labels and score ranges — like A for 80–100, B for 60–79, and so on. FormGent automatically evaluates each response and assigns the right grade the moment the user hits the submit button. It’s a great fit for educators, trainers, and anyone running online courses or assessments on their WordPress site.
Read More:
10 Pro Tips To Optimize Your Online Feedback Form For Better Responses
10 Reasons To Choose FormGent Over Google Forms (And Never Look Back)
How To Create Conversational Forms On Your WordPress Website
How to Create a Multi Step Form in WordPress (No Code)
How to Create Application Forms in WordPress Using FormGent
How to Create an RSVP Form in WordPress (Step by Step)
How to Create a T-shirt Order Form in Minutes Using AI-Form Builder

Rezaul Karim
Rezaul Karim is a passionate Digital Marketer driven by curiosity and creativity in the ever-evolving world of online marketing. With over 6 years of hands-on experience in Content Writing, Copywriting, SEO, and Social Media Marketing, he brings a strategic edge to crafting content that engages and converts. Always eager to explore new trends and tools, Rezaul thrives on finding smarter ways to connect brands with their audiences. Outside of work, he enjoys diving into books or recharging in nature.


WordPress Form Security: The Complete Guide (2026)
September 13, 2026[…] your site safe. Run your own forms through the questions above. Then, when you’re ready, create your next form in FormGent. You’ll get server-verified token protection and real CAPTCHA validation from the start. Not […]