
How to Create an Event Registration Form in WordPress
-
- Form Builder AI-Form Builder
- 11 mins read

Say you’re putting together a workshop next month. You need a way for people to tell you they’re coming, maybe pay for a seat, and get confirmation back. You could hand that job to a third-party ticketing service. Or you could build the form yourself, on your own site, and keep the whole process, and the data, under your control.
The second option costs less over time (no per-ticket fee eating into your revenue), looks like your brand instead of someone else’s, and puts every registrant’s details in a place you actually own.
Here’s how to build that form in WordPress using FormGent, covering both free RSVPs and paid tickets, since the two need different pieces. Along the way, this guide also answers the questions most tutorials skip: how to register a whole group in one go, what to do when your event fills up, and what actually happens to a registrant’s information once they hit submit.
Two Different Forms Hiding Under One Name
“Event registration form” can mean two fairly different things, and mixing them up leads to a form with the wrong fields.
| Category | Free RSVP | Paid ticket |
| What you’re really asking | Are you coming? | Are you coming, and how many tickets? |
| Fields that matter | Name, email, and whatever helps you plan (allergies, session pick) | Same, plus ticket type or quantity, plus payment |
| Extra setup | None beyond notifications | A connected payment gateway, and a running total so people see the price before they pay |
Figure out which one you’re actually building first. It decides which of the steps below you need and which you can skip. If you’re building the free RSVP side specifically, FormGent’s dedicated RSVP form guide walks through that narrower case field by field.
Sort Out the Event Itself Before You Touch the Builder
Three things are easier to decide now than mid-build:
- What are you actually asking people to show up for? The date, the time, and whether it’s in person, online, or both, all shape your field list.
- Is there a real ceiling on attendance? A 40-person workshop and an open-ended webinar are not the same problem. If you’re capping attendance, plan how you’ll manage that ceiling now (covered in detail further down), rather than discovering the gap the week before the event.
- Who needs to know the moment someone registers, and what should that alert actually say? Decide this before writing the notification, not while writing it.
Building the Form, Piece by Piece
1. Get FormGent Running
From your WordPress dashboard, open Plugins → Add New Plugin, search “FormGent,” then Install Now and Activate.
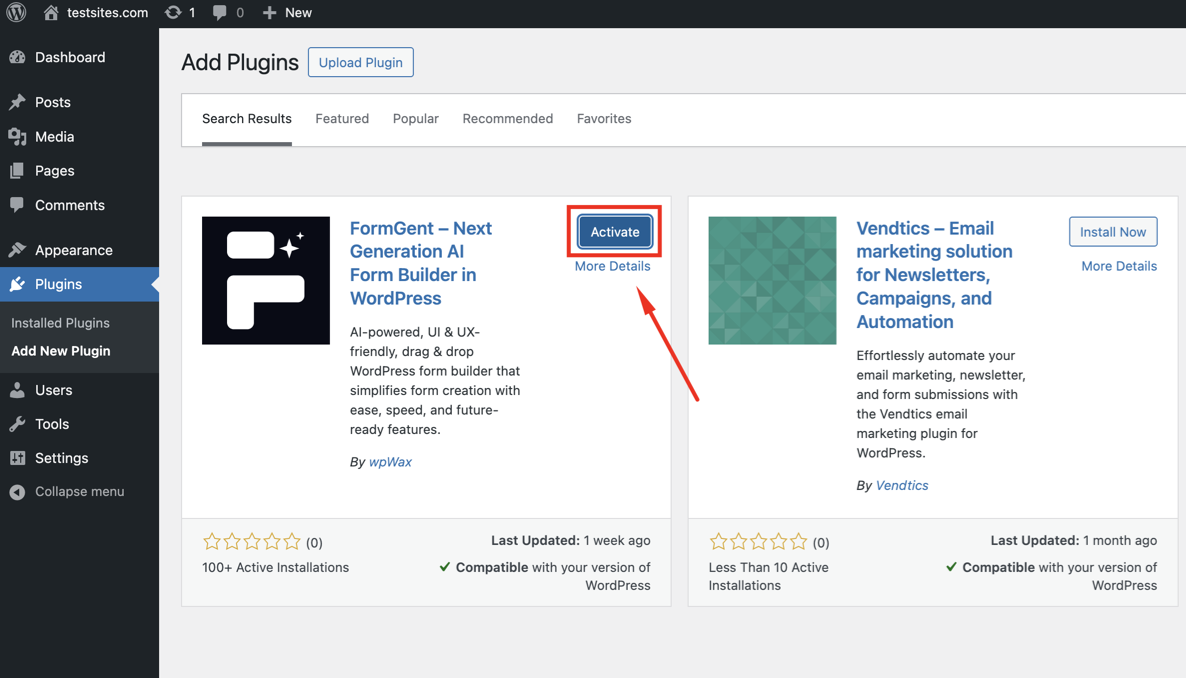
A new FormGent entry appears in your sidebar once it’s active, with All Forms, Entries, and Settings underneath it (plus a Go Pro link, if you ever want it).
2. Open a New Form
Head to FormGent → All Forms and click Add New Form.
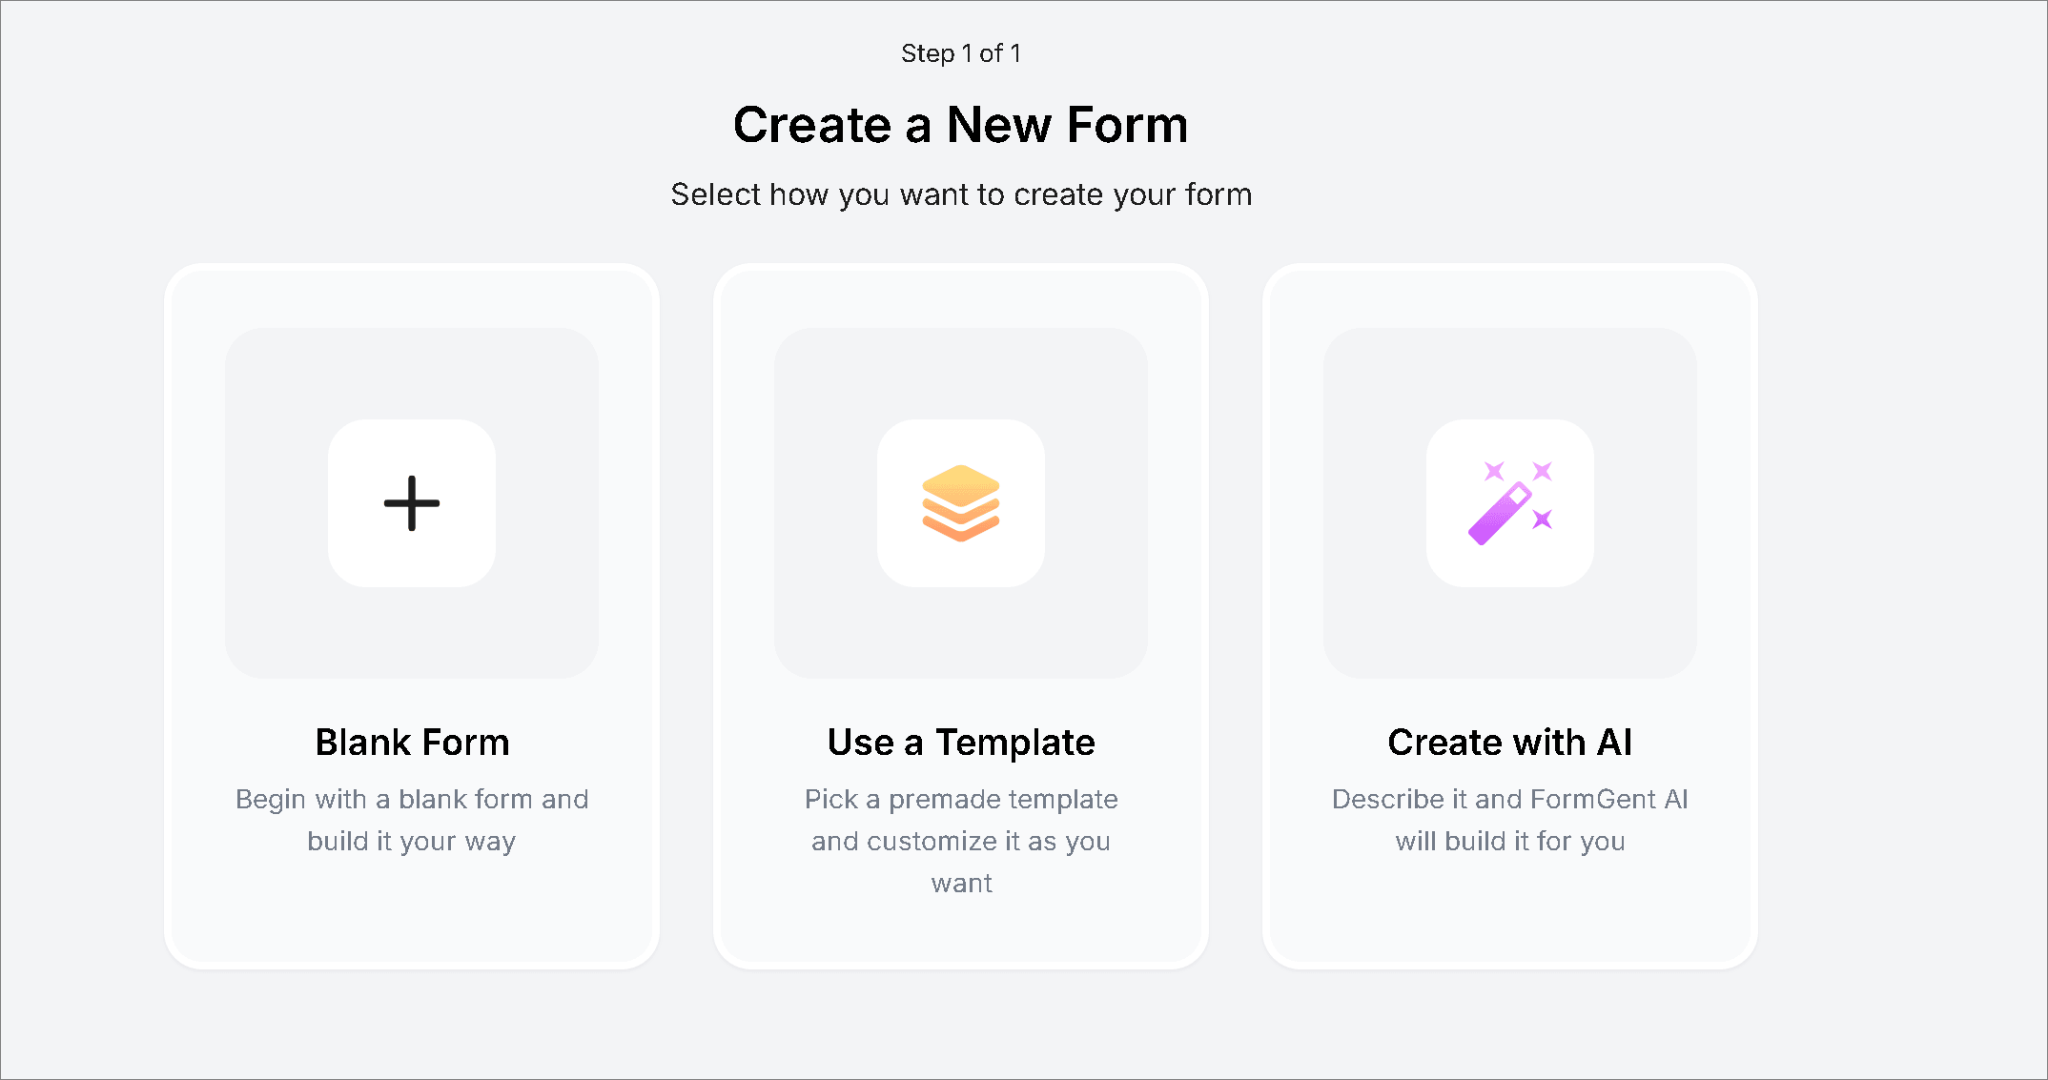
From here you can start with nothing and build field by field, or lean on FormGent’s AI builder. It already has a suggestion sitting there for exactly this situation, worded as “Generate an event registration form.” Click it and FormGent drafts a starting point for you. You can also skip that suggestion and type your own description of the event instead.
Whichever route you take, give the result a quick look before you publish it. Treat it as a first draft built specifically for your event, and trim anything that doesn’t match what you’re actually planning.
3. Choose Fields That Earn Their Place
A quick reference for what goes where:
| Field | What it’s for |
| Name | Identifying the attendee |
| Sending the confirmation and any tickets or follow-up | |
| Phone Number | Only add this if you’ll genuinely call or text people |
| Date & Time Picker | Letting someone pick a session or slot, if your event has more than one |
| Dropdown or Quantity | Ticket type, or how many tickets someone wants |
| Single Choice / Multiple Choice | Single Choice for a pick-one question (yes/no, or which session they’re attending); Multiple Choice for a pick-several question (for example, meal preferences, if you’re offering more than one option) |
| Repeater | Signing up more than one person in a single pass |
A field that doesn’t change what happens next is a field someone will abandon your form over. Keep the list short.
4. Let One Submission Cover a Whole Group
Families, coworkers, whole teams, sometimes one person is registering for several people at once, not just themselves. That’s what the Repeater block is for.
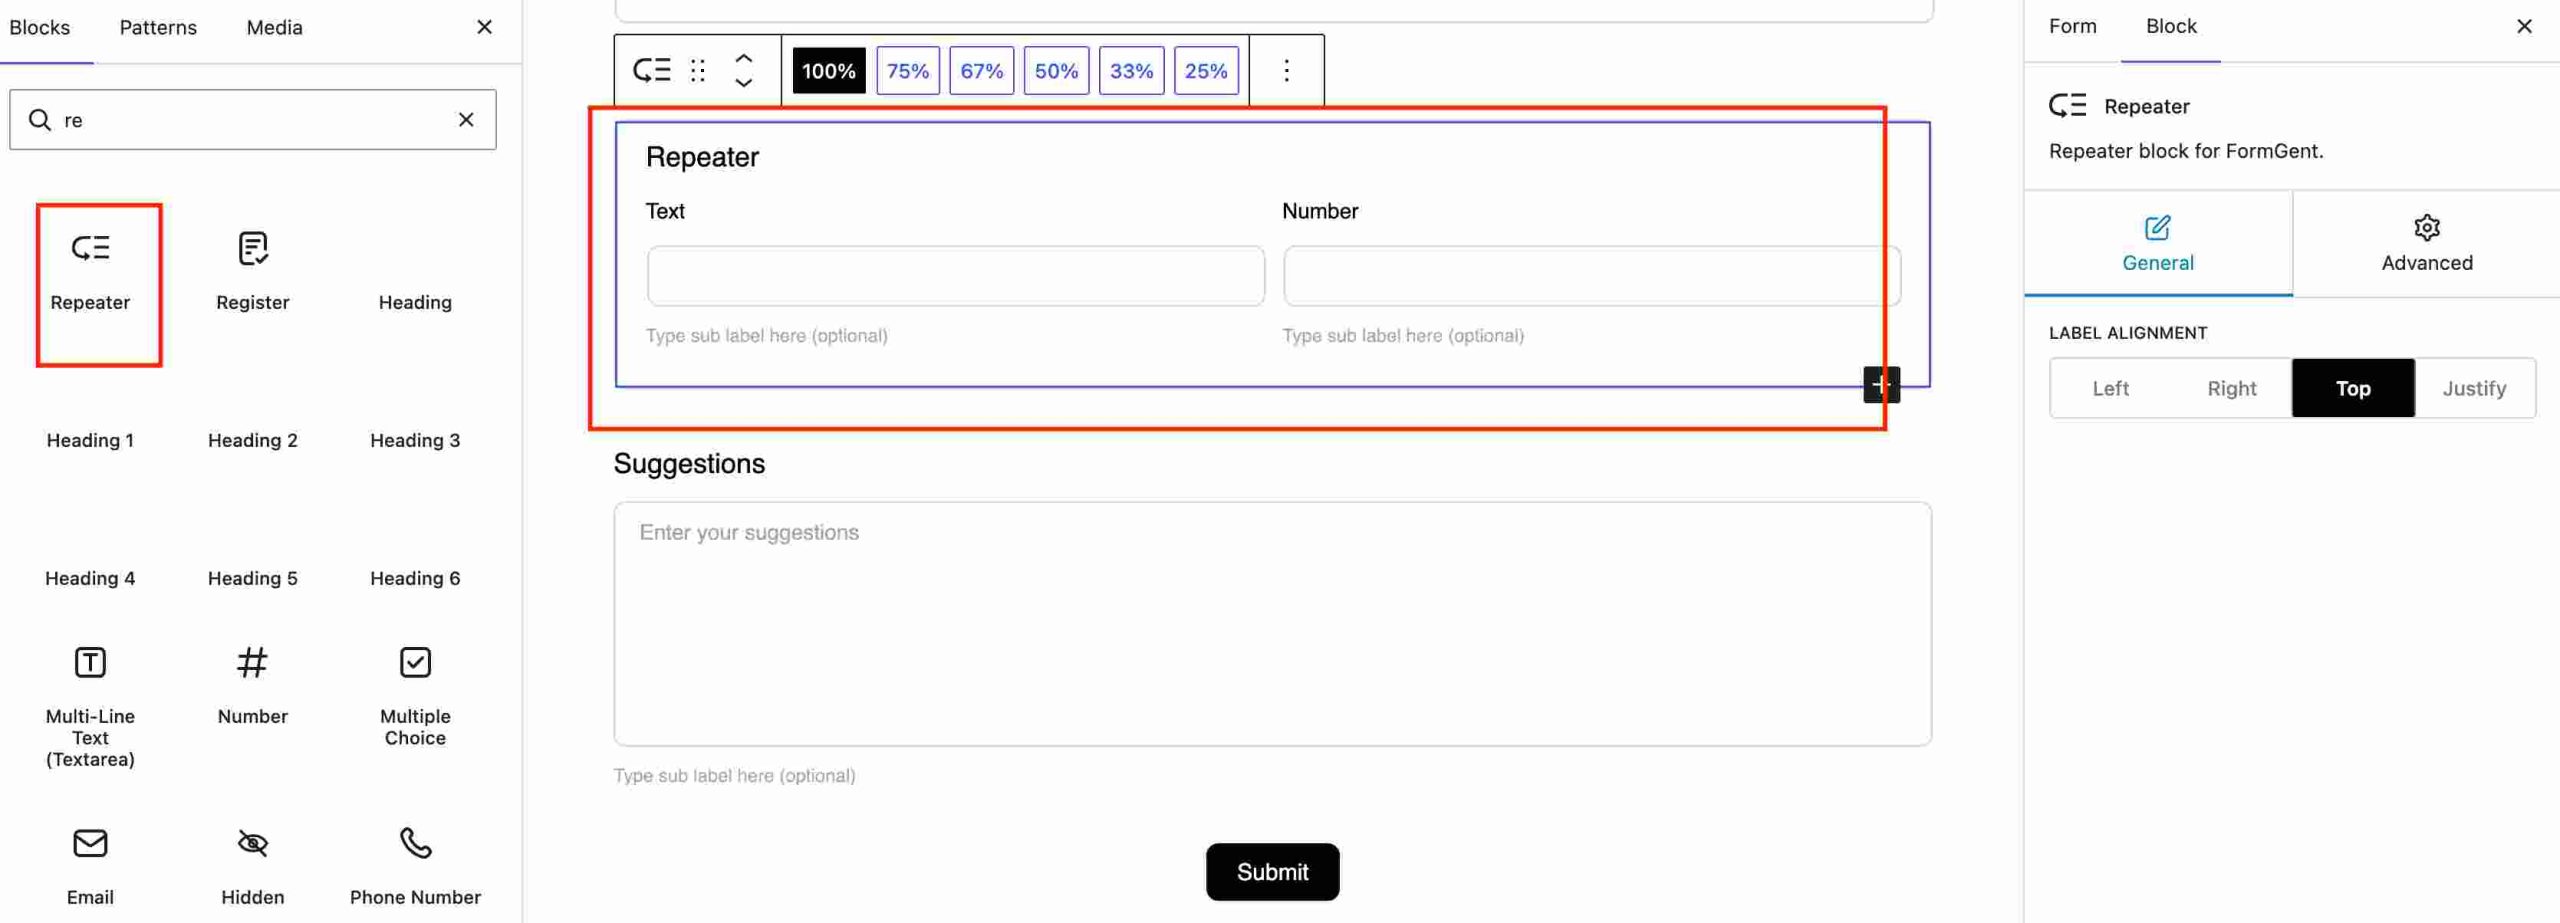
Drop a Repeater block into the form, then put the fields you want repeated (name, email, whatever else applies) inside it. Whoever’s filling out the form gets an “add another” option, so they can list every attendee in one pass instead of submitting the form five separate times.
Worth planning for: your submission count tracks entries, not attendees, so one Repeater entry with five people still counts as one submission. If you’re watching your numbers against a hard attendance limit, add up the people inside each Repeater entry yourself to get your real headcount.
5. Set Up Payment, If There’s a Price Tag
Free event? Skip straight to the next step.
Selling tickets means three blocks, minimum:
- Payment Item, one per ticket type, each with its own price
- Payment Summary, so whoever’s buying sees the total update as they pick quantities, before they’re asked to pay
- Payment, with your gateway of choice selected in its settings, Stripe, PayPal, and Mollie are all included free for one-time payments
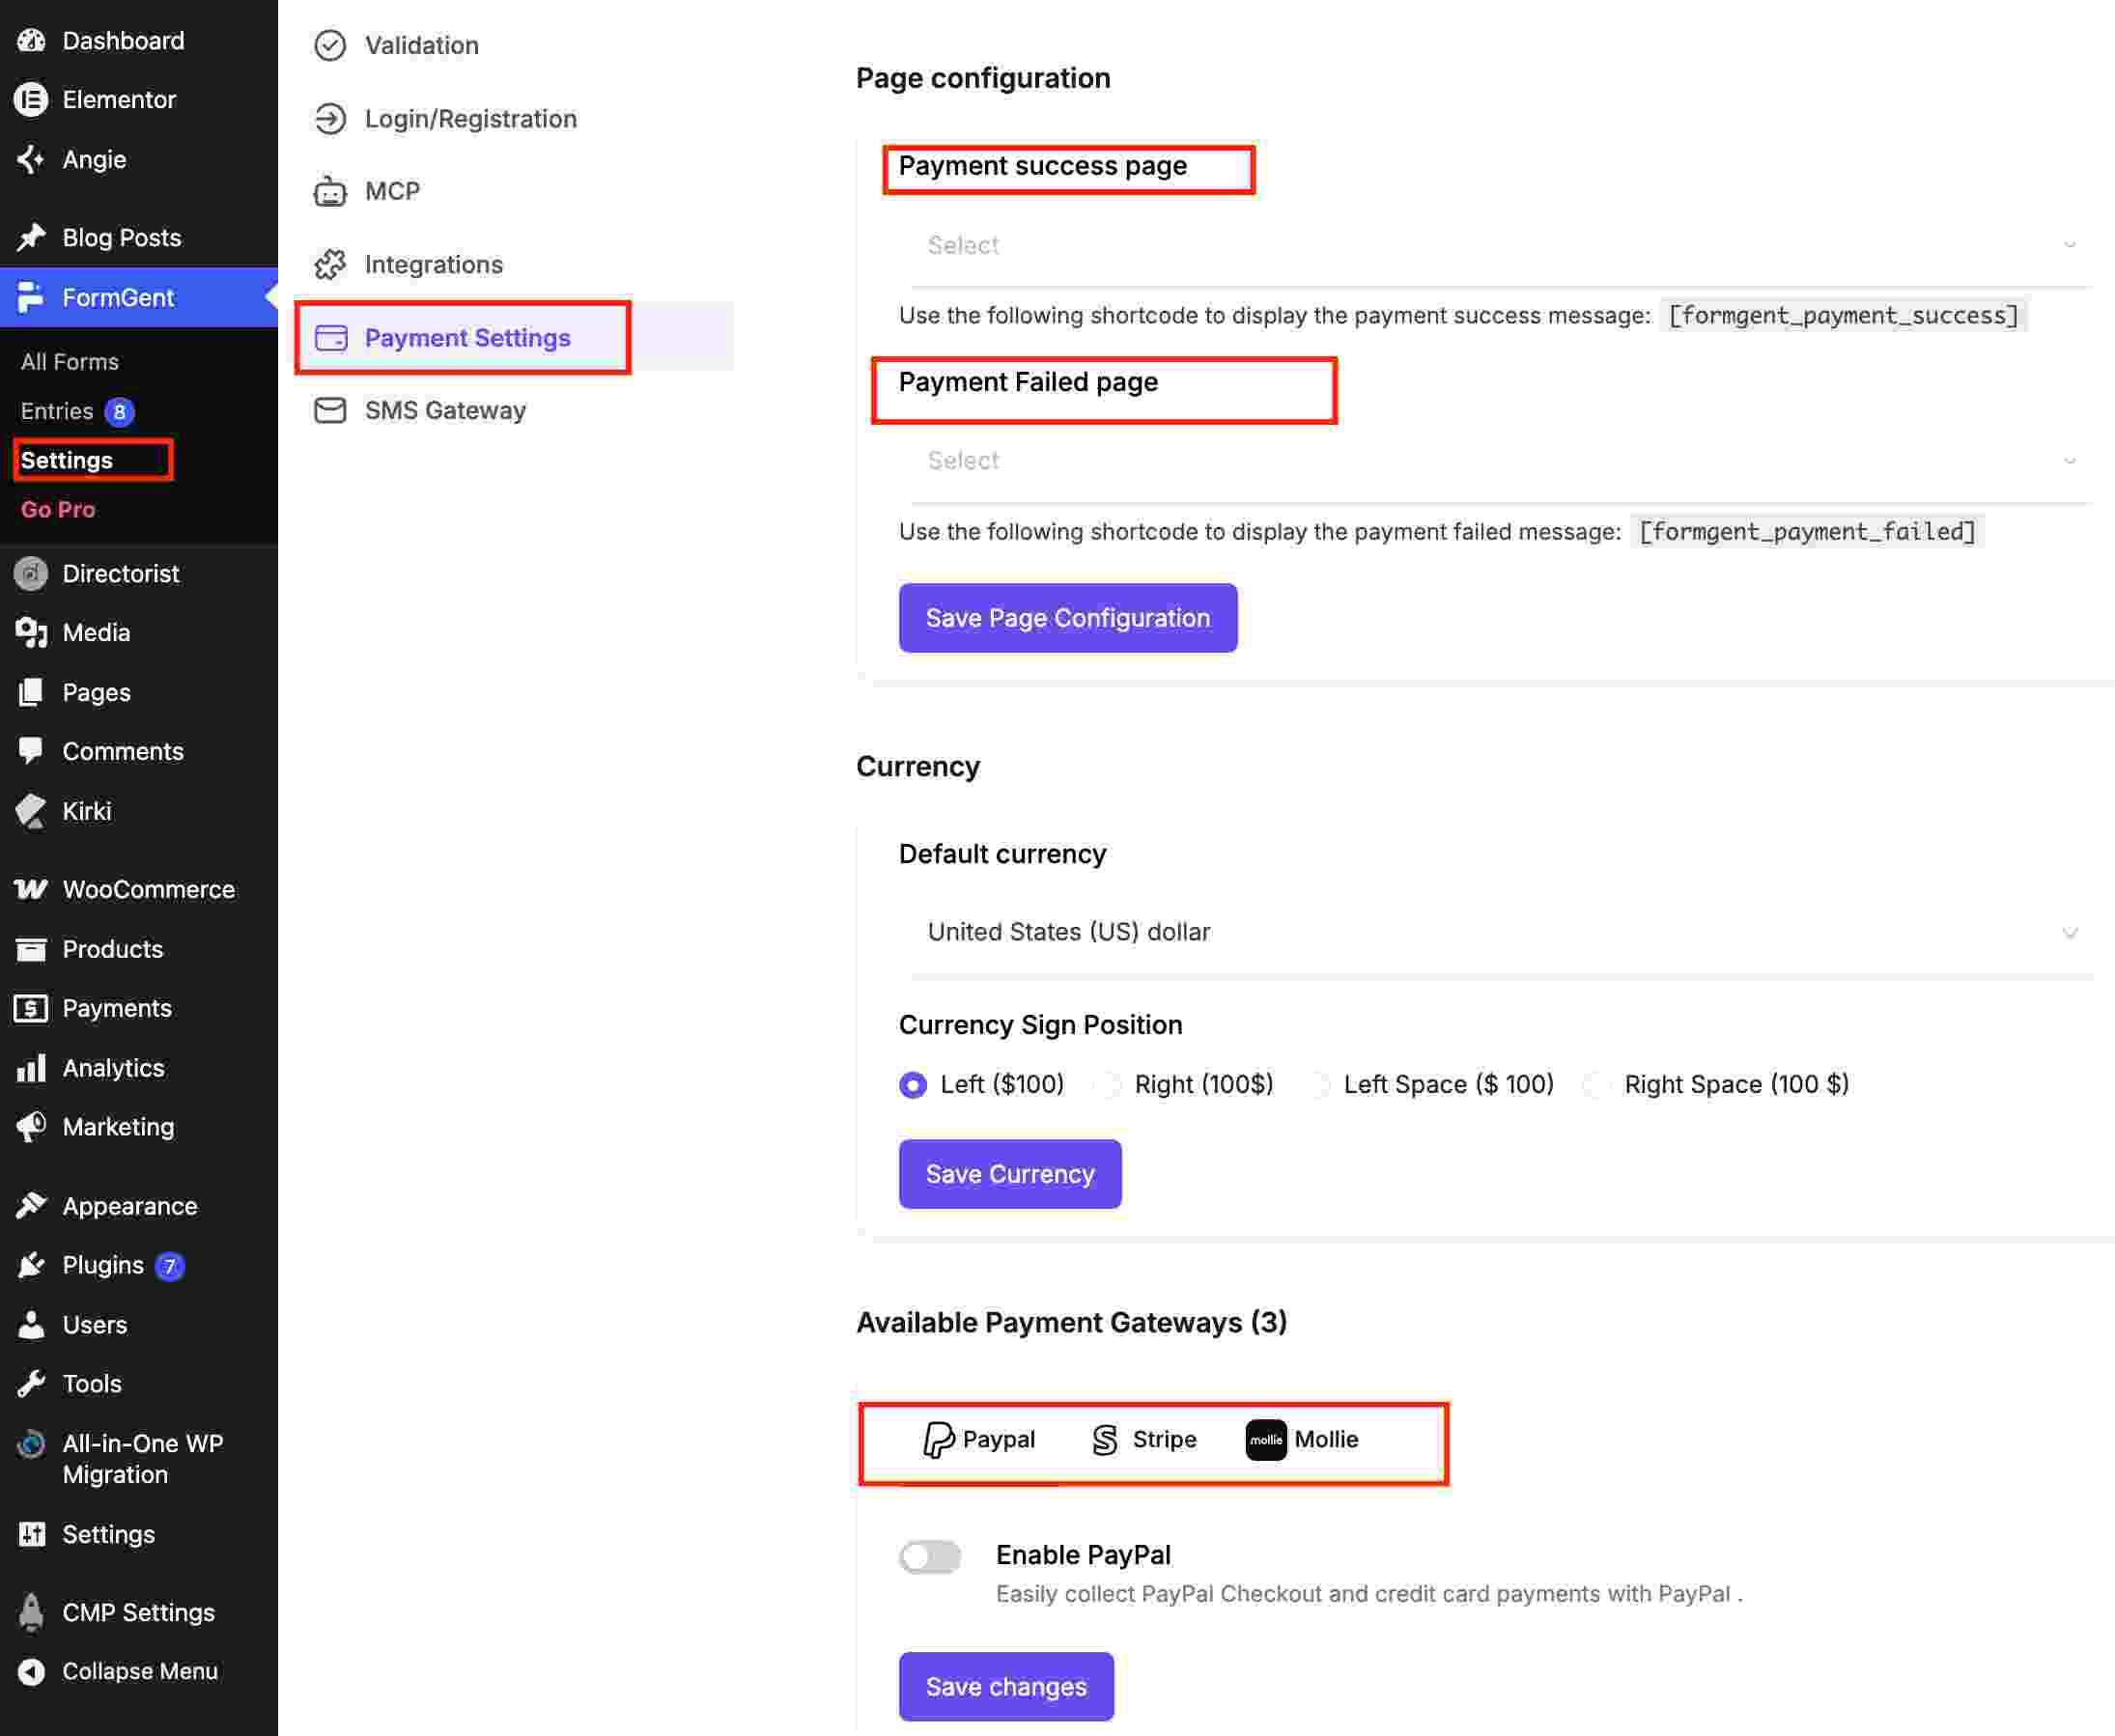
Once the price is set on each item and the gateway is connected, the running total takes care of itself as people make their selections.
6. Write a Confirmation People Actually Trust
Two things need to happen the instant someone submits: they need proof it worked, and someone on your end needs to know it happened.
Skip the generic “Thanks for registering!” The confirmation should actually tell them something:
- When and where the event is (or the link, if it’s virtual)
- What exactly they signed up for
- What, if anything, happens next
On your side, set the notification’s recipient and subject line so it’s obvious at a glance which event just got a new registrant, especially if you’re running more than one form at a time.
Want to hand someone a printable ticket instead of just an email? FormGent’s free PDF Generator does exactly that, turning a submission straight into a printable ticket.
7. Keep Bots Out of a Free Form
A free ticket is exactly the kind of thing a bot will try to grab in bulk. Before you publish, especially for a free event, add some friction for automated traffic.
FormGent ships with a Honeypot field (invisible to a real visitor, but bots fill it in anyway, which gives them away) and three CAPTCHA options: Google reCAPTCHA, hCaptcha, and Cloudflare Turnstile. All of it’s free. Pick a CAPTCHA if you want something visible, or rely on the honeypot alone if you’d rather nobody notice any protection is there at all. Whichever CAPTCHA you pick, you’ll need a site key and secret key from that provider, for reCAPTCHA, that means registering your site in Google’s admin console before you can paste the keys into FormGent’s settings. For help picking the right combination, especially for a paid-ticket form, see FormGent’s full comparison.
For more on this topic specifically, FormGent’s own guide, How to Avoid Spam Submissions with an Online Form Builder, goes deeper.
8. Put the Form Somewhere People Can Find It
You’ve got two real choices here: drop the form into an existing page using its shortcode or block, or give it a page of its own with nothing else competing for attention.
Go with the standalone page if you’re sending traffic in from an ad or an email and want nothing else on the screen. Embed it in an existing page if the form is just one part of a bigger event page that already explains what the event is about.
9. Submit One Yourself Before Anyone Else Does
Run through the whole thing as if you were a stranger seeing it for the first time. Fill in every field. If there’s a payment step, most gateways give you a test card number specifically so you can do this without spending real money, Stripe publishes its own list of test card numbers, and PayPal has a matching set for sandbox testing if that’s the gateway you connected instead.
Confirm that:
- The thank-you message reads correctly
- The notification landed in the right inbox
- The entry shows up under FormGent → Entries
- Anything connected downstream (a spreadsheet, a payment log) actually received the data
Then repeat the whole test on your phone. So much of this traffic arrives through a link tapped from a social feed or an email, and a form that’s awkward on a small screen loses you registrations you’ll never even know you missed.
What Happens When the Event Is Full
Straight answer first: capping registrations at an exact number isn’t a built-in dashboard setting today, so a hard ceiling takes a bit of planning on your side rather than a single toggle. It’s better to know that now than to assume a number will enforce itself.
So if your event genuinely has a ceiling, here’s what actually works:
- Close the form yourself once you’re full. Unpublish it, or swap the field list for a plain “Registration is now closed” message. It’s manual, but it works every time.
- Stand up a second, shorter form as a waitlist once the main one closes, so people who show up late have somewhere to go instead of a dead end.
For any of that to work, you need to actually see the number climbing, and you have two ways to do that. The first is opening FormGent → Entries in your dashboard whenever you want a headcount. The second skips the dashboard entirely: if you’ve connected FormGent’s MCP integration to Claude or ChatGPT, you can just ask your AI assistant something like “how many entries has the event registration form gotten this month?” and get a live number back in the conversation. Check manually when you remember to, or ask your assistant whenever it crosses your mind, either way, you’re watching the same count.
If you want more than watching, a true automatic cutoff is possible too, it just means custom development. That path involves hooking into FormGent’s submission-handling actions to reject entries past whatever number you set. It’s real, and it’s worth it if you’ve got a developer on hand, but you won’t find it as a toggle anywhere in the dashboard. FormGent’s own guide on limiting form submissions and blocking abusive users covers this same territory in more depth, including the duplicate-entry and logged-in-only questions that tend to come up alongside it.
Stopping People From Giving Up Halfway Through
Once a form grows past a handful of fields, especially with payment added on top, break it into steps rather than one long scroll.
A Page Break block marks where each new step begins. Whatever comes before the first one is step one, whatever comes after is step two, and so on down the form.
Conditional logic can work on a whole section, too, not just single fields. Someone marks themselves as attending online, and you can skip an entire block of questions about parking or meals in one move, instead of hiding each of those fields separately. It’s a cleaner way to handle a form where whole chunks simply don’t apply to some people.
If the form is genuinely long, think a multi-day conference with several sessions to pick between, FormGent Pro’s Save & Resume feature lets someone stop partway and pick up later from a personal link. That matters because a long form someone tries to finish in one sitting is precisely the kind of form that gets abandoned. A way back in can rescue a registration that would otherwise never happen.
Where Registrant Data Actually Goes
By default, every entry sits in FormGent → Entries. From there, a couple of free options put that data to work elsewhere:
- Google Sheets. FormGent’s Sheets integration is free, and it skips Zapier or any manual API setup entirely. New entries can flow straight into a spreadsheet, handy for handing a list to someone who doesn’t need dashboard access at all. FormGent’s own guide to connecting WordPress forms to Google Sheets walks through the one-click setup if you want the full picture.
- Email notifications, already covered above, for a live heads-up on every new registrant.
Two things worth stating plainly, so you’re not hunting for a setting that doesn’t exist:
- Turning a registration into a WordPress post or custom post type automatically is a Pro feature. The free version doesn’t do this.
- There’s no live attendee directory or calendar view built from your form data, free or Pro. If you pictured attendees browsing a public list of who else signed up, that’s not something FormGent currently builds for you.
For anything reaching further, a CRM or an email platform, FormGent Pro’s Webhooks feature can push submission data out to something like Zapier or Make, which then hands it off from there.
Checking Whether the Form Is Actually Working
A published form isn’t the same as a working one. FormGent’s Analytics, free, tracks Views, Started, Finished, Completion Rate, and Time to Complete for the form itself, which tells you whether people are opening it and then quietly leaving, particularly worth watching if you added a payment step and want to know exactly where people are dropping off.
The full breakdown of what those numbers mean and how to act on a weak one lives in How to Track Form Conversions in WordPress.
Don’t Forget the Phone in Someone’s Hand
A huge share of event traffic arrives through a phone, tapped from an ad, a text, or an email. Preview the form on a phone screen, not only on your laptop. Fields should be easy to tap, text should be readable without pinching to zoom, and the whole thing should work for someone using a touchscreen or a keyboard alone, with no mouse in sight.
Frequently Asked Questions
Do I need a dedicated events plugin, or is a form enough?
A form on its own handles the registration, the payment, and the notifications. Reach for a dedicated events plugin only if you specifically want a public events calendar or a browsable directory of upcoming events, since a form builder by itself doesn’t give you either of those.
Can I cap the number of people who register?
There’s no dashboard setting for an exact number today, so the practical approach is closing the form yourself once you’re full, or routing latecomers to a separate waitlist form. The “What Happens When the Event Is Full” section above walks through both.
Can someone register a whole group in one submission?
Yes, with the Repeater block. It lets one person add as many attendees as they need inside a single form entry, which suits family or group signups well.
What if I need to cancel or move the event?
There’s no built-in “cancel this event” button. Your registrant list already lives in FormGent → Entries, or in a connected Google Sheet, so pull it and email everyone directly, or push it through an email tool if you’ve got one wired up.
Can I skip payment on the form and invoice people afterward?
Sure. Leave the Payment blocks out entirely, use a Dropdown or Quantity field to record what someone wants, and send the actual invoice later, separately.
Where does the free plan stop and Pro start?
The form itself, payment collection, the Repeater block, PDF generation, and spam protection are all free, along with the Google Sheets sync. You’ll need Pro if you want people to save a longer form and finish it later, verify details with an OTP, send data through Webhooks, or automatically create WordPress posts from entries.


Leave a Reply