
How to Add File Upload to a WordPress Form
-
- Form Builder Tips and Tricks WordPress Plugins
- 16 mins read

Adding file upload to a WordPress form means adding a field that lets visitors attach a document, image, or other file directly to their submission, instead of emailing it to you separately. The fastest way to do it is to drag a File Upload field onto a form in a form builder plugin and set your allowed file types and size limit. In this guide, you’ll build one using FormGent, whose File Upload field ships free in the core plugin, not locked behind a paid tier like several competing tools.
By the end, you’ll have a working file upload field, know exactly how to secure it, and have a checklist to run through before you publish it live.
What does “adding file upload” to a WordPress form actually mean?
A file upload field is a form field that lets a site visitor attach a file, a resume, a photo, a signed contract, whatever the form needs, as part of their submission. Instead of writing “please email your resume to [email protected]” and hoping people remember the attachment, you give them one place to type their answers and attach the file at the same time.
It’s worth being clear about what WordPress does not do here by default. The WordPress Block Editor lets you upload media, but that upload happens in your admin dashboard, when you’re adding an image to a post. It’s not a frontend field a site visitor can use to send you a file. If you want visitors to upload files through a form on your site, you need a form plugin (or a custom-coded solution) that adds a frontend file upload field.
Once that field exists, four things determine how it behaves: which file types it accepts, how large a file it allows, where the uploaded file is stored, and how securely that file is protected once it’s on your server. The rest of this guide walks through all four.
Why file upload fields matter for WordPress forms
Think about what happens today when someone needs to send you a file without one. They fill out your contact form, then separately open their email client, attach the file, and hope the two messages end up in the same place in your inbox. If they forget the attachment (and people do), you’re stuck following up.
A file upload field fixes that by keeping everything in one submission. You get the applicant’s name, the position they’re applying for, and their resume, all landing together as one clean record instead of two disconnected messages you have to match up by hand.
That matters beyond convenience. A structured submission, form fields plus an attached file, is easier to search, filter, and act on than a loose email attachment. If you’re running a support desk, a screenshot attached directly to a ticket submission is far more useful than a screenshot buried three replies deep in an email thread.
It also changes how professional the experience feels. Asking a visitor to attach personal documents (a signed contract, an ID, a medical form) to a plain email feels informal at best and unsafe at worst. A branded, on-site upload field signals that you’ve thought about how that file is handled.
And once a file lands in a submission, it can trigger something automatically. You can get an email notification the moment a file comes in, free in FormGent’s core plugin. You can also send the submission, file included, straight into Zapier to push it into hundreds of other tools, also free in FormGent’s core plugin. If you’d rather send the data directly to your own endpoint, FormGent Pro adds webhooks for that. File upload isn’t just a convenience for the visitor; it’s the first step in an automated workflow for you.
Free vs. paid: where file upload sits in popular WordPress form plugins
Before you pick a tool, it’s worth knowing that “add a file upload field” isn’t free everywhere. Several of the most popular WordPress form plugins put this field behind a paid plan:
| Plugin | File Upload availability |
| FormGent | Free (Core plugin) |
| WPForms | Pro plans only |
| Ninja Forms | Free core plugin, but file uploads require a separate paid add-on |
| Formidable Forms | Listed as a “Premium Feature” in their own documentation |
| Gravity Forms | Included, but the plugin itself has no free tier |
FormGent’s File Upload field is part of the free core plugin. You don’t need a paid upgrade to add it to a form. (Pricing and feature gating change over time across all these tools, so double-check each vendor’s current pricing page if this comparison matters to your decision.)
Add a file upload field to your form free. Try FormGent and build your first file upload form without a paid plan.
Step-by-step: adding a file upload field to a WordPress form (using FormGent)
Here’s the full process, from installing the plugin to viewing the files people send you.
Step 1: Install and activate FormGent
In your WordPress dashboard, go to Plugins → Add New, search for “FormGent,” then click Install Now and Activate. It’s free.
Step 2: Create a new form
Go to FormGent → All Forms in your dashboard menu, then click Create New. You’ll see three starting options: Blank Form (an empty drag-and-drop builder you build from scratch), Use a Template (pick a premade layout from FormGent’s template library and customize it), or Create with AI (describe the form in a sentence and FormGent drafts it for you). Free accounts get 5 AI-generated forms; after that, AI creation requires FormGent Pro. For a file upload form, Blank Form or a close-matching template both work fine, since you’ll add the File Upload field yourself either way.

Step 3: Add the File Upload field
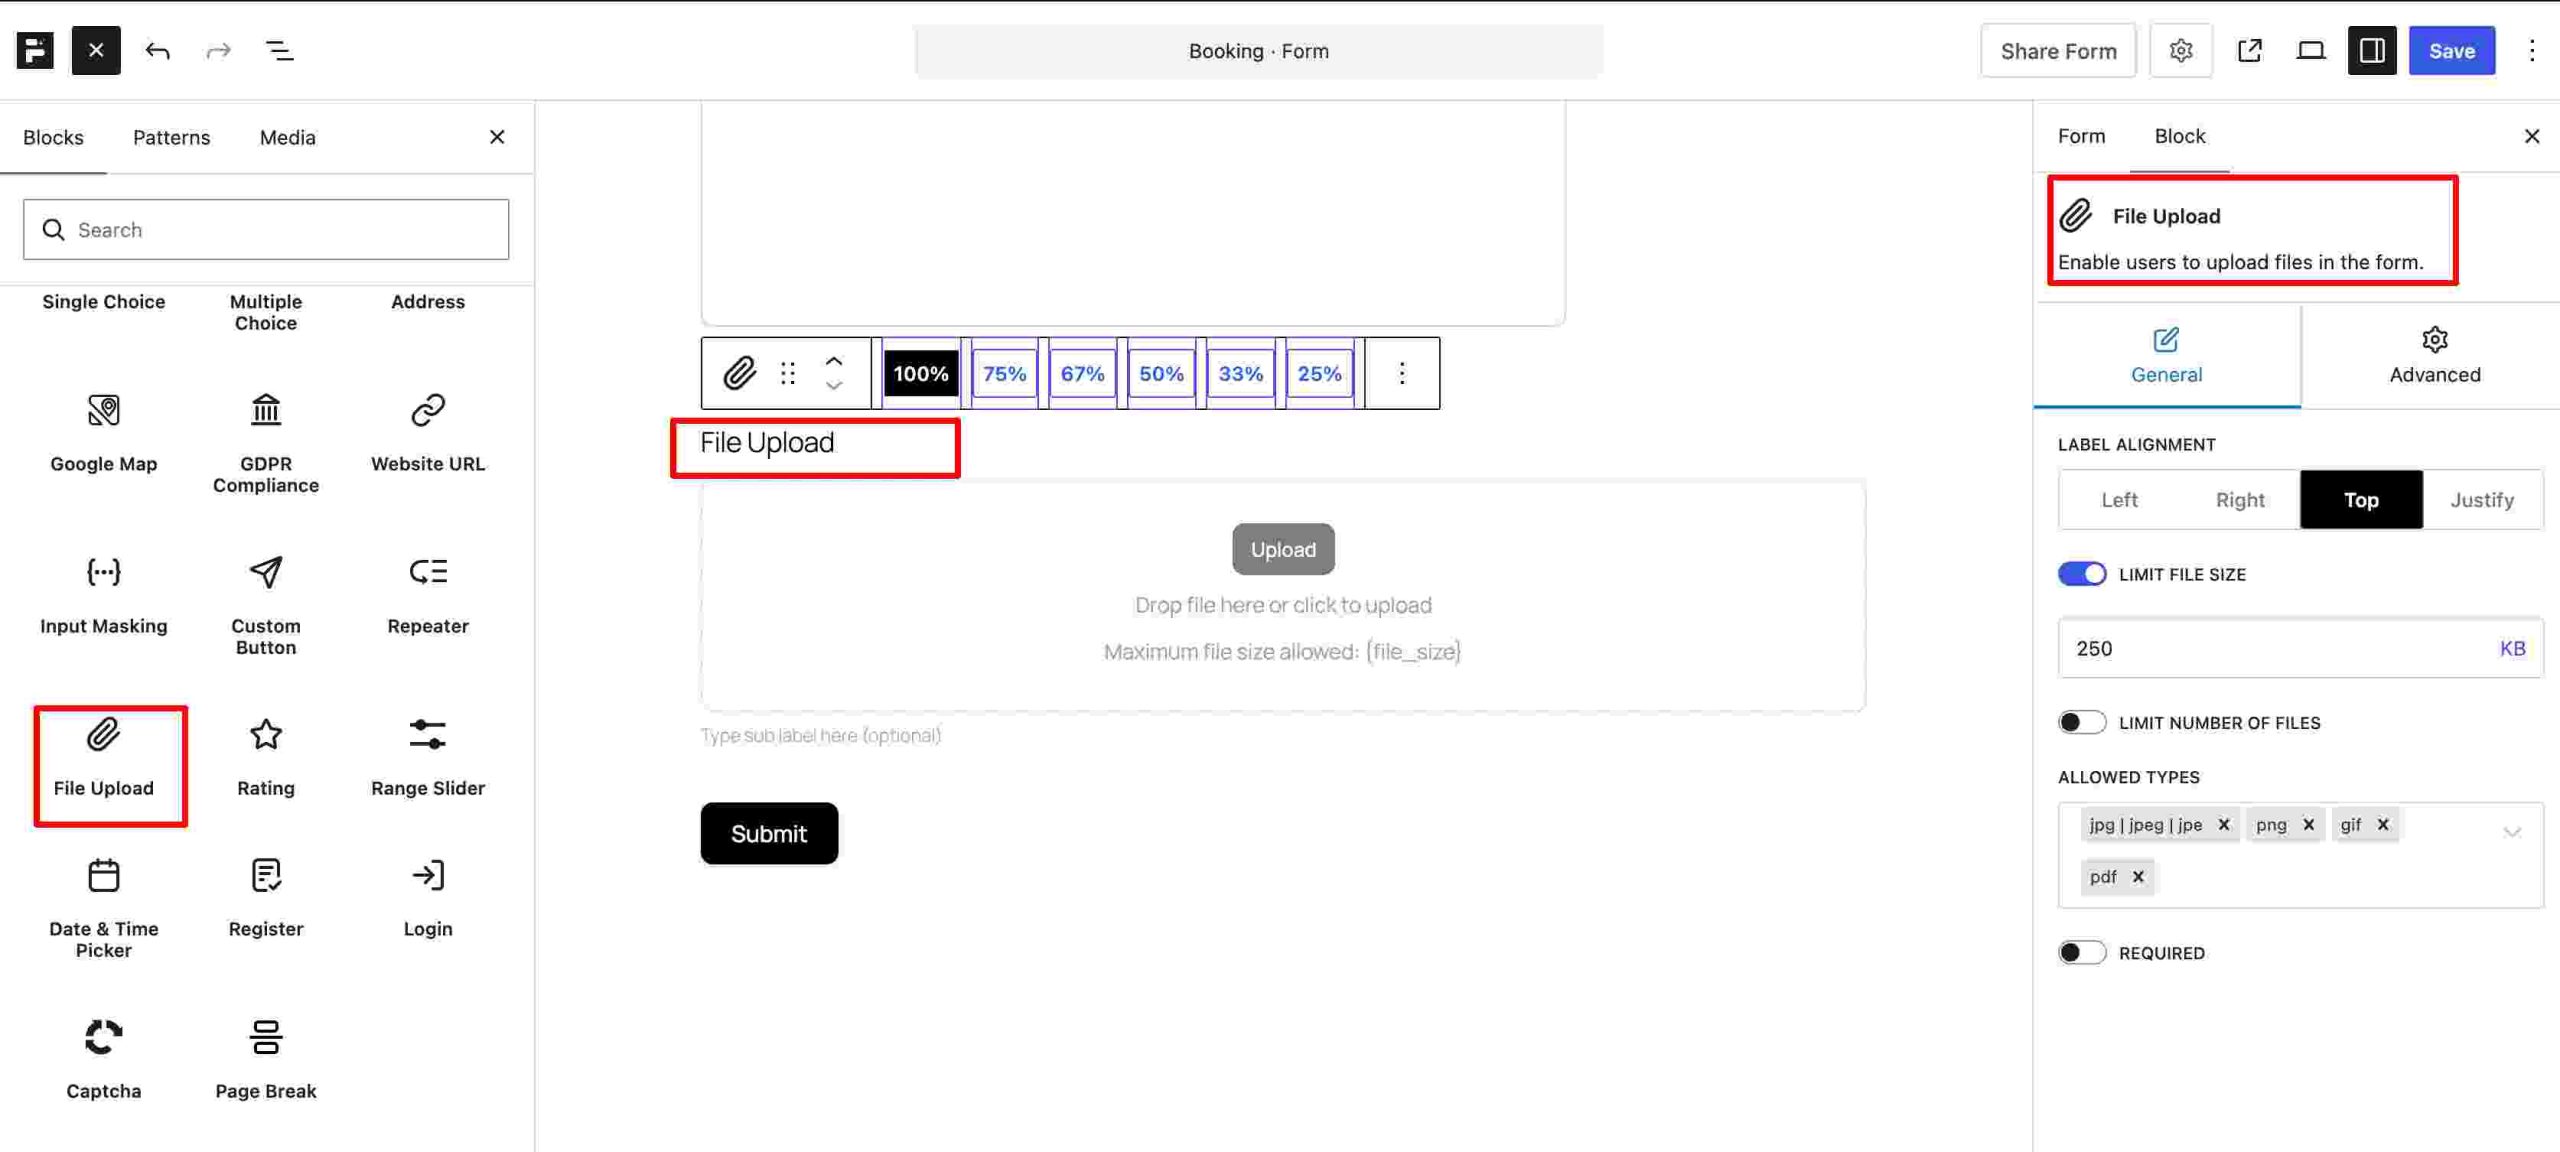
In the form editor, open the block library (usually a “+” or “Add Block” button) and find File Upload in the list of field types. Click it, or drag it, onto your form.
Step 4: Fill in the field’s basic settings
Click the File Upload field to open its settings panel. Set the label (what the visitor sees, like “Upload your resume”), an optional sub-label for extra instruction, the upload button text, and whether the field is required.
Step 5: Raise the file size limit
This is the step most people miss. FormGent’s default size limit is 250KB, too small for most real files (a one-page PDF resume alone is often 300 to 500KB). In the field settings, turn on the size limit toggle, pick KB or MB, and enter a number that fits the files you actually expect.
Step 6: Set which file types are allowed
The default allow-list is JPEG, PNG, GIF, and PDF. Add or remove types to match your use case, for example, add DOC and DOCX if you’re collecting resumes. Keep the list only as wide as you actually need.
Step 7: Turn on a file count limit, if needed
By default, visitors can attach as many files as they want. If you’d rather cap it, turn on the file limit toggle in the field settings and enter a maximum.
Step 8: Add conditional logic, if the field shouldn’t always show
Select the File Upload field, then go to Block → Logic → Set Conditional Logic in the left-hand menu. In the window that opens, set your condition (for example, “only show this if the visitor selected ‘international applicant’ earlier”) and click Apply. Read more on conditional logic if you want to see more use cases.
Step 9: Set up a notification so you know when a file arrives
Open your form, go to Email Notification, and click Add Notification. Fill in a template name, the email subject, who it should send to, and the email content, then click Submit. Include the file’s merge tag in the content so the notification links directly to the uploaded file.
Step 10: Publish the form, then embed it on a page or post
First, set the form’s status to Published inside the FormGent editor. Then open the page or post where you want it to appear and click the block inserter (the “+” icon). Search for “Dynamic Forms,” the exact name FormGent’s embed block is registered under. If search doesn’t surface it right away, browse to the FormGent category in the block list instead, it’s grouped there with the other FormGent blocks. Add the block, then pick your form from its dropdown. Publish or update the page and the form goes live. If you’re using a page builder that doesn’t play well with Gutenberg blocks, FormGent also generates a shortcode for the form that you can paste into any page, post, or widget area instead.
Step 11: View submitted files
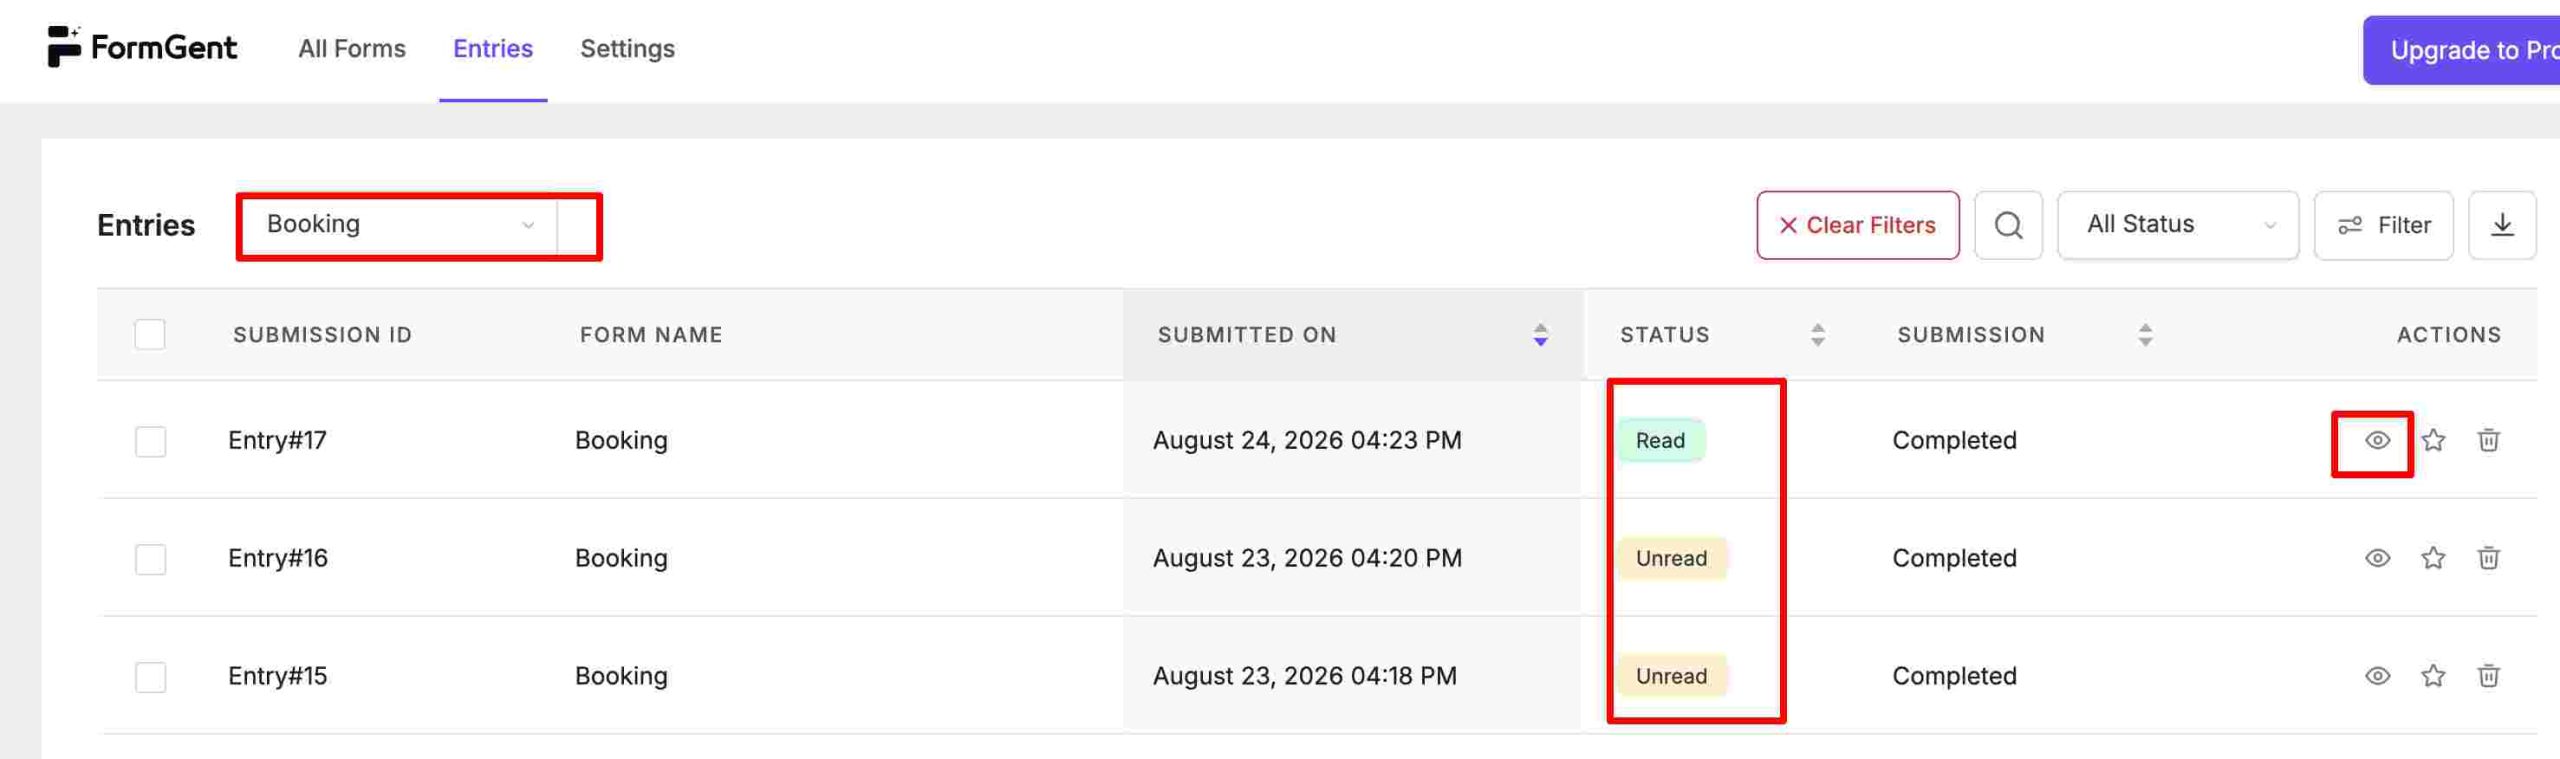
Go to FormGent → Entries in your dashboard menu, select your form from the list, then open any submission to see its attached file as a clickable link you can view or download.
That’s the whole flow. From here, the rest of this guide covers how to make good decisions at each of those steps, keep the files secure, and know whether the field is actually working for your visitors.
Examples: good vs. bad file upload field design
The difference between a file upload field people use correctly on the first try and one that generates a stream of rejected uploads usually comes down to wording.
| Bad | Good | Why |
| “Upload” | “Drop your file here or click to browse (PDF or DOC, up to 5MB)” | Tells the visitor the format and size limit before they try, instead of after they get rejected |
| “File type is not permitted for security reasons” | “That format isn’t supported. Please resave your file as a PDF, DOC, or DOCX and try again.” | Tells the visitor exactly what to do next, not just what went wrong |
| “File Upload” with no context | “Upload signed contract (PDF only)” | Names the exact document you’re expecting |
Here’s what that looks like across a few real use cases:
- Resume upload: PDF or DOC, single file, required. Label it “Attach your resume (PDF or DOC, max 5MB)” so applicants know exactly what’s expected before they click. This is the same pattern FormGent’s own guide to building application forms recommends: name the exact document and cap the file size before a candidate ever hits “upload.”
- Support ticket screenshot: PNG or JPG, up to 3 files, optional. Support forms often lean on this exact pattern, letting a customer attach a screenshot instead of describing an error in words.
- Client intake documents: PDF, DOC, or DOCX, up to 5 files, required. A new client handing over several documents at once needs the same multi-file setup covered in the step-by-step section above.
On layout: keep the file upload field lower in the form, after you’ve already asked for context like name and purpose. Don’t lead with it. A file upload field as the very first thing a visitor sees on your form reads as more effort than a text field, and that’s often the point where people leave before they’ve even started.
Decision guide: single file vs. multiple files, and how many types to allow
Two quick decisions shape how well your upload field performs.
Single file or multiple? Default to a single file when the use case is one clear document, a signed contract, one resume, one ID scan. Turn on multiple files only when the use case naturally spans more than one, like a design portfolio or several photos of a damaged product for a return request. If you do allow multiple files, set a sane cap (2 to 5 for most use cases) rather than leaving it unlimited.
How many file types to allow? Keep the list matched to the actual use case, not maximally permissive. A support ticket form doesn’t need to accept PDF, DOCX, and PPT; it probably just needs image formats for screenshots. A narrower allow-list means fewer chances for someone to upload something you can’t use, and fewer chances for something malicious to slip through.
Keeping uploaded files secure
Once a visitor uploads a file, that file lives on your server, and where it lives and who can reach it matters.
Where the files go. FormGent stores uploaded files in a dedicated folder inside your WordPress uploads directory (wp-content/uploads/formgent/), organized by year and month. That’s a deliberate choice: it keeps form uploads separate from your WordPress Media Library, so a resume someone submitted through a form doesn’t end up mixed in with the images you’ve deliberately published on your site.
How access is controlled. Here’s the part that matters most if your form collects anything sensitive. Each file FormGent stores is referenced by a signed, tamper-proof token rather than a plain, guessable URL. In practice, that means a visitor’s uploaded file isn’t sitting at a predictable web address that anyone could stumble onto or guess by trying different file names. This is worth knowing because it’s not how every form plugin handles it: some tools store uploaded files at a public, predictable location by default, and leave it up to you to manually lock that down. FormGent’s default already avoids that trap.
File type and size limits are security controls, not just UX. A narrow allow-list of file types reduces the chance that someone uploads an executable or script file disguised as something else. A size ceiling protects your hosting storage from being filled by oversized or abusive uploads. Both settings you configured in the steps above are doing double duty.
Pair it with spam protection. File upload fields are a common target for spam and abuse, since they give an attacker a way to push a payload onto your server. FormGent’s File Upload field doesn’t include built-in CAPTCHA on its own; add a Captcha block (Google reCAPTCHA by default) to any public-facing form that accepts uploads. See FormGent’s full guide to avoiding spam submissions for the other layers, like honeypot fields and IP filtering, worth stacking on top of CAPTCHA.
Make the field accessible. A file upload field needs a real, visible label, not just placeholder text that disappears the moment someone clicks in. It needs to be fully operable by keyboard alone (Tab to reach it, Enter or Space to open the file picker), and it should clearly announce success or error states so a visitor using a screen reader knows whether their upload worked. This lines up with the Web Content Accessibility Guidelines (WCAG) 2.1 for non-text content and keyboard operability, and it’s easy to overlook because it doesn’t show up in a quick visual check. It’s the difference between a form some visitors can complete and a form they can’t.
Think about how long you keep files. If your form collects anything personal, a resume, an ID, a medical form, you’re responsible for deciding how long you keep it and how it gets deleted. GDPR’s storage limitation principle requires that personal data only be kept as long as it’s needed for the purpose you collected it for, then deleted or anonymized. There’s no plugin setting that automatically enforces this for you; that’s a process decision you need to make and follow, whether that means periodically clearing out old entries or setting a manual review schedule. Don’t assume “the plugin handles it.”
Checklist before you publish a file upload form
Run through this before the form goes live:
- File types allowed actually match your use case (not left on the default)
- Size limit raised above FormGent’s 250KB default to something realistic for the files you expect
- Required or optional set on purpose, not left at default
- Multiple-file limit set if relevant, with a sane cap
- Upload field label states the accepted format and size limit in plain language
- Notification set up so the uploaded file reaches the right inbox
- reCAPTCHA or another spam control added if the form is public-facing
- Confirmation message set so the visitor knows their upload succeeded
- Tested on mobile, including camera capture and tap-to-browse
- Retention or deletion process decided if the form collects sensitive documents
Start faster with a ready-made form. Start from a file upload form template instead of building one from scratch.
Troubleshooting common file upload problems
Most file upload problems trace back to one of five causes.
| Symptom | Likely cause | Fix |
| “File type is not permitted” even though it’s in your allow-list | WordPress itself blocks certain file types at the core level, separate from your form plugin’s settings | Extend WordPress’s upload_mimes filter for that file type, or choose a type WordPress already supports |
| Upload silently fails on larger files | Your hosting provider’s server-level limits (upload_max_filesize, post_max_size) are lower than what you set in the field | Ask your host to raise these server settings, or lower your field’s limit to match what your host allows |
| Visitor sees a rejection the moment they choose a file | This is expected behavior: the field checks type and size before submission, not a bug | Double-check that the limits you communicated in the field’s label match what you actually configured |
| The file link in a notification email doesn’t work | The notification is set to attach a large file rather than link to it, or the file was later removed | Use a direct link to the file instead of attaching it, especially for larger files |
| Upload works on desktop but fails on mobile | Usually a conflict with another active plugin or theme intercepting the upload request | Temporarily switch to a default WordPress theme with other plugins disabled to isolate the conflict |
How to measure success for a file upload form
A file upload field is easy to set and forget, but it’s worth checking whether it’s actually working for your visitors.
Completion rate. Compare how many people view the form to how many actually submit it. Form Analytics for WordPress Forms covers how to track this across any FormGent form.
Where people drop off. If visitors are reaching the file upload field and not finishing, the size limit, the allowed types, or unclear wording on the field itself are the first places to check. A vague label (“Upload”) gives people no way to know in advance whether their file will even be accepted.
Submission quality. Are people uploading the right file type on the first try, or is your inbox filling up with wrong-format files you have to follow up on? That’s a signal your field’s instructions aren’t clear enough.
Spam rate. File upload fields attract spam. After you connect reCAPTCHA, keep an eye on rejected or junk submissions to confirm it’s actually catching what it should.
If your form is a longer, multi-step one that includes a file upload, also look at Save Incomplete Form Data, which marks partial entries instead of discarding them so you can see how far someone got before they left. Note that browsers don’t let a file selection be restored automatically into a file field, so a visitor resuming a saved form will still need to re-attach their file even if their other answers come back.
Related guides and product pages
- How to Create Application Forms in WordPress Using FormGent, the closest hands-on walkthrough for a form type that leans on file upload
- Mastering Conditional Logic in Forms, for showing or hiding the upload field based on earlier answers
- How to Avoid Spam Submissions with an Online Form Builder, for locking down a public-facing upload form
- How to Automate Website Form Submissions into Zapier, for pushing a submitted file into other tools automatically
- Best WordPress Form Plugin, if you’re still comparing form builders
- File Upload Forms for WordPress Forms, WordPress Client Intake Form Plugin, WordPress Support Ticket Form Plugin, and Email Notifications for WordPress Forms are planned dedicated guides on these exact topics; links will be added here once they’re published
See how FormGent compares. Compare FormGent against paid alternatives before you commit to a plugin.
What is a file upload field in a WordPress form?
A file upload field is a form field that lets a visitor attach a file, like a document, image, or PDF, directly to their submission. For example, a job application form might include one so applicants can attach their resume instead of emailing it separately, keeping everything in one WordPress forms submission.
Why does file upload matter for WordPress forms?
It replaces email attachments with a single, structured submission, so you’re not matching up two separate messages by hand. A support form with a screenshot attached directly to the ticket is a good example: the file and the context arrive together, which makes WordPress forms easier to act on quickly.
How do I add file upload to a form with FormGent?
Install FormGent, drag the File Upload block onto your form, then set your allowed file types and size limit. For instance, a resume form would allow PDF and DOC files with a 5MB limit rather than FormGent’s 250KB default, which is too small for most real documents.
What are file upload best practices?
Keep allowed file types narrow and matched to your use case, set a realistic size limit, and write a clear label that states the format and size upfront. A field labeled “Upload your resume (PDF, max 5MB)” prevents far more rejected uploads than a bare “Upload” button ever will.
What are some good vs. bad file upload field examples?
A bad example is a generic “Upload” button with no context. A good example is “Drop your file here or click to browse (PDF or DOC, up to 5MB),” which tells the visitor exactly what’s expected before they try. That single change is often enough to cut down failed submissions on WordPress forms.
What related pages should I read next?
Start with How to Create Application Forms in WordPress Using FormGent to see file upload applied to a real use case, then read Mastering Conditional Logic in Forms if your upload field should only appear in certain situations.
Is the file upload field free in WordPress form plugins?
It depends on the plugin. WPForms, Formidable Forms, and Ninja Forms all gate file upload behind a paid plan or paid add-on. FormGent’s File Upload field is included in the free core plugin, so you can add it to a WordPress forms setup without upgrading first.
Why is my file upload size limit not working?
Your hosting provider sets its own server-level upload limits, and those override whatever you configure in your form plugin. If your host’s limit is 2MB and you set your field to accept 10MB files, uploads over 2MB will still fail. Ask your host to raise the limit, or set your field’s limit to match it.
Are uploaded files visible to anyone with the link?
That depends on the plugin. Some form plugins store uploaded files at a public, guessable URL by default. FormGent instead protects each file with a signed, tamper-proof token, so a visitor’s upload isn’t sitting at a predictable address anyone could stumble onto.
Can visitors upload a file from their phone camera?
Yes. A file upload field is a standard file input, and most mobile browsers already let visitors choose “take a photo” directly from the file picker without any extra setup on your form. It works the same way across WordPress forms built with any plugin, since it’s a browser-level behavior, not a plugin feature.
How long should I keep uploaded files?
That’s your decision to make, not something a plugin enforces automatically. If your form collects personal documents, like resumes or IDs, set a retention schedule and periodically remove submissions you no longer need, especially if you’re subject to GDPR or similar data-protection rules.


WordPress Form Security Checklist: 14 Things to Check Right Now
September 13, 2026[…] client-side validation back in point 10. Haven’t added this field to a form yet? Our guide to adding file upload to a WordPress form walks you through […]