
How to Create a Signup Sheet in Google Forms (And a Smarter Way to Do It)
-
- Tips and Tricks Form Builder
- 8 mins read
Volunteer coordination, event registrations, RSVPs, waitlists — a signup sheet quietly powers more of everyday organizing than anyone stops to credit it for. Behind every smoothly run workshop or community drive, someone built a form. Probably in a hurry.
Google Forms earned its reputation honestly. Pull it up, add a few fields, share the link — the whole thing wraps up before your coffee cools. Free, no account gymnastics, no tutorial required. For something that could easily be overcomplicated, it stays out of its own way.
This guide covers the exact steps to Create a Signup Sheet in Google Forms. And somewhere toward the end — once the how-to is done — we’ll walk through a tool that moves just as fast, costs nothing, and quietly carries a few things Google Forms never got around to building: conversational forms that feel less like paperwork, quizzes, multi-step layouts, analytics that actually tell you something. No hard sell. Just worth seeing before you decide what to use.
How to Create a Signup Sheet in Google Forms: Step by Step
Step 1: Open Google Forms

Go to forms.google.com and sign in with your Google account. Click the + icon to start a blank form, or choose Template gallery to browse pre-built options. Google does offer a basic event signup template you can customize.
Step 2: Add Your Form Title and Description

Click on “Untitled form” and replace it with something clear and specific — for example, “Summer Volunteer Signup” or “Workshop Registration — June 14.” Add a short description below it to give respondents context: what they’re signing up for, when it is, and any instructions they need.
Step 3: Build Your Form Fields
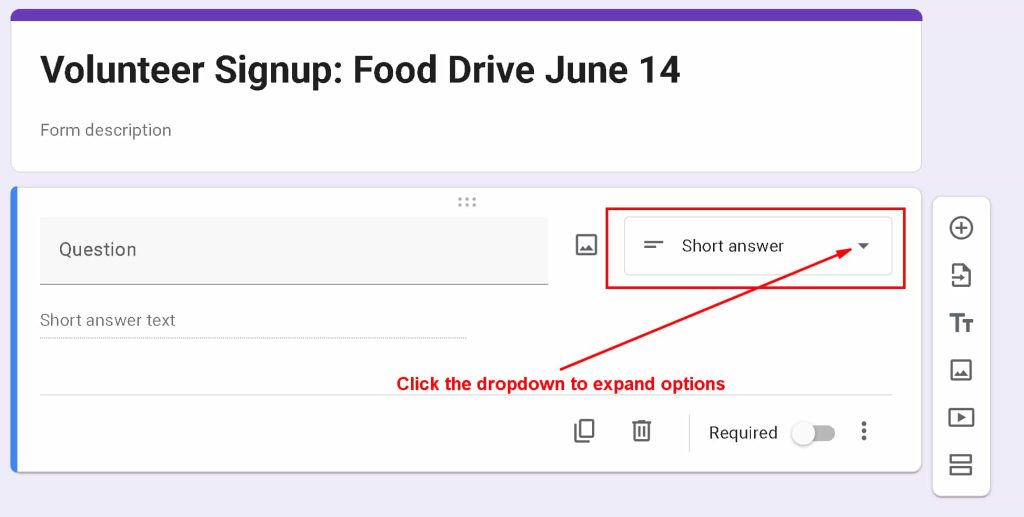
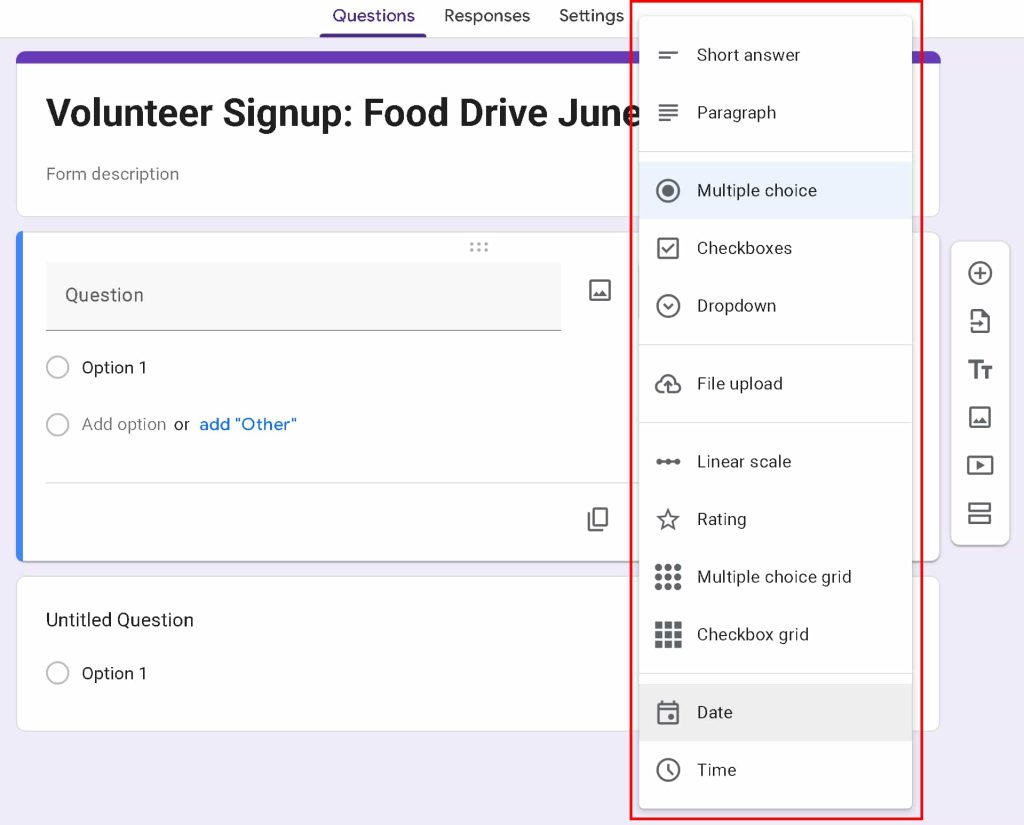
Click the + button on the right-side toolbar to add questions. Google Forms offers several field types:
- Short answer — best for names, email addresses, phone numbers
- Multiple choice — useful for selecting a shift, session, or preference
- Checkboxes — for selecting multiple options (e.g., dietary restrictions)
- Dropdown — good for longer lists of choices
- Date/Time — helpful if respondents are selecting a preferred time slot
- Paragraph — for open-ended comments or special requests
For a typical signup sheet, you’ll want at minimum: full name, email address, and whatever specific information your event requires (shift preference, number of guests, etc.).
To make a field required, toggle the Required switch at the bottom of each question card.
Step 4: Configure Your Form Settings
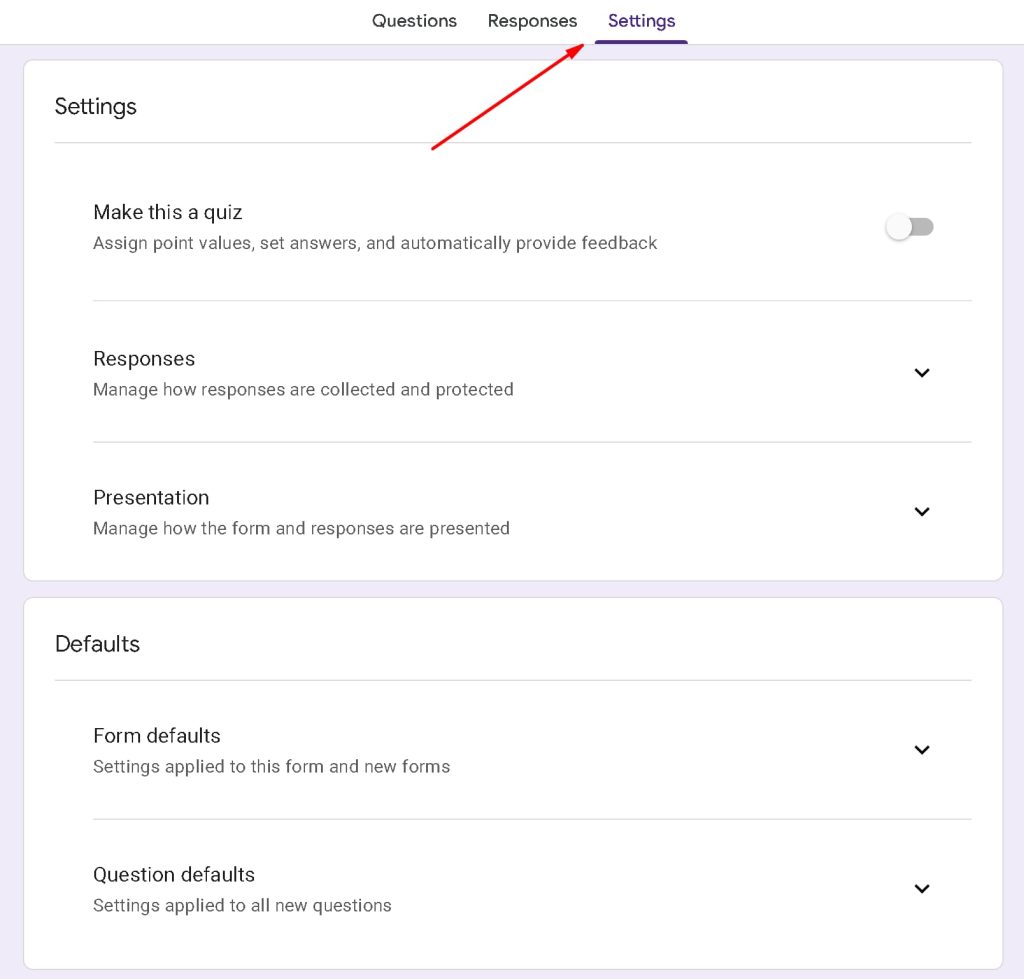
Click the Settings tab at the top of the editor. Here you can:
- Collect email addresses — toggle this on and set it to “Verified” to ensure accurate contact info
- Limit to one response — prevents the same person from signing up multiple times (requires Google sign-in)
- Allow response editing — lets respondents update their answers after submitting
- Set a confirmation message — customize what people see after they submit
Under Presentation, you can shuffle question order and add a progress bar if you have multiple sections.
Step 5: Connect to Google Sheets (Optional but Recommended)
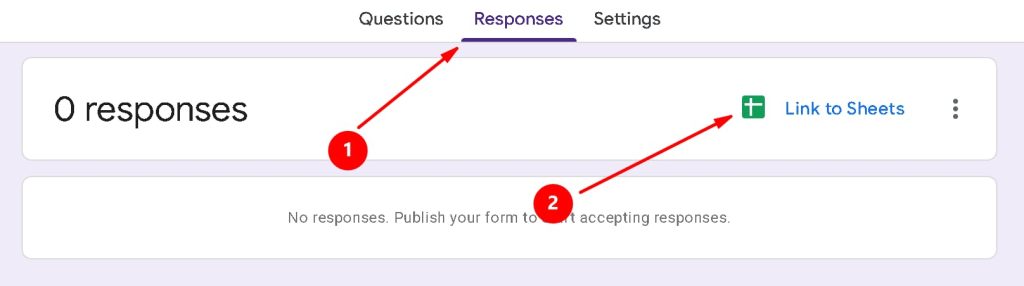
Click the Responses tab and select Link to Sheets. This creates a connected Google Sheet that automatically records every new submission in real time. From there, you can sort by shift, filter by dietary need, share the sheet with co-organizers, or use it for mail merge.
You can also enable email notifications for new responses from the three-dot menu in the Responses tab — useful so you’re not constantly checking for new signups.
Step 6: Customize the Look
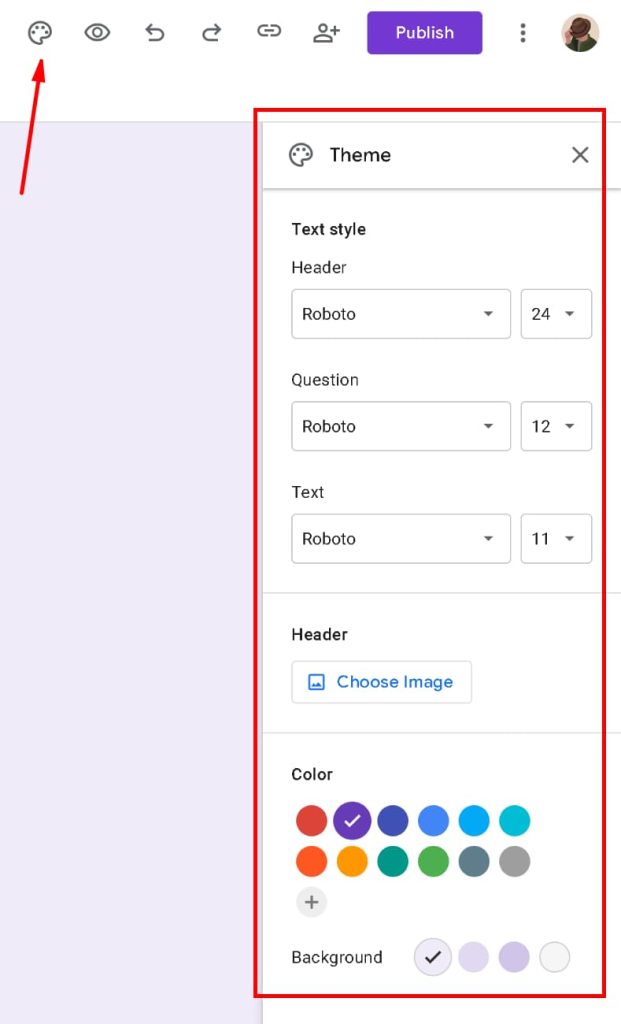
Click the paint palette icon in the top-right corner to open the theme editor. You can:
- Upload a header image (event banner, logo, etc.)
- Choose a color scheme
- Select a font style from three options (Default, Decorative, or Formal)
Google Forms’ design options are functional but limited. You can’t control font sizes, spacing, or layout beyond these basic settings.
Step 7: Preview Your Form

Click the eye icon in the top-right corner to preview how your form looks to respondents on desktop and mobile. Check that all fields are present, required fields are marked correctly, and the flow makes sense from top to bottom.
Step 8: Publish & Share Your Signup Sheet

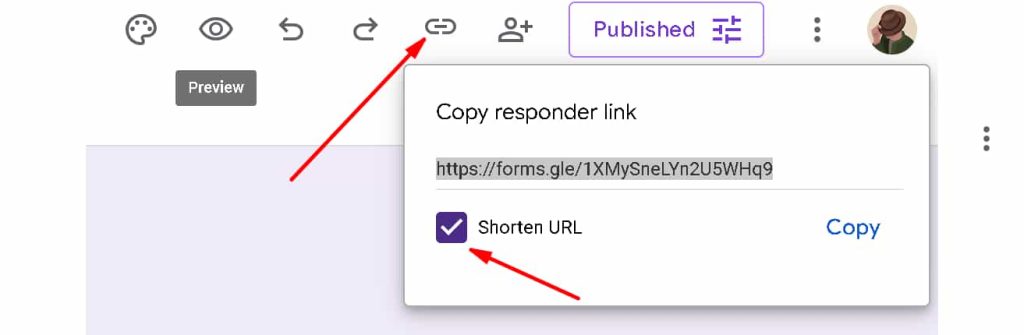
Choose from the following options to distribute your form. Your options are:
- Email — send directly to a list of addresses, with the option to embed the form in the email body
- Link — copy a shareable URL to post in Slack, WhatsApp, social media, or anywhere else
- Embed — copy an
<iframe>code snippet to place the form on any website
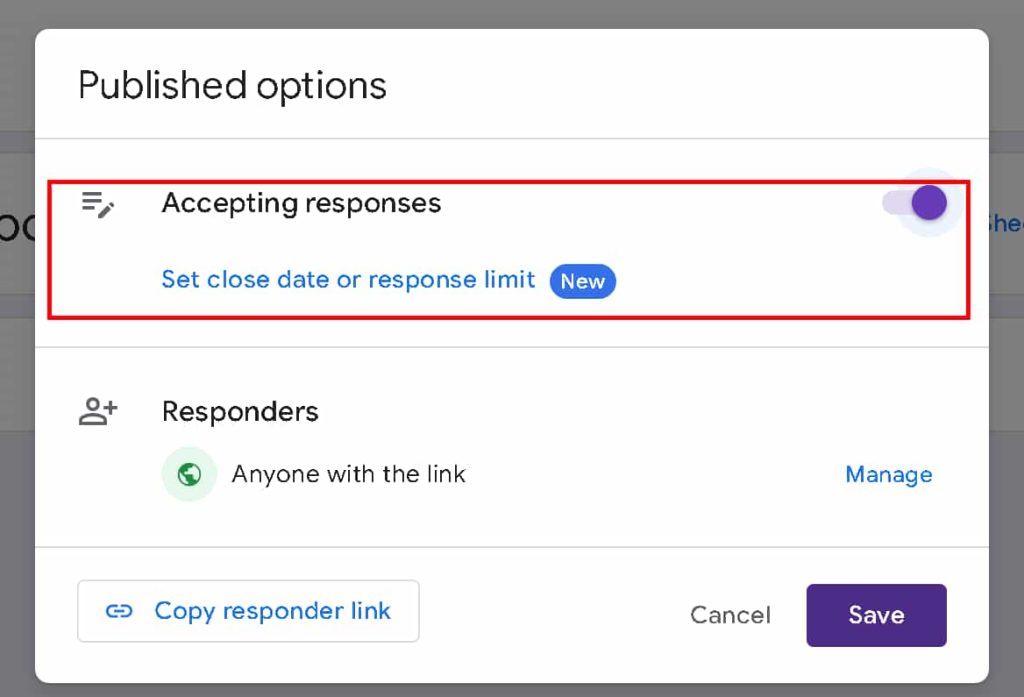
You can also shorten the URL using Google’s built-in shortener by checking the checkbox next to the link. An additional option “Accepting responses” can help you to set close date or response limit of your Signup Sheet.
Where Google Forms Falls Short for Signup Sheets
Google Forms is free and relatively easy to use, but it has real limitations — especially as your needs grow:
- No conversational or multi-step format. All questions appear on one long page, which can feel overwhelming and leads to abandonment.
- Very limited design control. With a Google Form, there is a limitation for design that can feel hard to match your brand’s colors, fonts, or layout.
- No built-in analytics. You can see raw response counts, but there’s no conversion tracking, field-level drop-off data, or A/B testing.
- No partial submission saving. If a respondent closes the tab before submitting, their data is lost.
- No payment collection. Google Forms has no native way to collect a registration fee alongside a signup.
- No digital signatures. If your signup requires a waiver or consent form, Google Forms can’t handle it.
- Google account dependency. Limiting responses to one per person requires respondents to sign in with a Google account, which creates friction.
If any of these limitations matter to you, it’s worth looking at a purpose-built alternative.
How to Create a Signup Sheet with FormGent (The Smarter Alternative)
FormGent is an AI-powered, WordPress-native form builder designed to do everything Google Forms does — and a lot more. Here’s how to build the same signup sheet in FormGent, and why the experience (and the result) is noticeably better.
Step 1: Install FormGent on Your WordPress Site
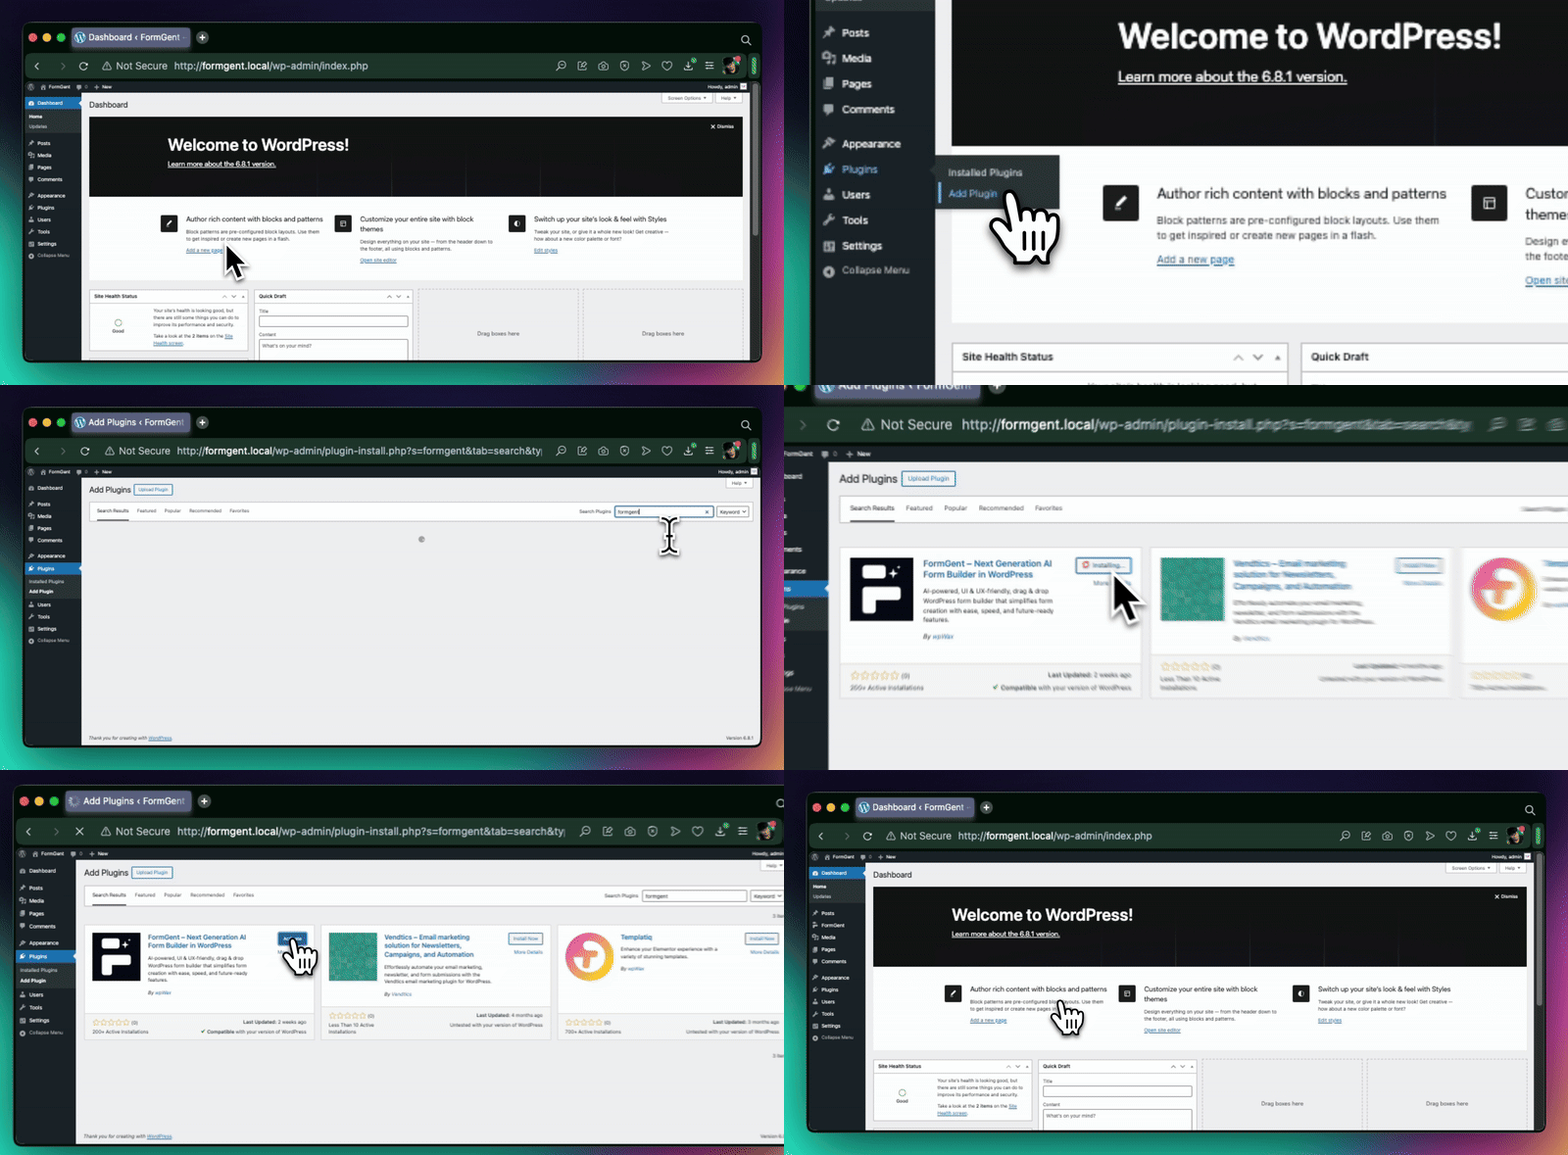
From your WordPress dashboard, go to Plugins → Add New, search for “FormGent,” and click Install Now, then Activate. The free plan is genuinely feature-rich and more than enough for most signup sheet use cases.
Step 2: Generate Your Form with AI
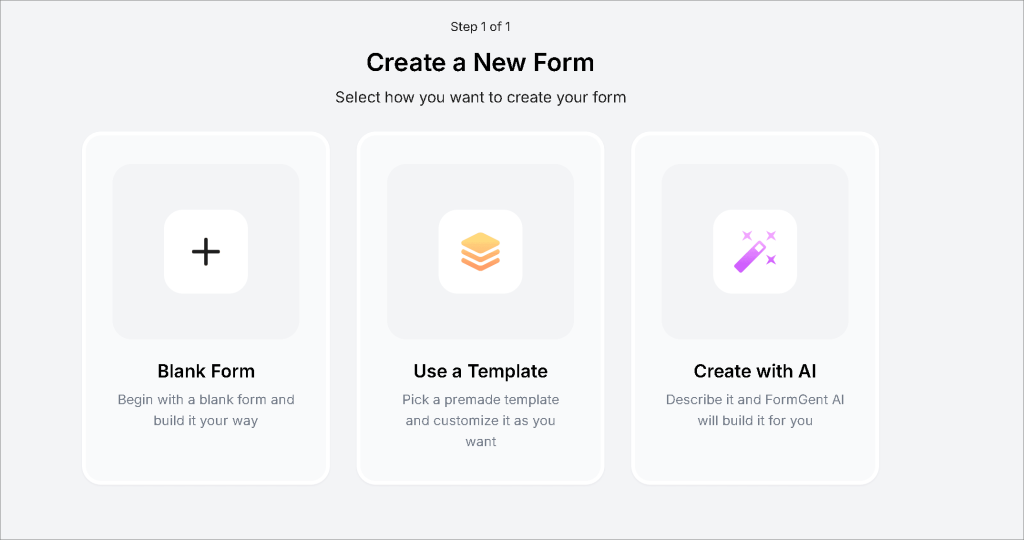
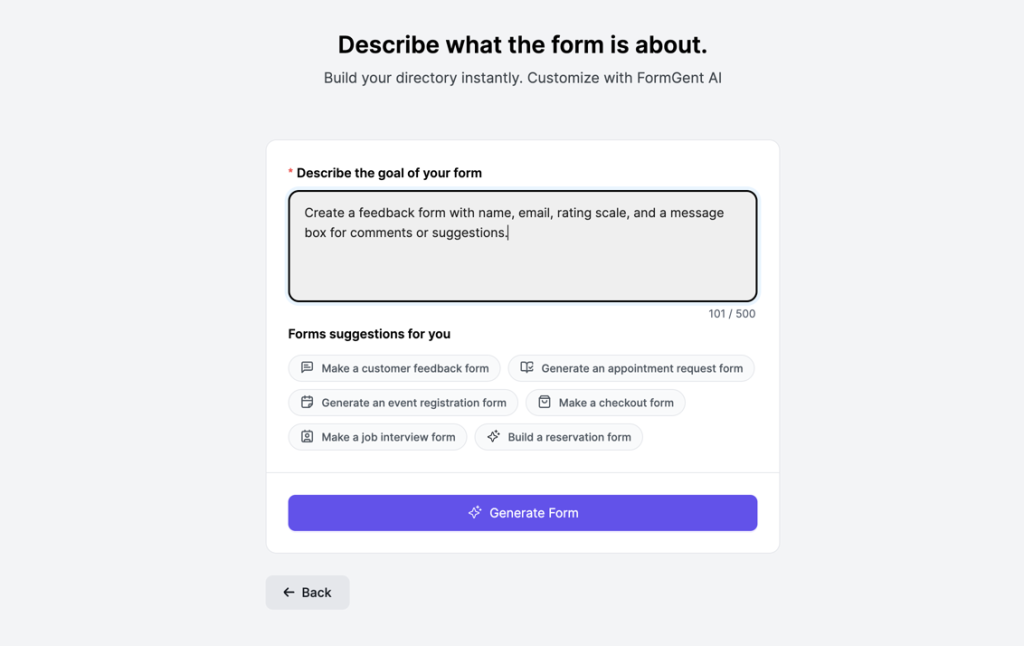
In your WordPress dashboard, navigate to FormGent → Create New Form. Instead of building from scratch, type a natural language prompt — for example:
“Create a volunteer signup sheet for a community food drive on June 14. Collect name, email, phone number, shift preference (morning or afternoon), and whether they need parking.”
FormGent’s AI generates a complete, ready-to-use form in seconds. Field types, labels, and structure are all suggested automatically. You can accept the result as-is or jump in and customize it — either way, you’ve saved significant time compared to building field by field.
Step 3: Choose a Conversational or Multi-Step Layout
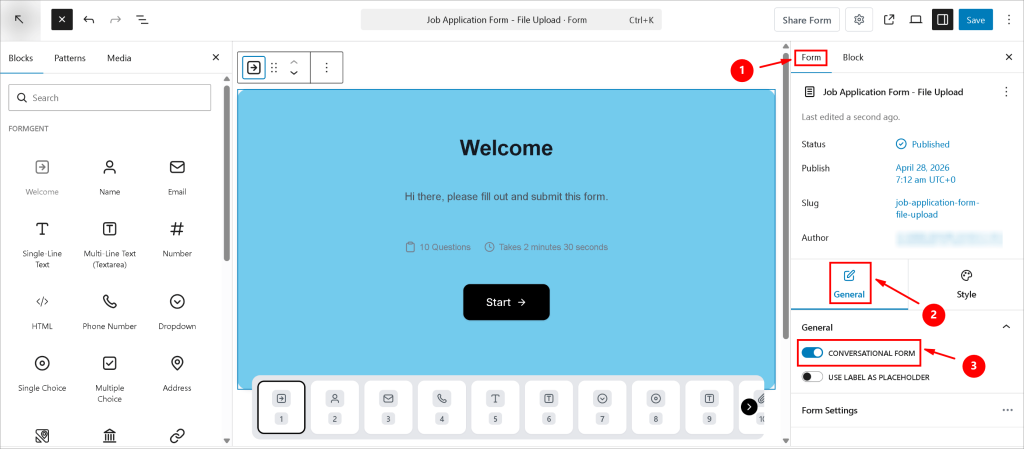
This is one of FormGent’s standout advantages. Instead of presenting all your questions on one long page, you can switch your form to:
- Conversational mode — questions appear one at a time, like a chat. This dramatically increases completion rates because it feels less overwhelming.
- Multi-step mode — questions are grouped into logical sections (personal info, preferences, confirmation) with a progress bar, giving respondents a sense of momentum.
For signup sheets with more than four or five fields, either of these layouts will outperform a standard single-page form.
Step 4: Add and Configure Your Fields
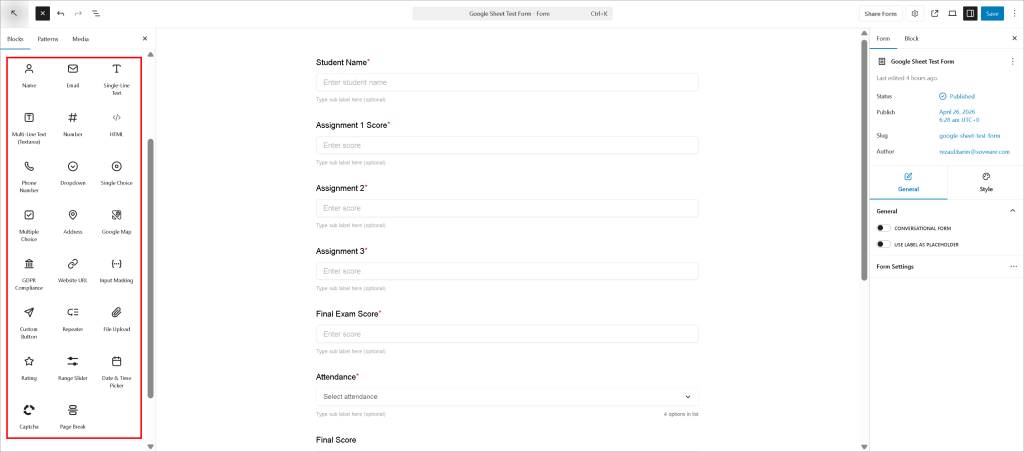
FormGent offers 20+ field types, including all the standard ones you’d use in Google Forms plus several it doesn’t have:
- Digital signature — ideal for waivers or consent forms attached to your signup
- Payment fields — collect a registration fee via PayPal or Stripe directly in the signup sheet
- File upload — useful if attendees need to submit a photo, document, or proof of eligibility
- Repeater fields — let one respondent sign up multiple household members in a single submission
- Calculations — automatically calculate totals (e.g., ticket price × quantity)
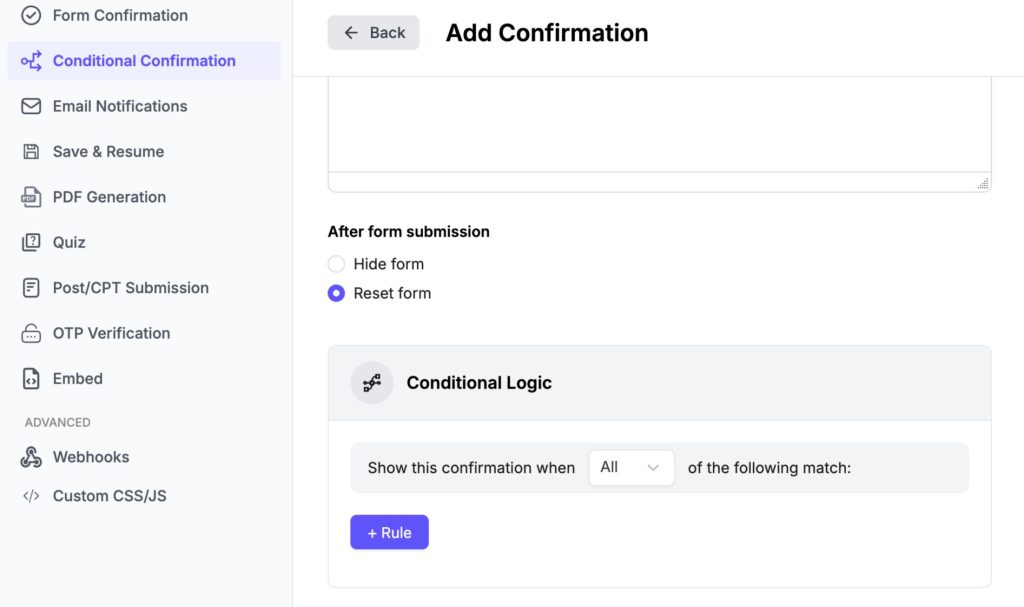
Conditional logic lets you show or hide fields based on previous answers. For example: if someone selects “Yes, I’m bringing a guest,” a new field appears asking for the guest’s name. This keeps the form clean and only asks people questions that are relevant to them.
Step 5: Customize the Design to Match Your Brand
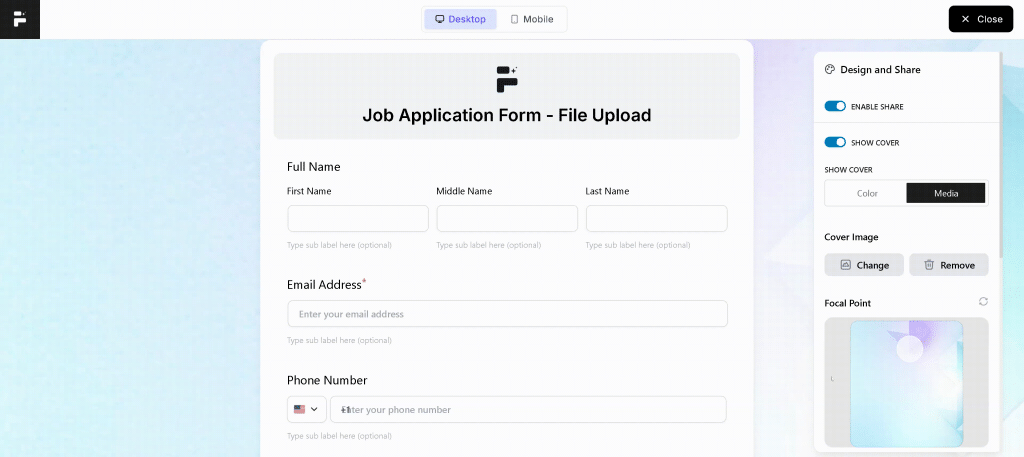
FormGent forms live natively inside WordPress, which means your form inherits your site’s theme and feels like a natural part of your website — not an embedded Google product. You have full control over colors, typography, spacing, and layout. Whether your site is minimal and corporate or bold and colorful, your signup sheet will match.
Step 6: Enable Partial Submission Saving (PRO)
Under FormGent’s form settings, enable Save Incomplete Data. This means if someone starts filling out your signup sheet and closes their browser before hitting submit, their progress is saved. You can follow up with them and invite them to complete the form — recovering signups that would otherwise be lost entirely.
Step 7: Set Up Notifications and Integrations
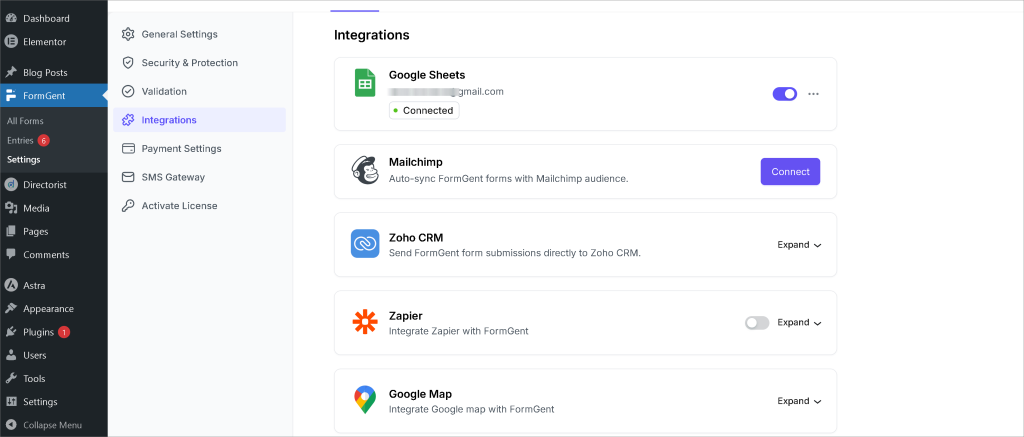
FormGent sends instant email notifications when someone submits your signup sheet. You can customize the notification email to include the respondent’s answers, making it easy to review submissions at a glance.
For deeper automation, you can integrate with popular tools like Zapier, MailChimp, Zoho CRM and Google Sheet (You’ll not missed although leaving the Google Forms). FormGent also supports webhooks to connect with tools like your CRM or email marketing platform — so new signups can automatically be added to your mailing list, spreadsheet, or project management tool.
Learn More:
- How to Connect WordPress Forms to Google Sheets Without Zapier or API Setup
- How To Automate Website Form Submissions Into Zapier (Step-By-Step With FormGent)
- Mastering Conditional Logic in Forms: A Guide to Personalized User Experiences
- Form Design Best Practices: How to Create User-Friendly and Conversion-Optimized Forms
- How to Create a Form in WordPress: A Step-by-Step Guide
Step 8: Publish and Share Your Signup Sheet
Once your form is ready, you have flexible publishing options:
- Embed on any WordPress page or post using the FormGent block in the Gutenberg editor — just drop it in wherever you want it to appear
- Share via a direct link — FormGent generates a standalone URL for your form
- Use the shortcode to embed the form in classic WordPress themes or widgets
Your form will be fully responsive and optimized for mobile out of the box.
The Actual Difference Between Them
| Feature | Google Forms | FormGent |
|---|---|---|
| AI form generation | ❌ | ✅ |
| Conversational layout | ❌ | ✅ |
| Multi-step layout | ❌ | ✅ |
| Design customization | Color + font only | Inherits full theme |
| Built-in analytics | Response count | Field-level drop-off |
| Partial submission saving | ❌ | ✅ |
| Digital signatures | ❌ | ✅ |
| Payment collection | ❌ | ✅ (PayPal / Stripe) |
| Conditional logic | Basic | Field-level |
| WordPress native | ❌ | ✅ |
| Free plan | ✅ | ✅ |
When Each One Makes Sense
Google Forms earns its place for fast, internal signups — team potlucks, office polls, anything where speed matters more than polish and everyone involved already lives in Google Workspace. Open a tab, build a form in five minutes, share the link. Done.
FormGent fits differently. If your signup lives on a WordPress site, needs to look like it belongs there, or involves any step beyond “collect name and email” — a fee, a waiver, a multi-member household — the extra setup (which isn’t much) pays off in a form that actually matches what you were trying to build.
Besides, If you’re already a WordPress user, there’s no reason to send your visitors off to a Google-hosted form when you can build something better, right inside your own site.
Ready to get started? Install FormGent from the WordPress plugin directory and create your first signup sheet in minutes — no coding required.
Have questions about setting up your signup sheet? Drop them in the comments below. Also you can check out the feature page to know more about FormGent.

Rezaul Karim
Rezaul Karim is a passionate Digital Marketer driven by curiosity and creativity in the ever-evolving world of online marketing. With over 6 years of hands-on experience in Content Writing, Copywriting, SEO, and Social Media Marketing, he brings a strategic edge to crafting content that engages and converts. Always eager to explore new trends and tools, Rezaul thrives on finding smarter ways to connect brands with their audiences. Outside of work, he enjoys diving into books or recharging in nature.
Leave a Reply