How to Accept and Review User-Submitted Posts in WordPress
-
- Practical Guide Making Better Tips and Tricks
- 20 mins read

To allow users to submit posts in WordPress, place a FormGent form on a public page and connect its fields to a Post/CPT Submission feed. A visitor completes the form, and FormGent turns the submitted title and content into a WordPress post. Visitors can submit content without opening the WordPress dashboard.
For a safe public workflow, enable guest posting, assign the post to an account controlled by your team, and use Pending status. An editor can then review the post before it becomes public.
This guide covers more than form setup. You will also learn how the submission moves through WordPress, which fields to collect, how to test every stage, and what to check when FormGent saves an entry but no post appears.
Before you begin, make sure Post/CPT Submission is available in your FormGent setup.
What you will build
The finished workflow looks like this:
- A visitor opens a normal page on your site.
- They enter a post title and content.
- FormGent saves their response as an entry.
- The Post/CPT Submission feed creates a separate WordPress post.
- The post waits in Pending status.
- An editor checks and publishes it.
The basic version needs about nine setup steps. Start with title and content only. Add images, categories, metadata, or custom post types after the basic workflow works.
What does this form do?
A user-submitted post form collects content on the front end of your site. The person submitting the article does not need to open wp-admin.
The smallest useful form needs two fields:
- Post Title for the article title
- Post Content for the main article
You may also add fields for an excerpt, an image, the writer’s name, or an email address.
When the active feed completes successfully, the workflow creates two separate records:
- An entry in FormGent → Entries
- A post in WordPress → Posts
This is useful because you can keep the original form response while editing the WordPress post.
A success message is not the final proof
The form response and post-creation feed run as separate parts of the workflow. A success message confirms that FormGent accepted the form. It does not, by itself, confirm that WordPress created the post.
Always check both places after a test:
- FormGent → Entries confirms that the response was stored.
- Posts → All Posts confirms that the feed created the post.
This two-record check is the fastest way to find a partial failure.
Is a front-end form the right method?
WordPress can accept contributor content in several ways. Choose the method that fits the people who will submit.
| Method | Best for | Main advantage | Main drawback |
| Front-end FormGent form | Guests, customers, community members, or occasional contributors | No dashboard account is required | You must configure and test the post feed |
| WordPress user account | Trusted, regular writers | Writers can work directly with WordPress posts | You must manage accounts, roles, and dashboard access |
| Email submission | A very small number of occasional submissions | Almost no setup | Editors must copy, format, and track the content manually |
Use a front-end form when you want structured content without giving every writer a WordPress account. Use normal WordPress accounts when trusted writers need to return, edit drafts, and work inside the editorial system.
Choose your basic settings
Decide these settings before you build the form.
| Setting | Good starting choice | Reason |
| Who can submit? | Guests, if you want a public form | People do not need an account |
| Post status | Pending | The post waits for review |
| Post author | A user account controlled by your team | Guest posts have one clear owner |
| Publishing | Manual | An editor checks the post first |
These settings solve different problems:
- Guest posting controls whether a logged-out visitor can trigger post creation.
- Post author controls which WordPress account owns the generated post.
- Post status controls whether the post is public or waiting for work.
- WordPress role controls what a team member can edit or publish.
Do not treat these as one permission setting. For example, a guest can submit a post that belongs to a site-controlled author and remains Pending for an editor.
Should you use Draft or Pending?
Both options keep the post unpublished.
- Use Draft when an editor still needs to develop the article.
- Use Pending when the article is ready for review.
For a public form, Pending is usually the clearer choice. WordPress defines Pending as a post that is waiting for a user with the right permission to publish it. You can compare the core choices in the WordPress post-status reference.
Do not choose Publish unless you are comfortable putting submissions online without review. A public form may receive spam, unsafe links, or content that needs editing.
Plan the information you will collect
Every field should have a clear purpose. Collecting less information makes the form easier to complete and gives your team less private data to manage.
| Field | Why collect it? | Where should it go? | Required? |
| Post Title | Identifies the submission | WordPress Post Title | Yes |
| Post Content | Contains the main article | WordPress Post Content | Yes |
| Contributor Name | Helps the editor identify the writer | Entry or a carefully chosen meta field | Depends on your process |
| Contributor Email | Lets the editor ask follow-up questions | Keep in the entry; do not publish it by mistake | Only if follow-up is needed |
| Post Excerpt | Provides a short summary | WordPress Post Excerpt | Optional |
| Featured Image | Provides a proposed image | Featured Image mapping | Optional |
| Content agreement | Records permission or policy acceptance | Keep with the entry | Recommended when you publish submitted work |
Tell contributors why you collect personal information. If you accept images or written work, explain what they may submit and whether your team may edit it.
How the submission moves through WordPress
Understanding the workflow makes setup and troubleshooting easier.
| Stage | What happens | Where to check it |
| 1. Form validation | Required fields and security checks run | The public form shows an error or success message |
| 2. Entry storage | FormGent stores the submitted answers | FormGent → Entries |
| 3. Feed decision | The active Post/CPT feed checks guest access and any conditions | Post/CPT Submission settings |
| 4. Post creation | WordPress creates the mapped post | Posts → All Posts |
| 5. Editorial review | An editor checks content, links, media, author, and status | WordPress post editor |
When something fails, start at Stage 1 and stop at the first missing result. That point usually tells you which settings to inspect.
Create the post submission form
The steps below create a simple form with a title and content field. Each submission becomes a Pending WordPress post.
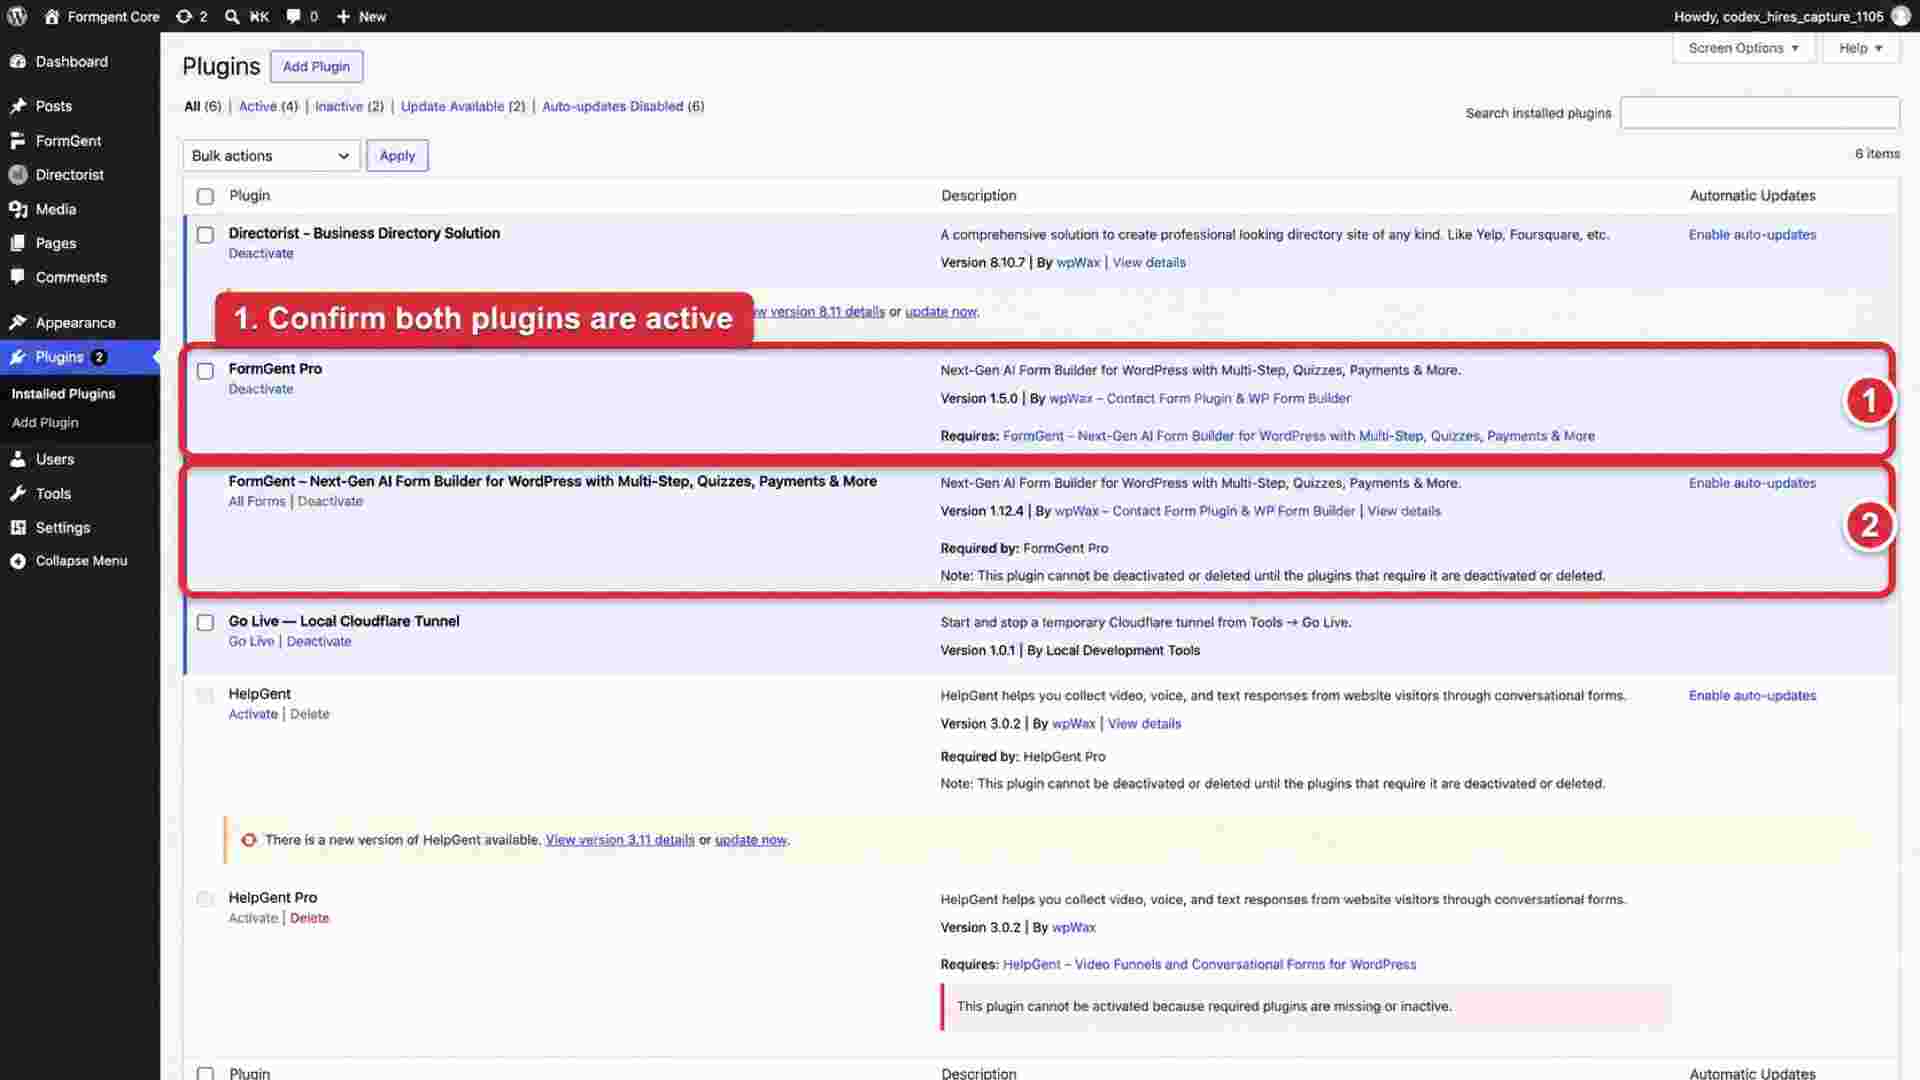
Step 1: Prepare your FormGent setup
Install and activate FormGent, then confirm that your FormGent features are ready to use.
Open a form and check that Post/CPT Submission appears under Form Settings.
If you have not created a form before, the FormGent first-form guide explains the form builder.
Step 2: Create a blank form
From the WordPress dashboard:
- Go to FormGent → All Forms.
- Click Create New.
- Choose Blank Form.
- Enter a name, such as Guest Article Submission.
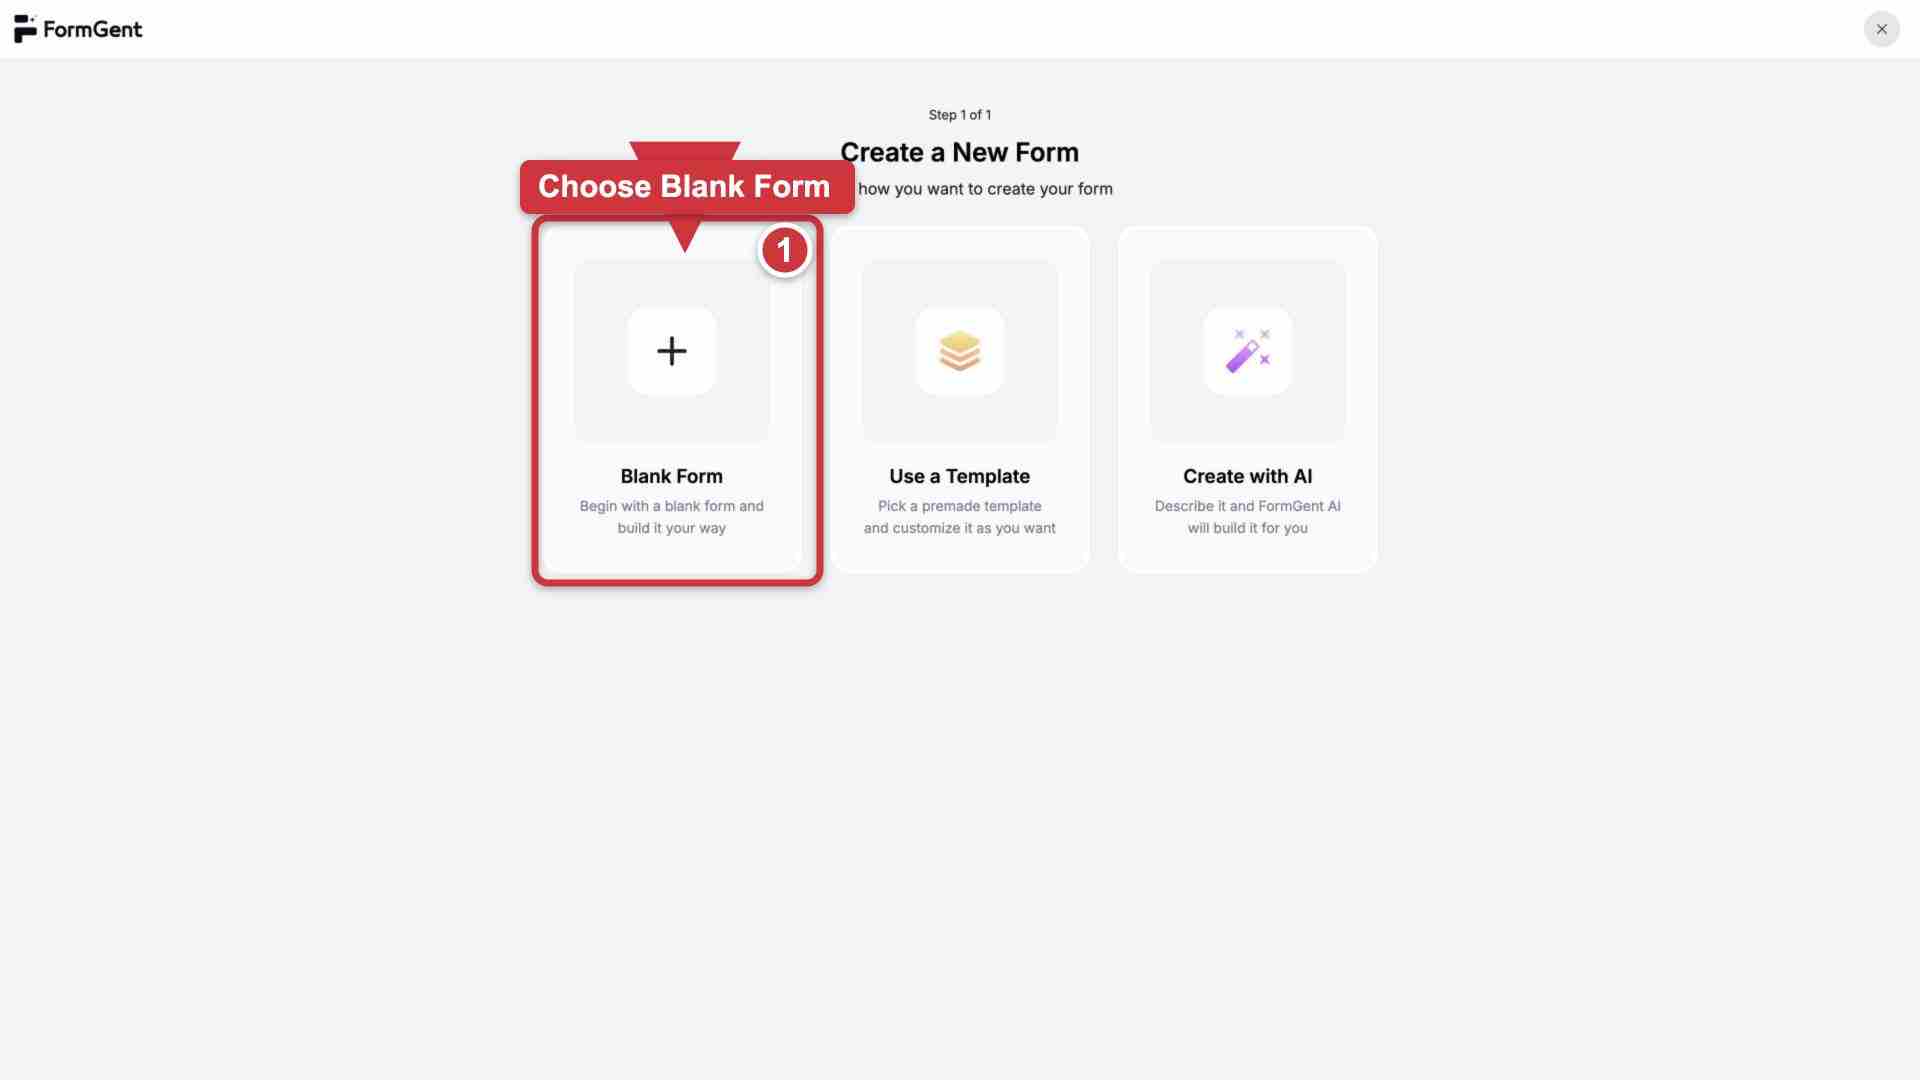
This name is for your team. Visitors do not have to see it.
Step 3: Add a title and content field
Add these fields to the form:
- Add a Single-Line Text field. Change its label to Post Title.
- Add a Multi-Line Text field. Change its label to Post Content.
- Make both fields required.
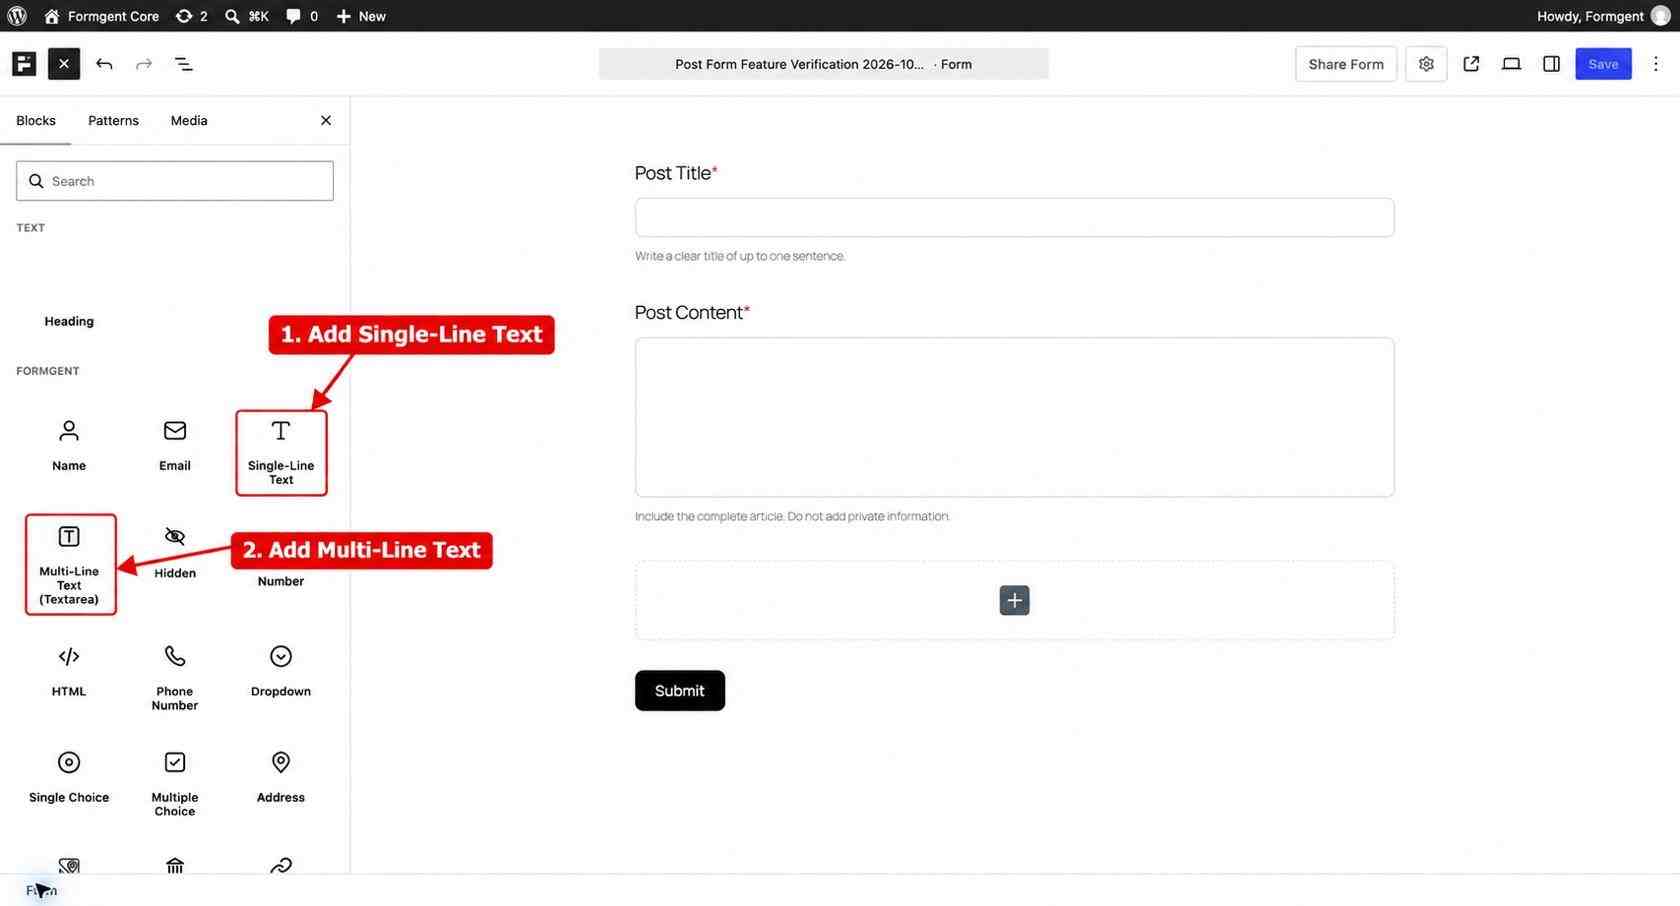
The required title helps your team find each submission. It also prevents empty titles.
Use field descriptions to set expectations. For example:
- Under Post Title: “Write a clear title of up to one sentence.”
- Under Post Content: “Include the complete article. Do not add private information.”
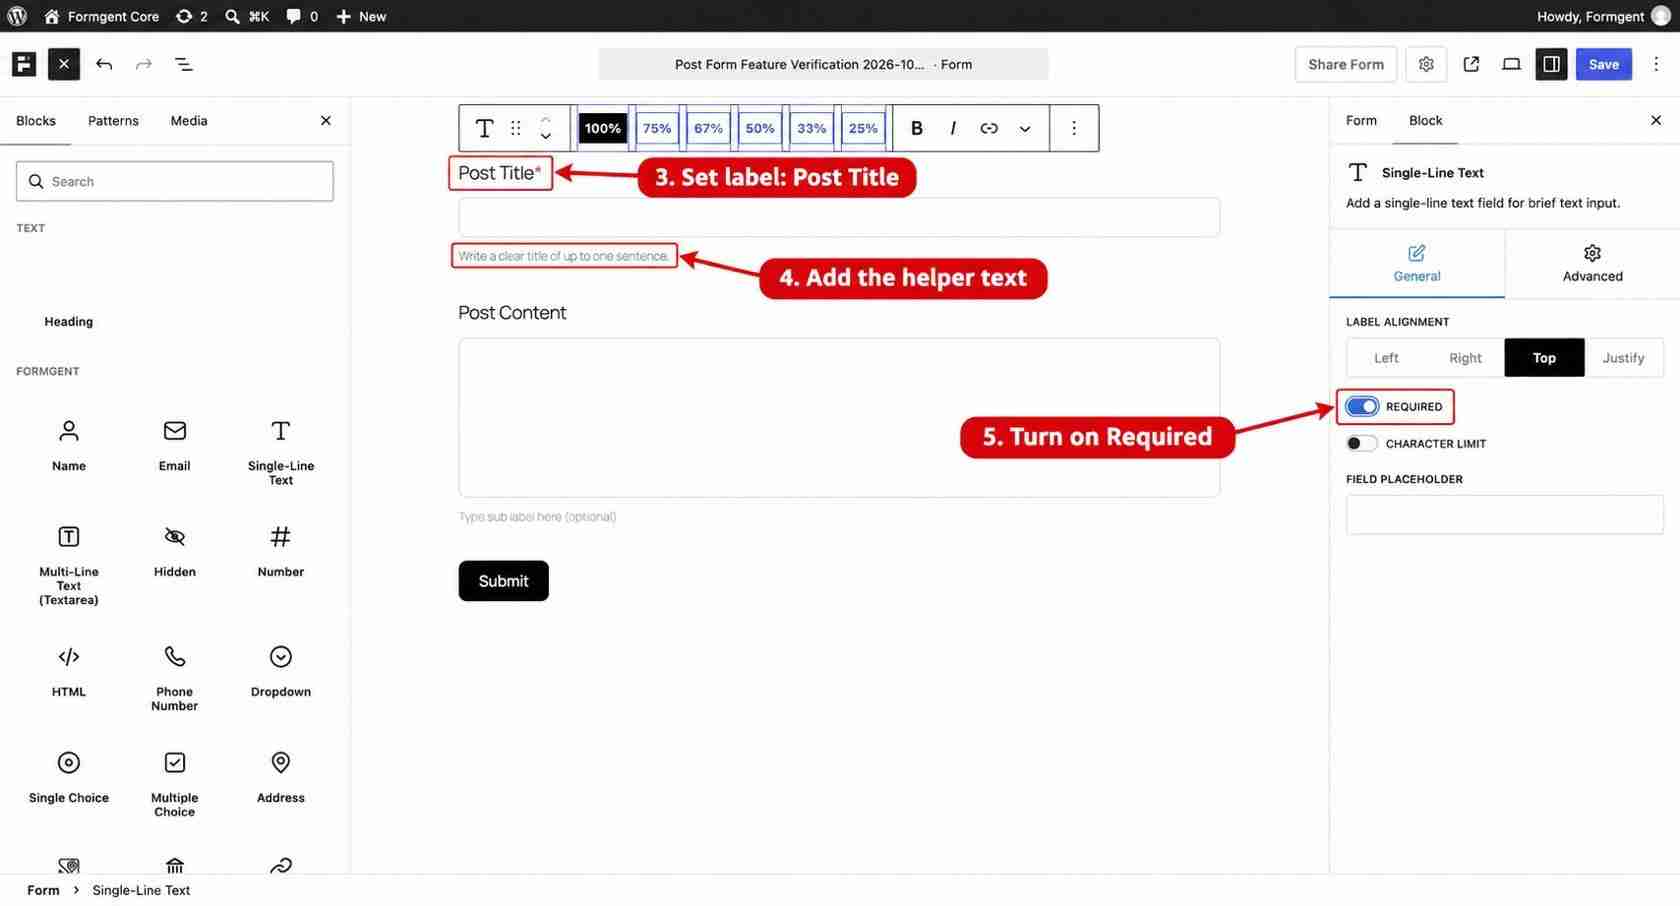
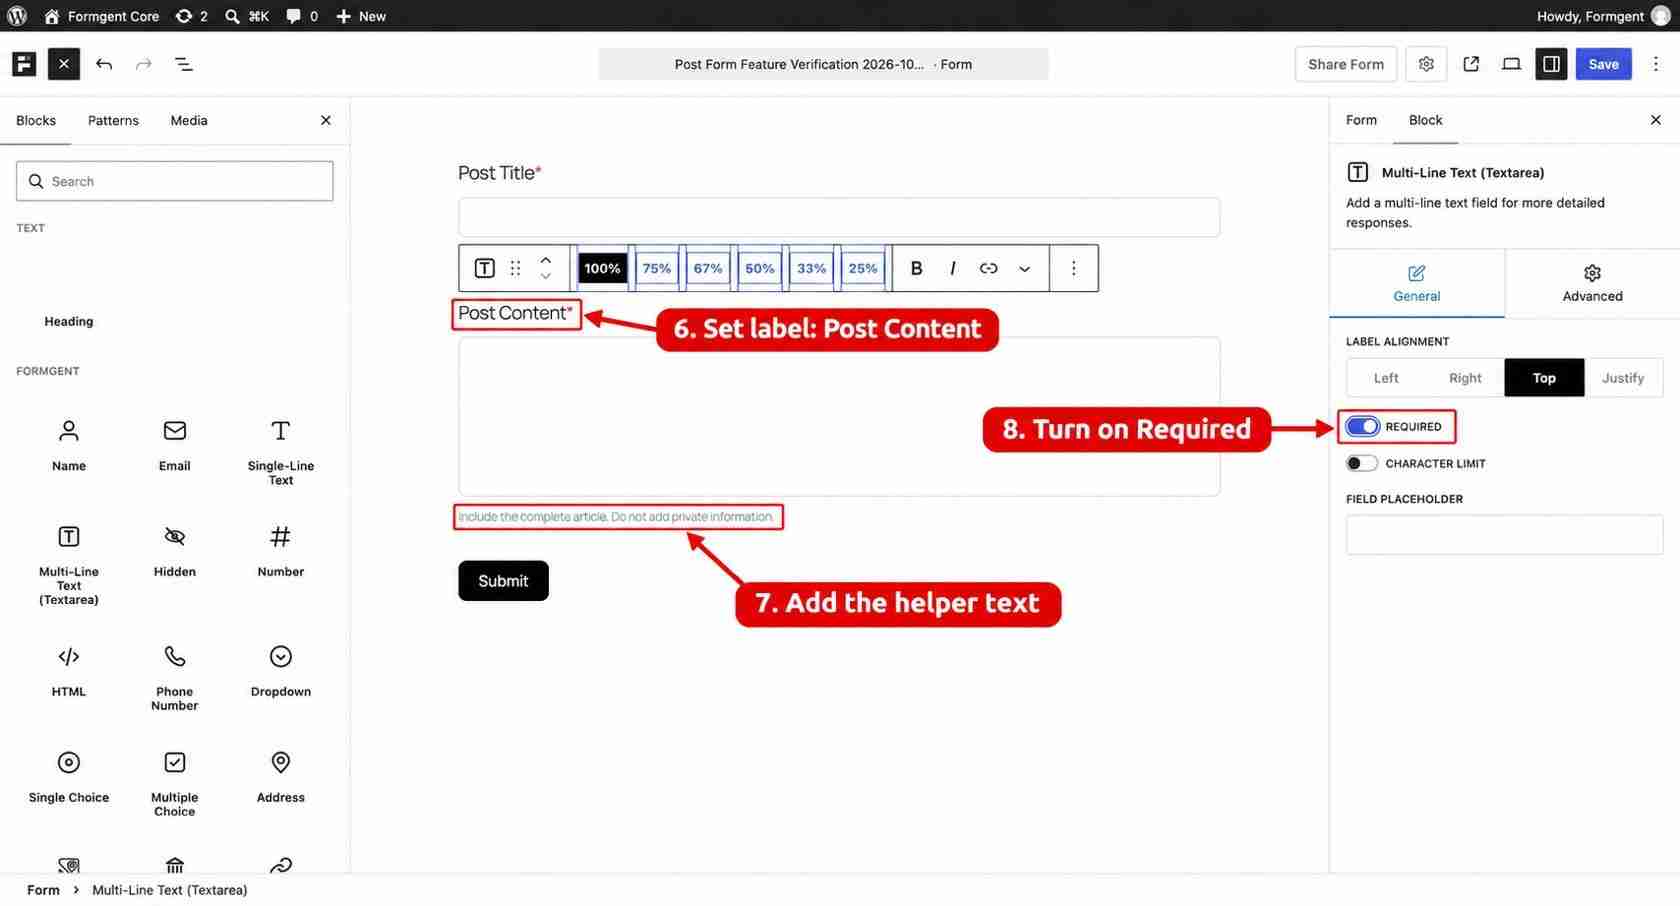
Clear instructions reduce avoidable editing later. If you have a minimum length, formatting rule, or topic restriction, state it above the form instead of surprising the writer after submission.
Preview the form and confirm that both fields appear as shown below. You will submit the form after you finish the post settings.
You can add more fields later. Useful options include:
- Contributor name
- Contributor email
- Post excerpt
- Author bio
- Source links
- Featured image
- An agreement about content rights
Keep the form short. Ask only for information that your team will use.
If you collect an email address, keep it separate from the public post content. Mapping an email field into Post Content could publish it accidentally.
Step 4: Open Post/CPT Submission
Open Form Settings, then choose Post/CPT Submission.
If you do not have a feed, click Add Post Feed. If a feed is already there, click its edit icon.
The feed tells FormGent how to turn a form entry into a WordPress post. The official feature guide linked in the introduction explains the available sections.
Give the feed a name that describes its purpose, such as Guest Articles – Pending Posts. A clear name becomes helpful when one form has several feeds or conditions.
Step 5: Choose Posts and Create post
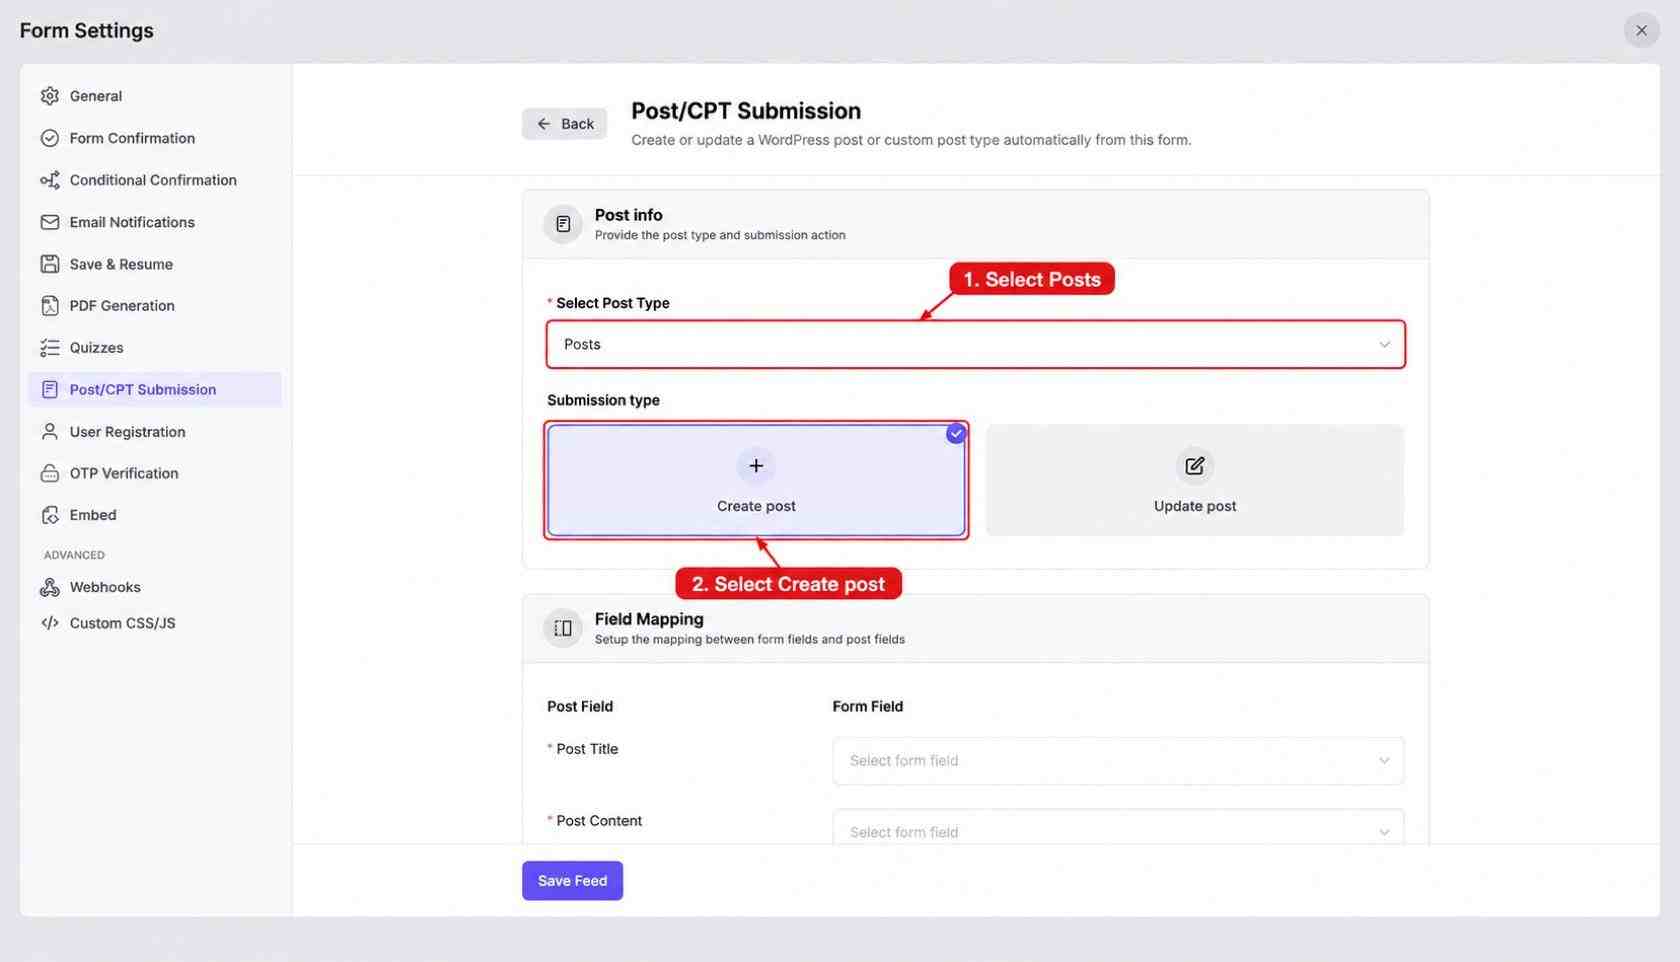
In Post info:
- Set Select Post Type to Posts.
- Choose Create post.
FormGent will now create a new post for each successful submission.
For this guide, choose Create post. Use Update post only when you have a separate workflow for a selected existing post.
Create post is the correct choice when every submission should become a new editorial item. It is not a contributor portal: the writer does not receive a dashboard for returning to the generated post.
Step 6: Connect the form fields to WordPress
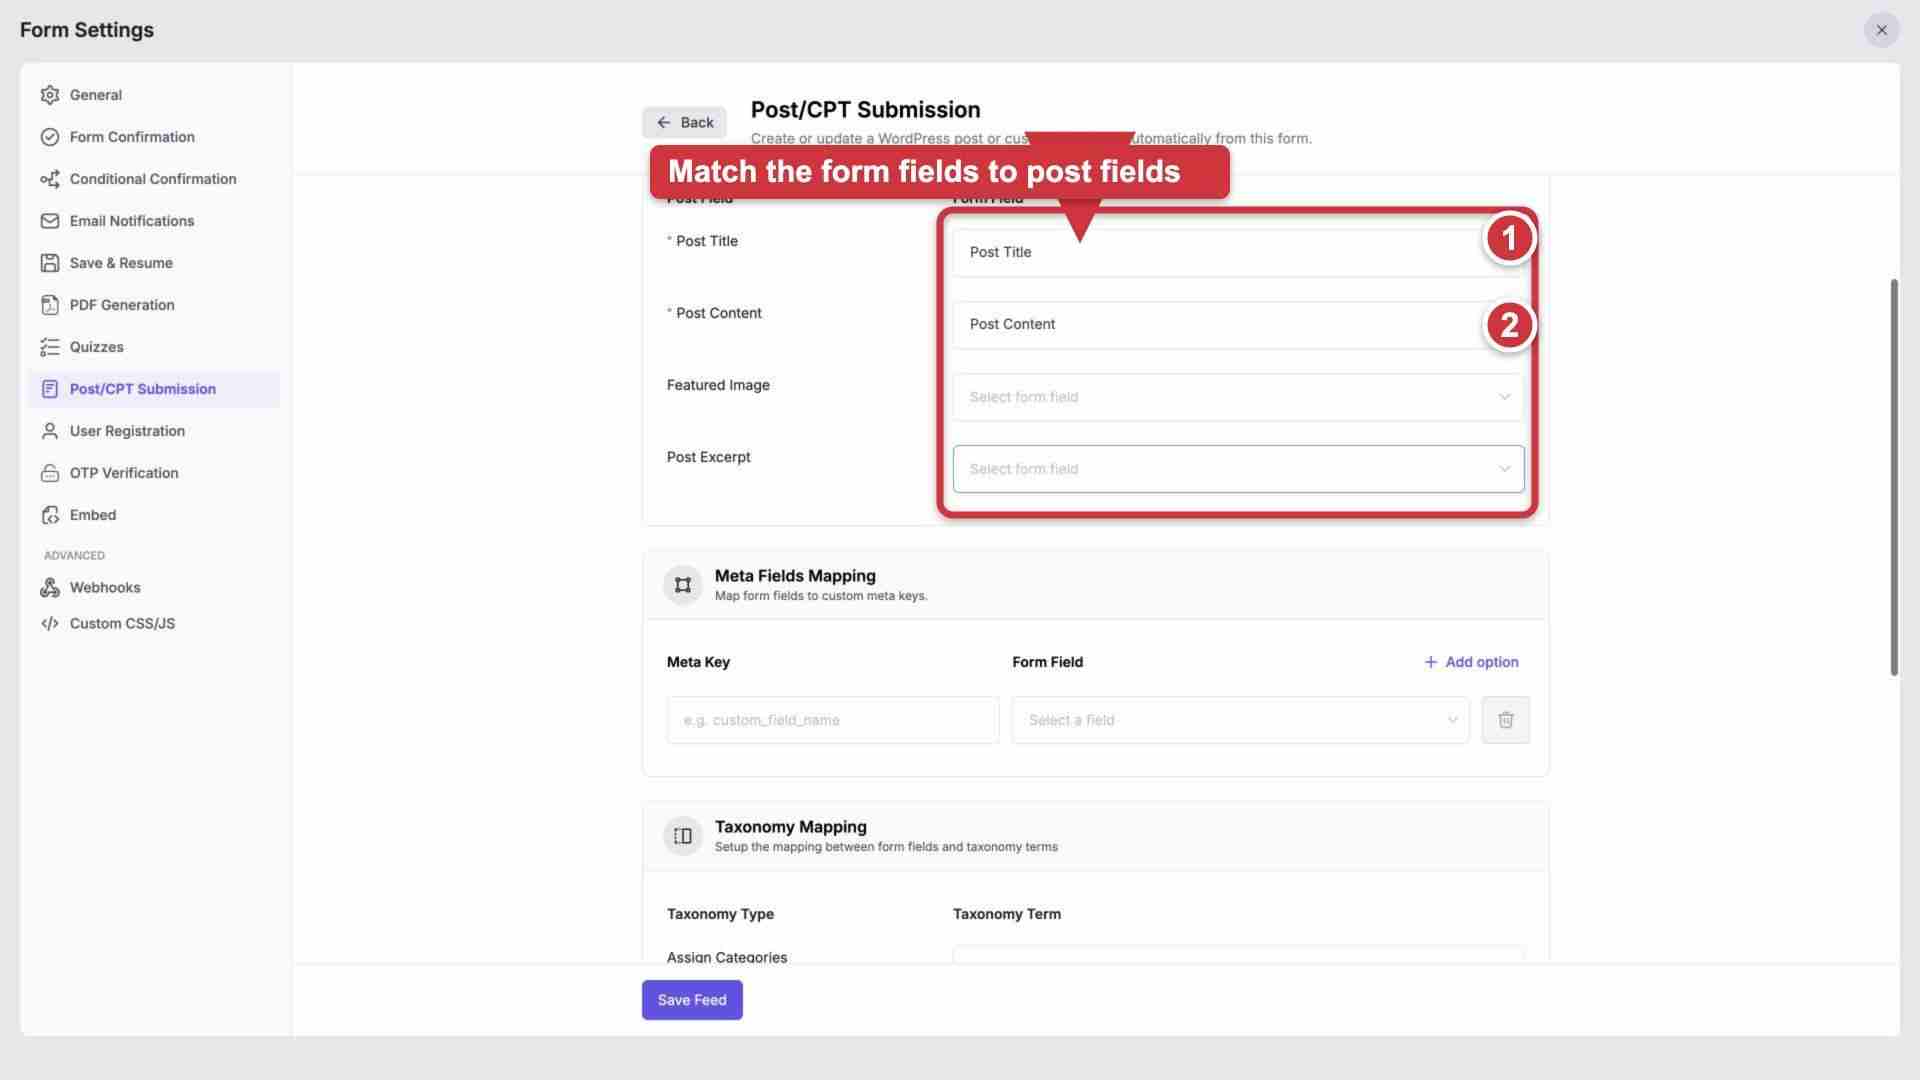
Open Field Mapping and use these settings:
| WordPress field | Form field |
| Post Title | Post Title |
| Post Content | Post Content |
| Post Excerpt | Excerpt field, if you added one |
| Featured Image | File Upload field, if you added one |
The first two mappings are required for this guide. The other two are optional.
Think of mapping as a destination rule. The label visible to the visitor can be friendly, but the destination must match the type of content:
- A short text field belongs in Post Title.
- The main multi-line response belongs in Post Content.
- A short summary can go to Post Excerpt.
- A suitable single image upload can be proposed for Featured Image.
After changing a field name or replacing a field, open the feed again. Confirm that every mapping still points to the intended field before accepting new submissions.
You can use Meta Fields Mapping for extra post data. Add the WordPress meta key, then choose the matching form field. Check that your theme or plugin can read that meta key. Saving a value does not automatically display it on the website.
Step 7: Choose a category or tag
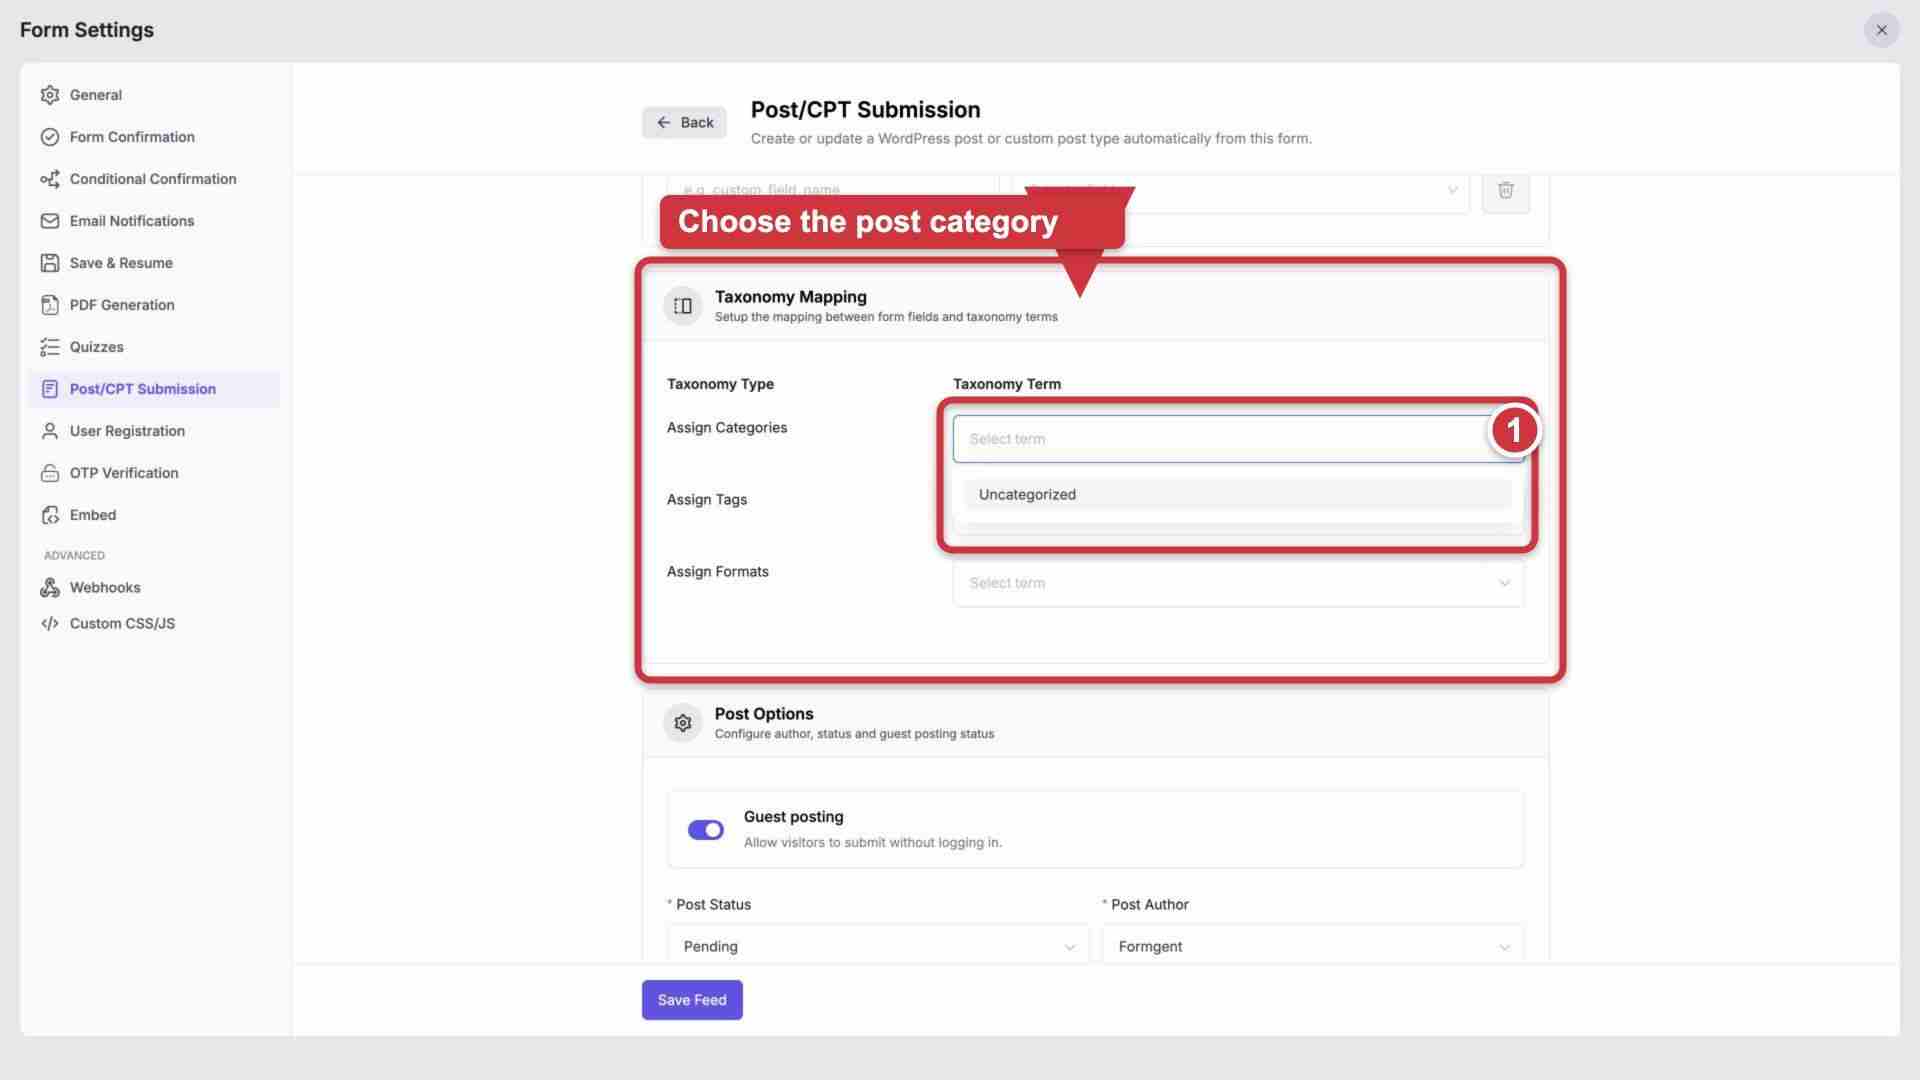
FormGent can assign existing categories, tags, and post formats to the new post.
Choose a term that fits every submission from this form. For example, a form for local news could assign every post to a Community News category.
This setting uses terms that already exist in WordPress. Do not expect visitors to create new categories from this section.
Use a fixed term only when it is correct for every submission from this form. If writers submit many unrelated topics, let an editor choose the final category during review instead of assigning an inaccurate category automatically.
Step 8: Set guest access, status, and author
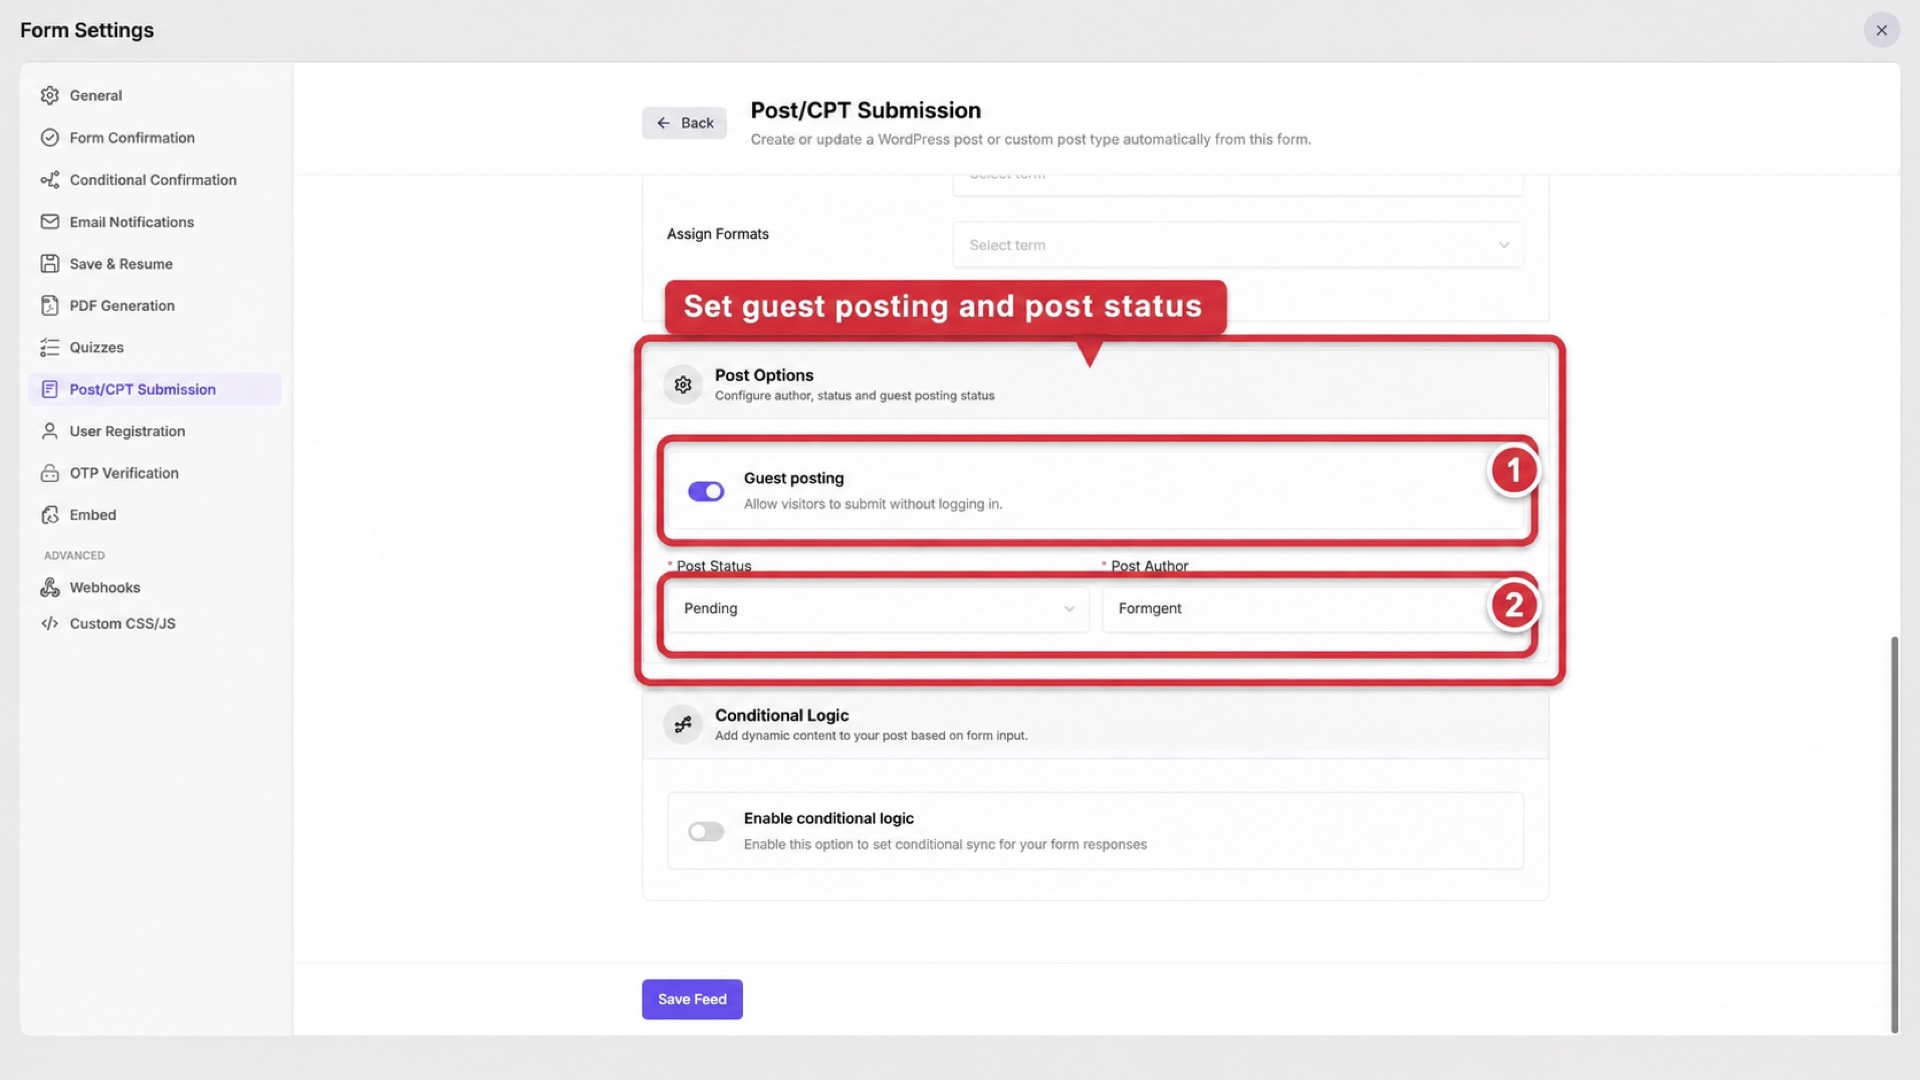
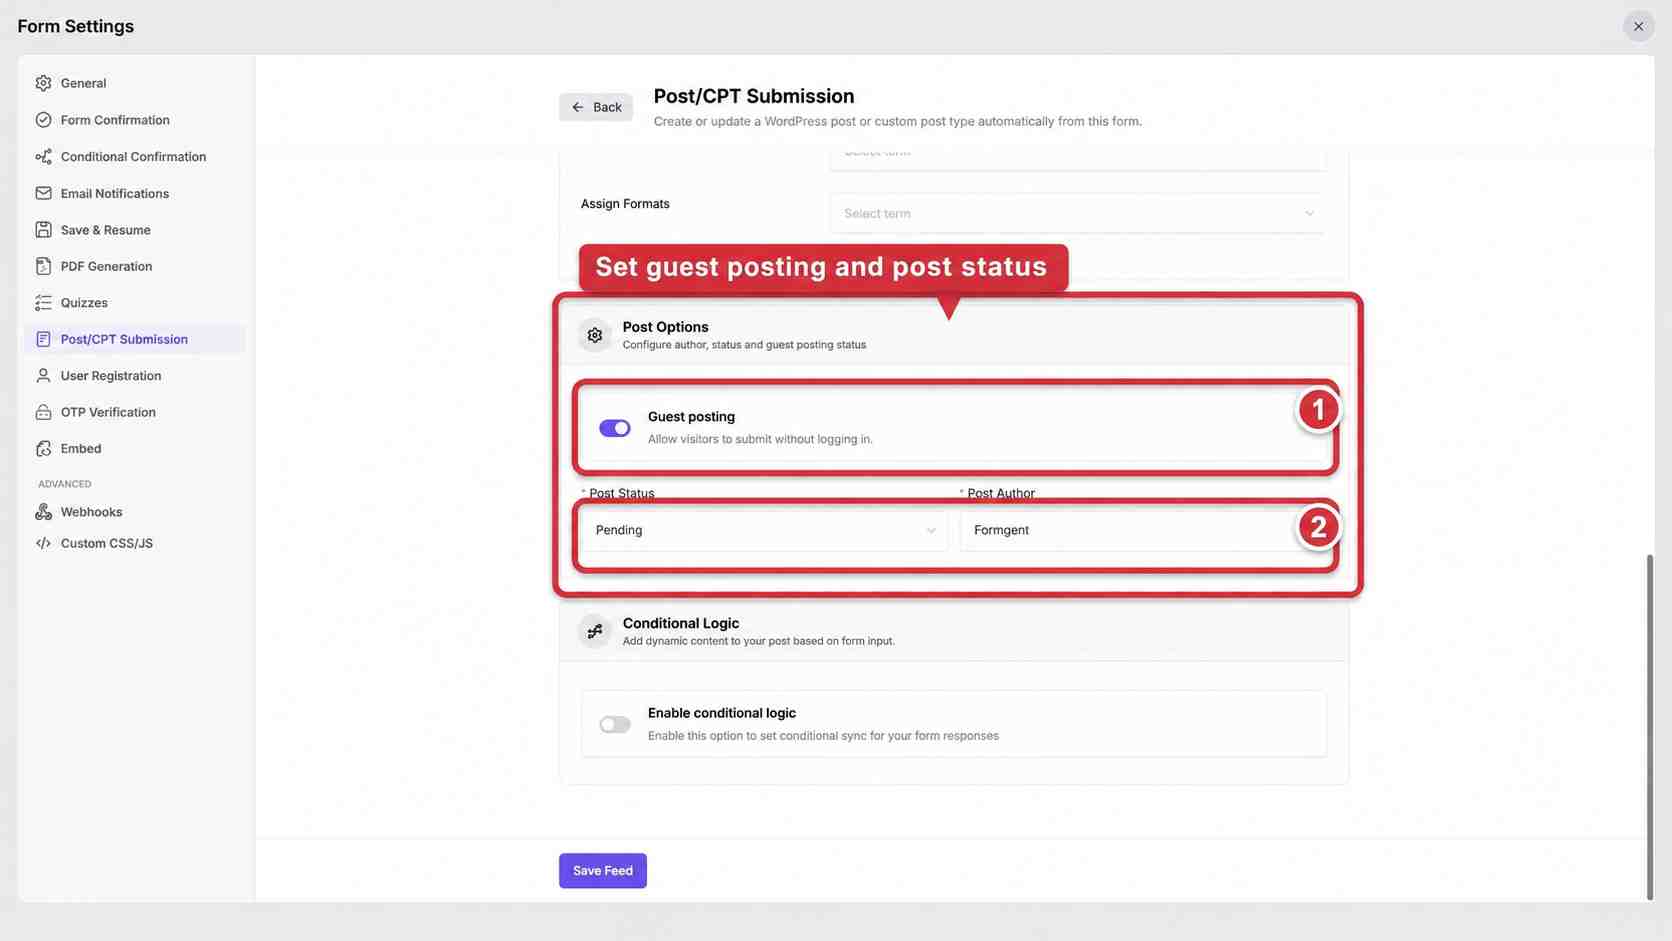
Open Post Options and set:
- Guest posting: Turn it on if people can submit without an account.
- Post Status: Choose Pending.
- Post Author: Choose a user account managed by your team.
For public submissions, keep Guest posting on. If it is off, FormGent may save a logged-out visitor’s entry without creating the WordPress post. If your form is for members only, tell visitors to sign in before they start.
Choose a site-controlled account as the post author unless each contributor already has a suitable WordPress account. The name entered in a Contributor Name field does not automatically become a WordPress user or post author.
WordPress user roles control who can edit and publish the new posts. Use the WordPress roles and capabilities guide when you give access to editors.
Step 9: Save the feed and place the form on a page
This part has several small actions. Follow them in order so you do not publish a page with the wrong form.
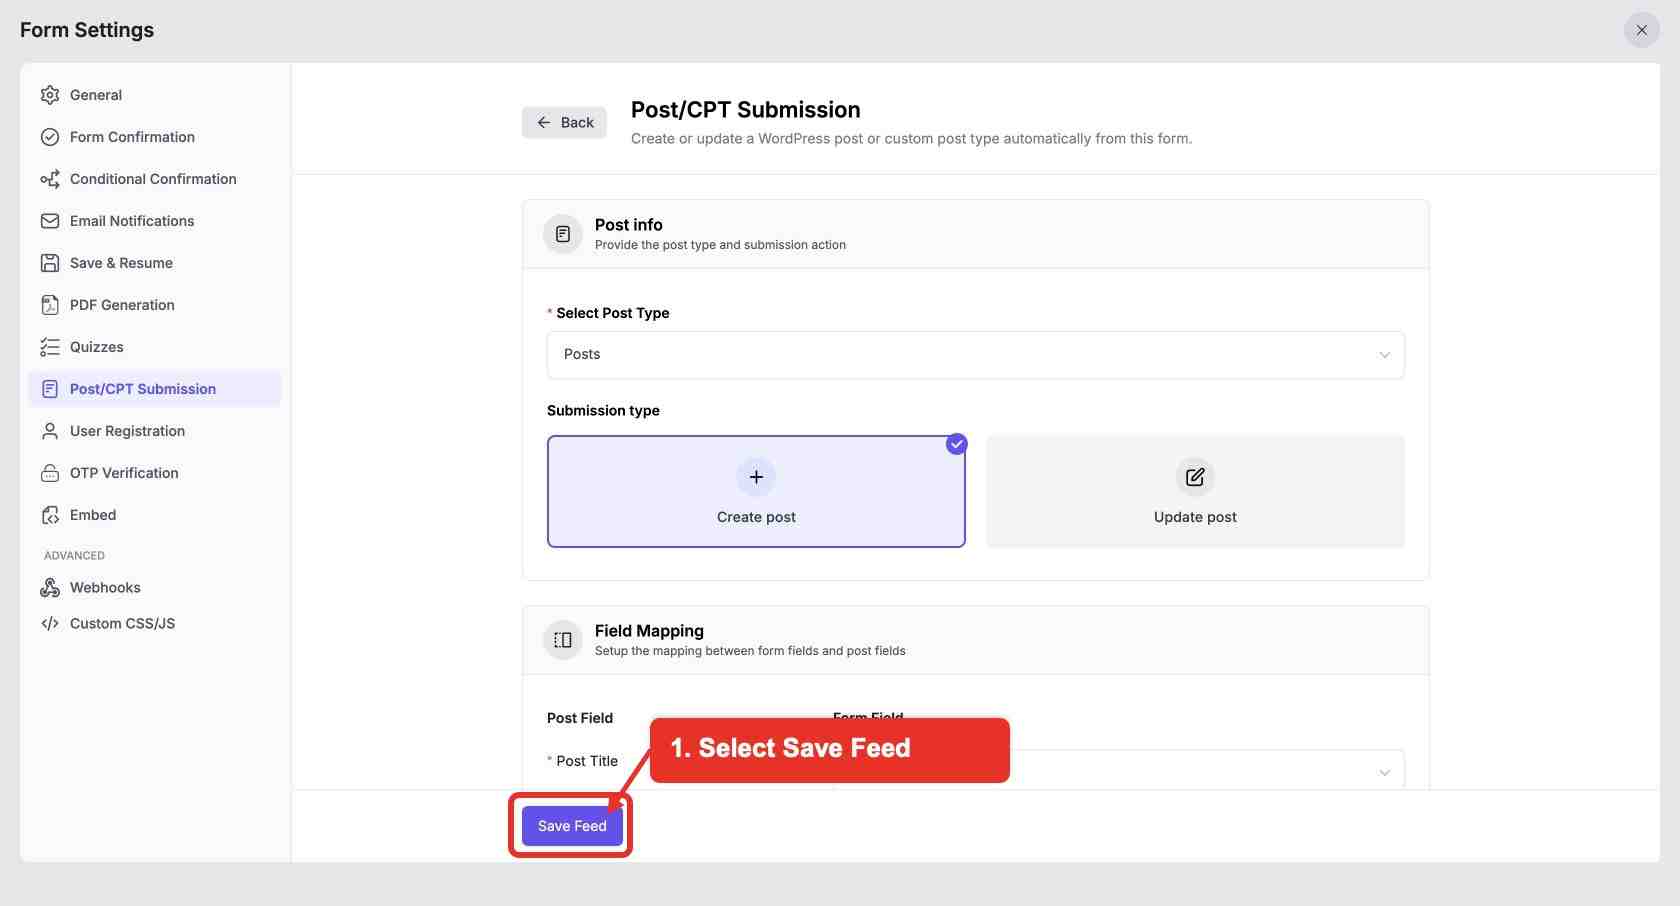
9.1 Save the post feed
- Review the post type, submission type, field mappings, guest access, post status, and post author.
- Select Save Feed at the bottom of the settings screen.
- Wait for the save confirmation before you close the settings.
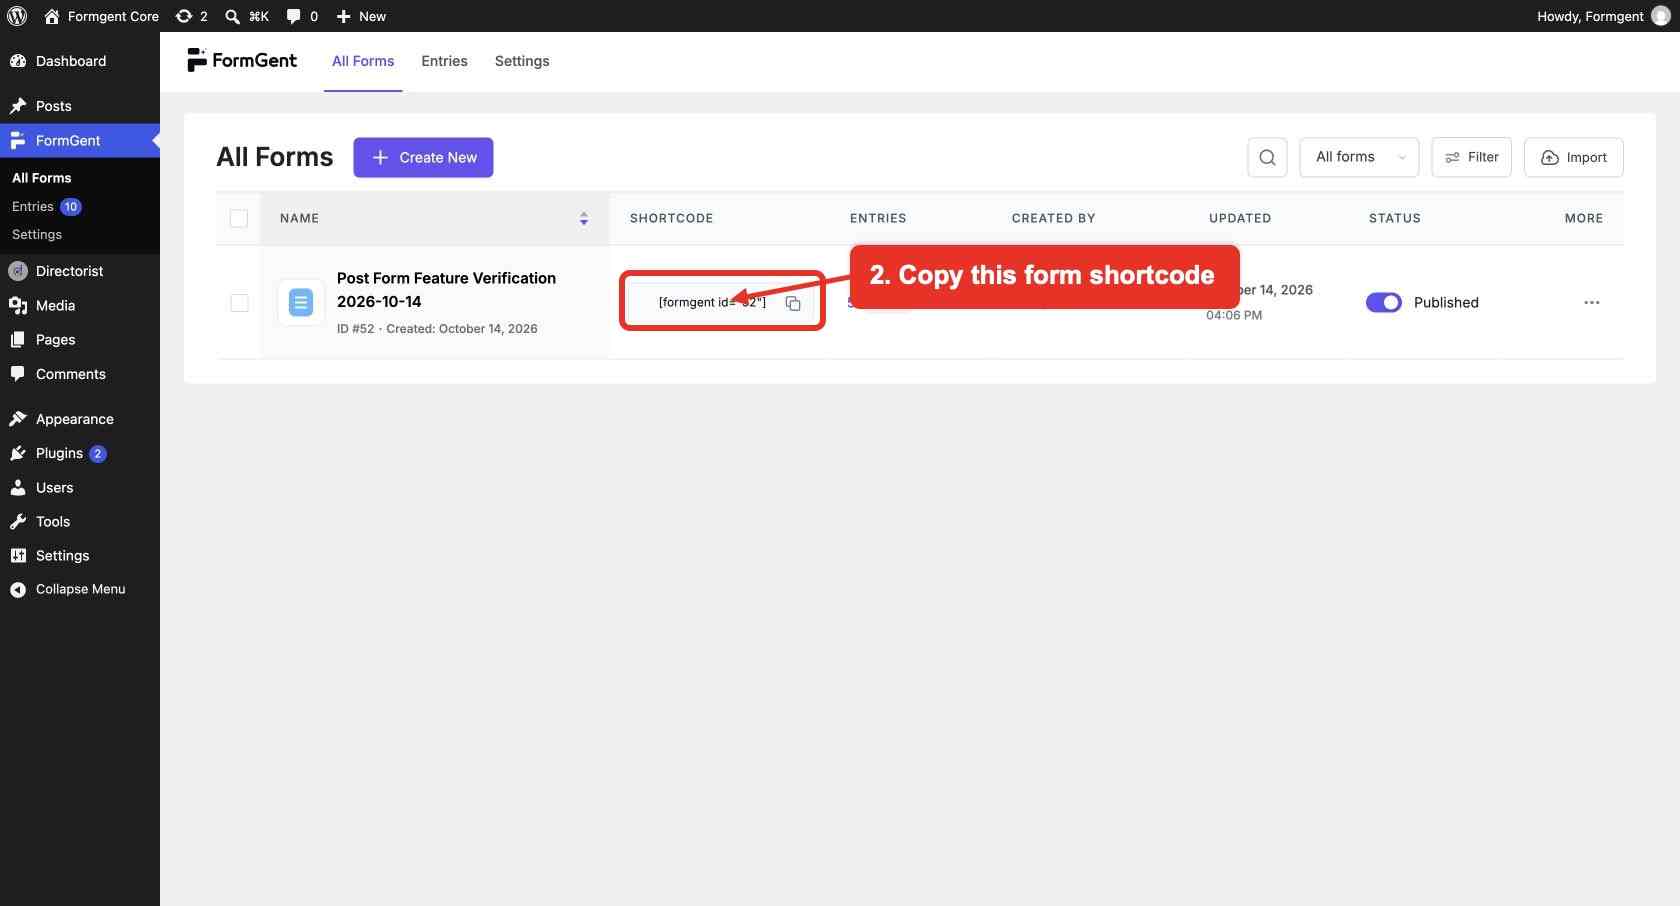
9.2 Copy the shortcode for this form
- Go to FormGent → All Forms.
- Find the form you configured.
- Copy the value in the Shortcode column.
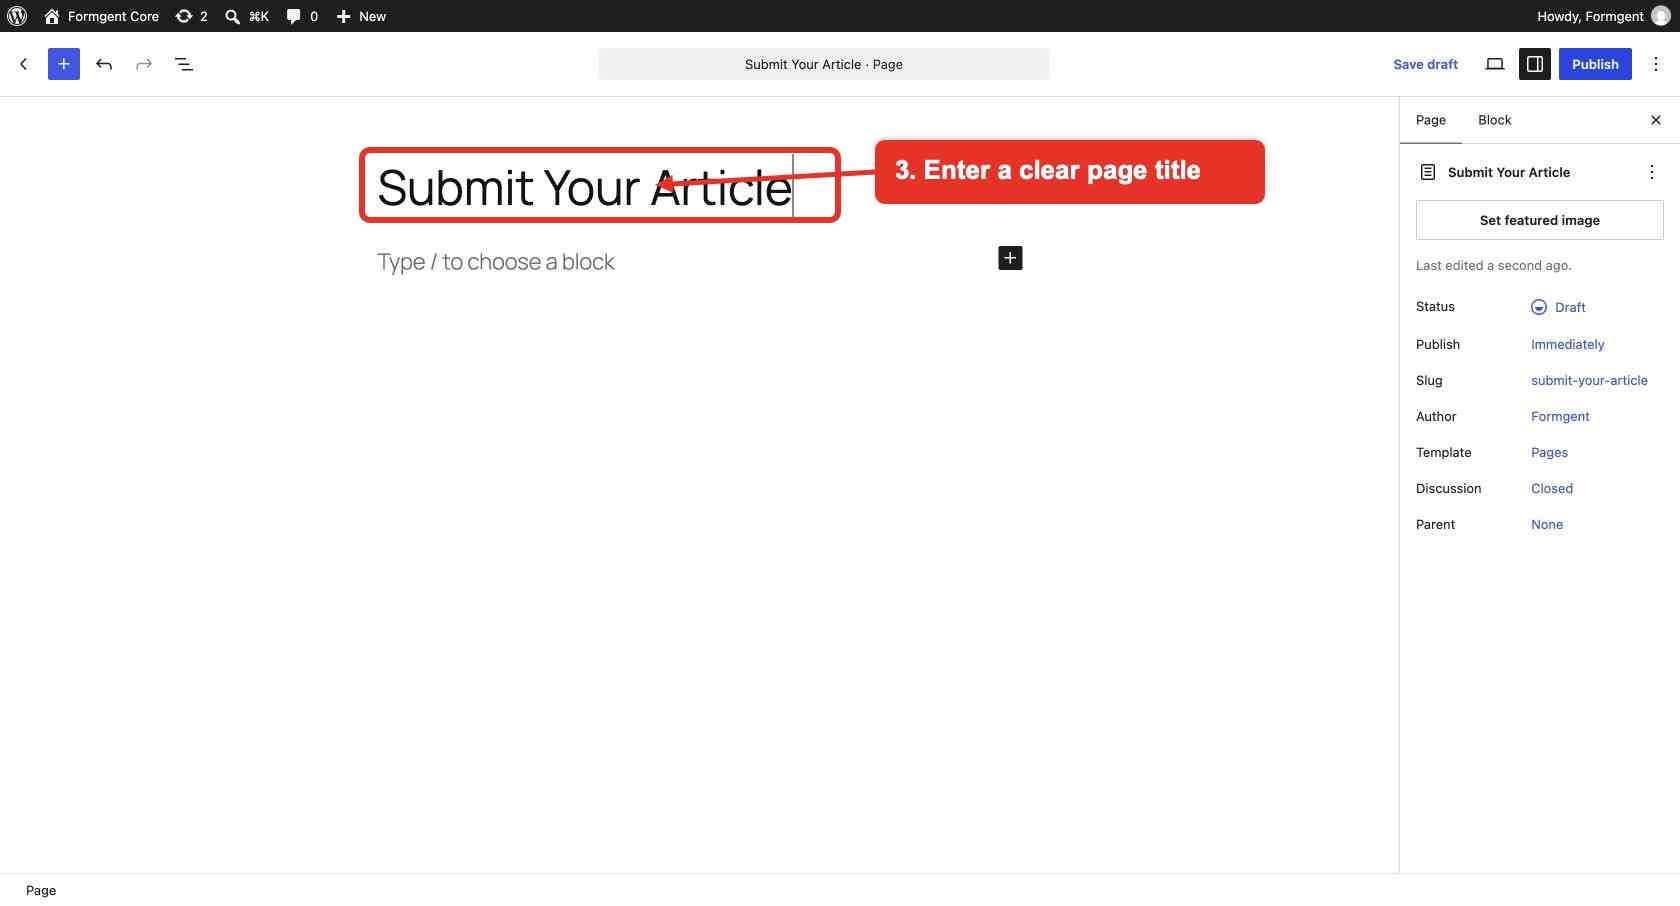
9.3 Create the page
- In WordPress, go to Pages → Add Page.
- Enter a clear title, such as Submit Your Article.
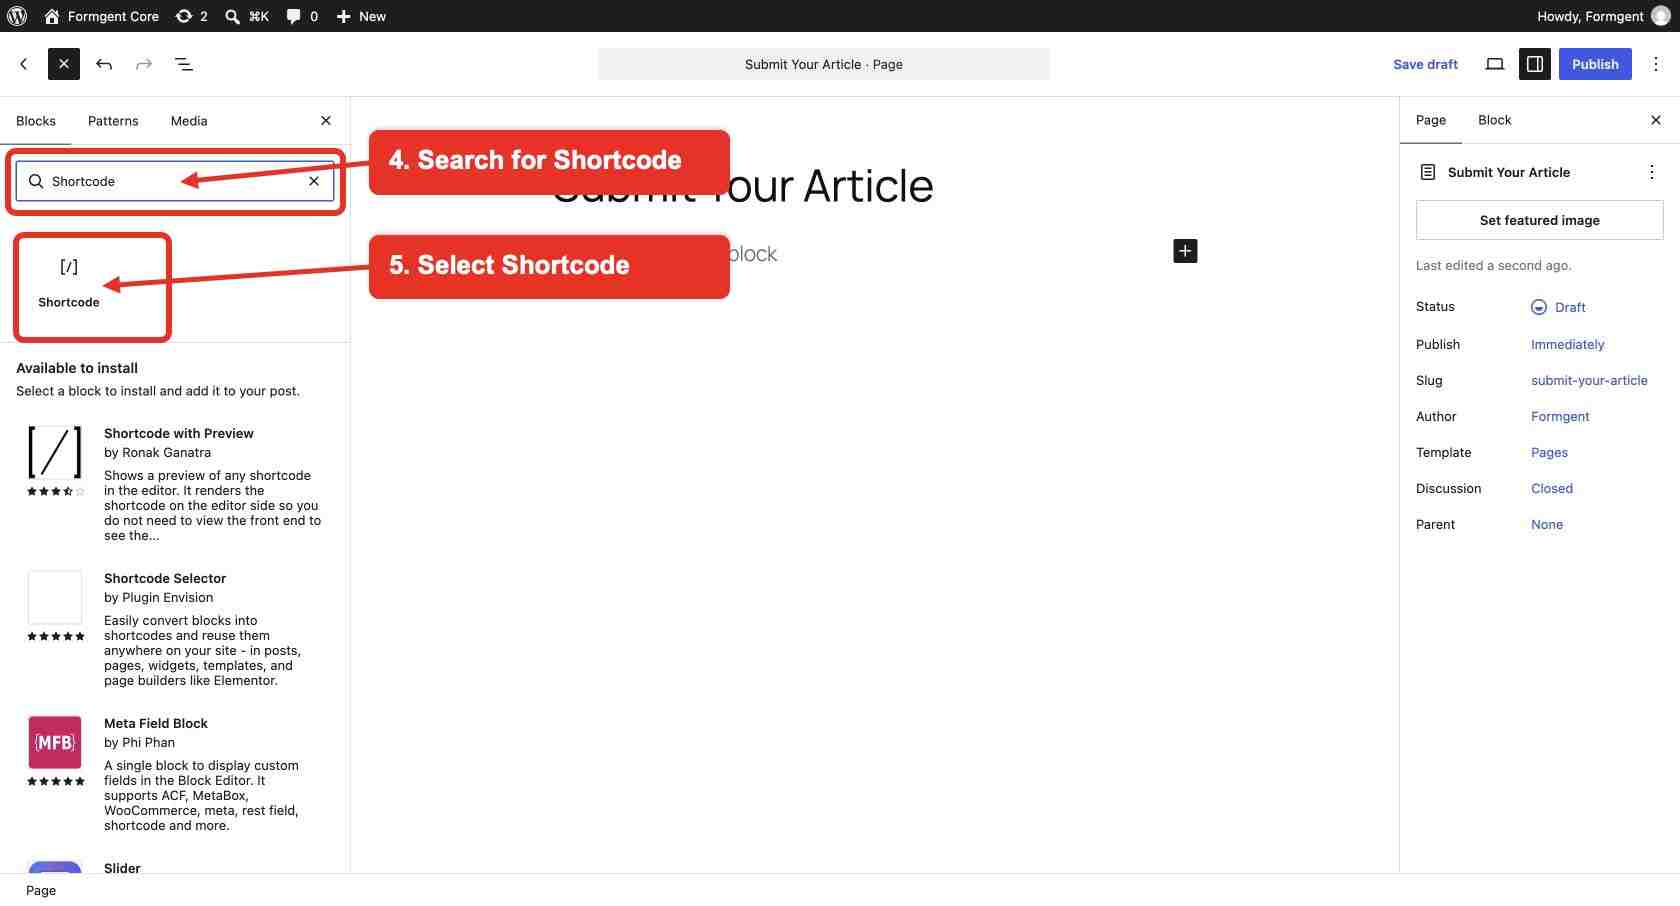
9.4 Add a Shortcode block
- Select the + block inserter in the top-left corner.
- Type Shortcode in the search box.
- Select the Shortcode block from the search result.
Choose the standard block named Shortcode. You do not need to install any of the blocks listed under Available to install.
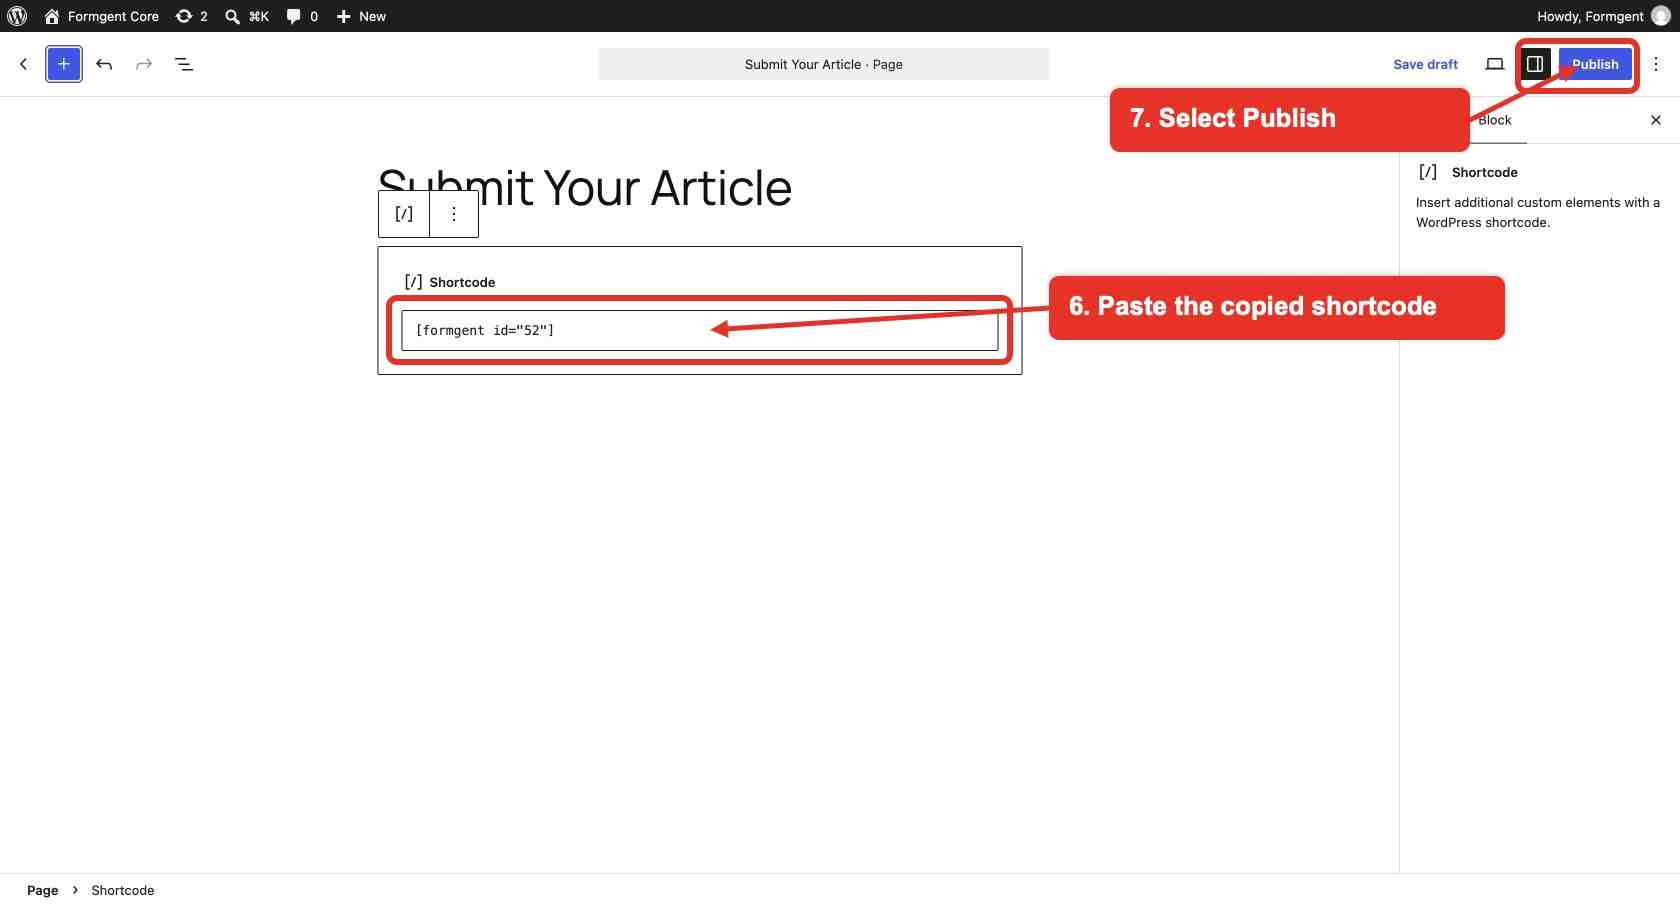
9.5 Paste the FormGent shortcode
- Select the shortcode input box.
- Paste the shortcode you copied from FormGent → All Forms.
- Check that the shortcode includes formgent, the correct form ID, and both square brackets.
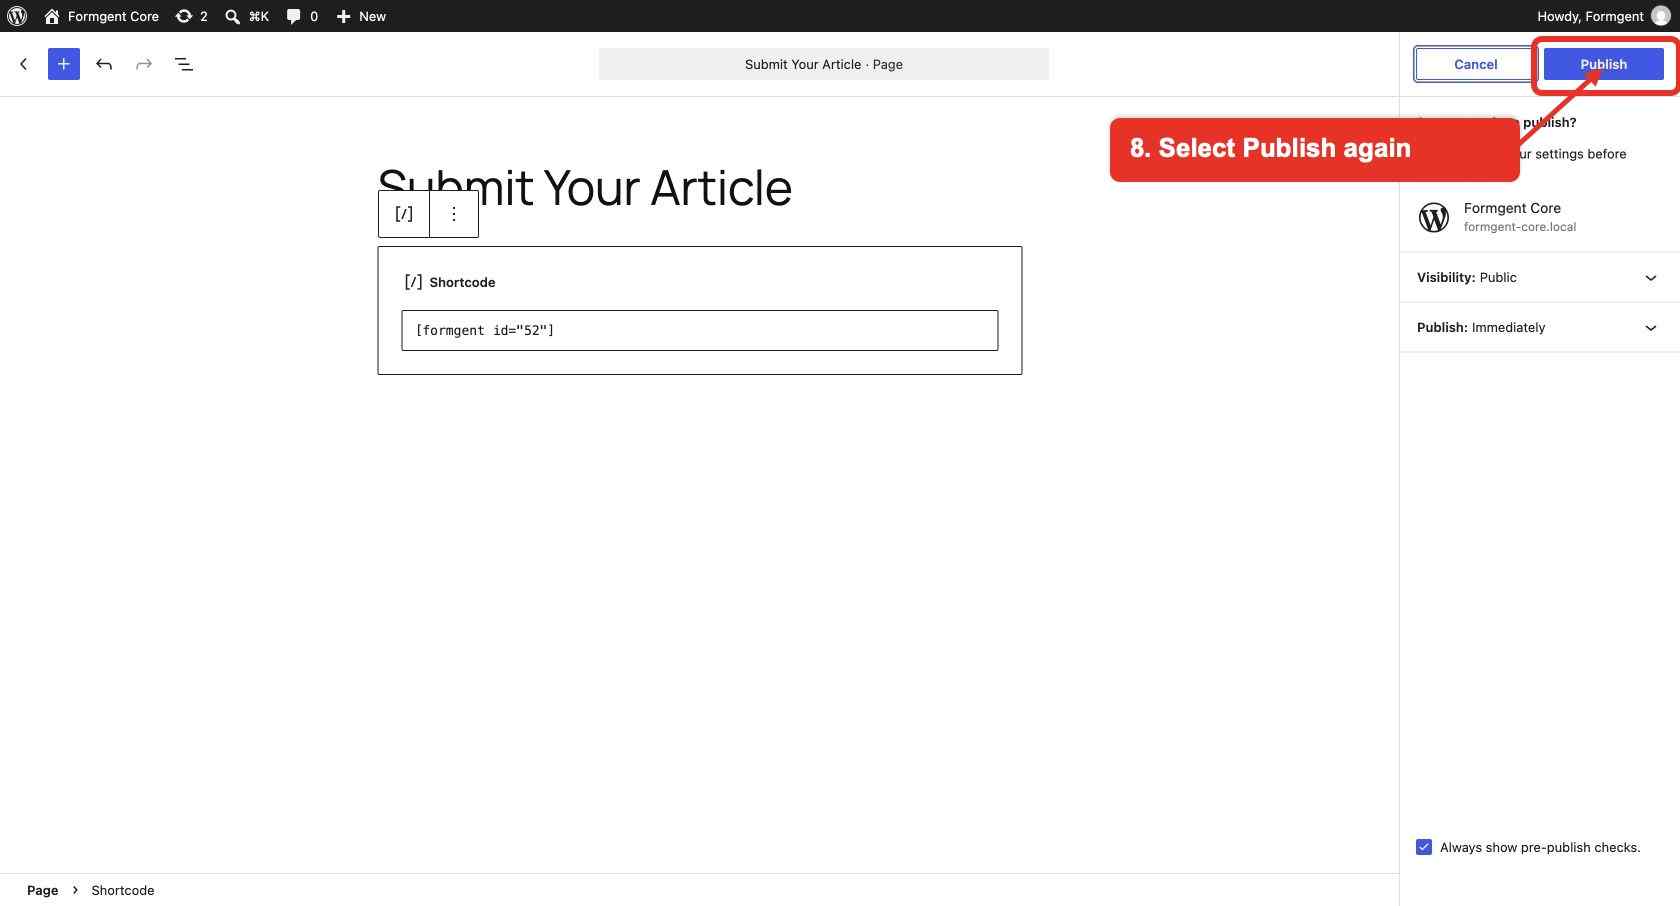
- Select Publish in the top-right corner.
9.6 Confirm the page settings and publish
- Check that Visibility is set to Public if everyone should be able to open the form.
- Check that the page will publish immediately, or choose the date you want.
- Select Publish again.
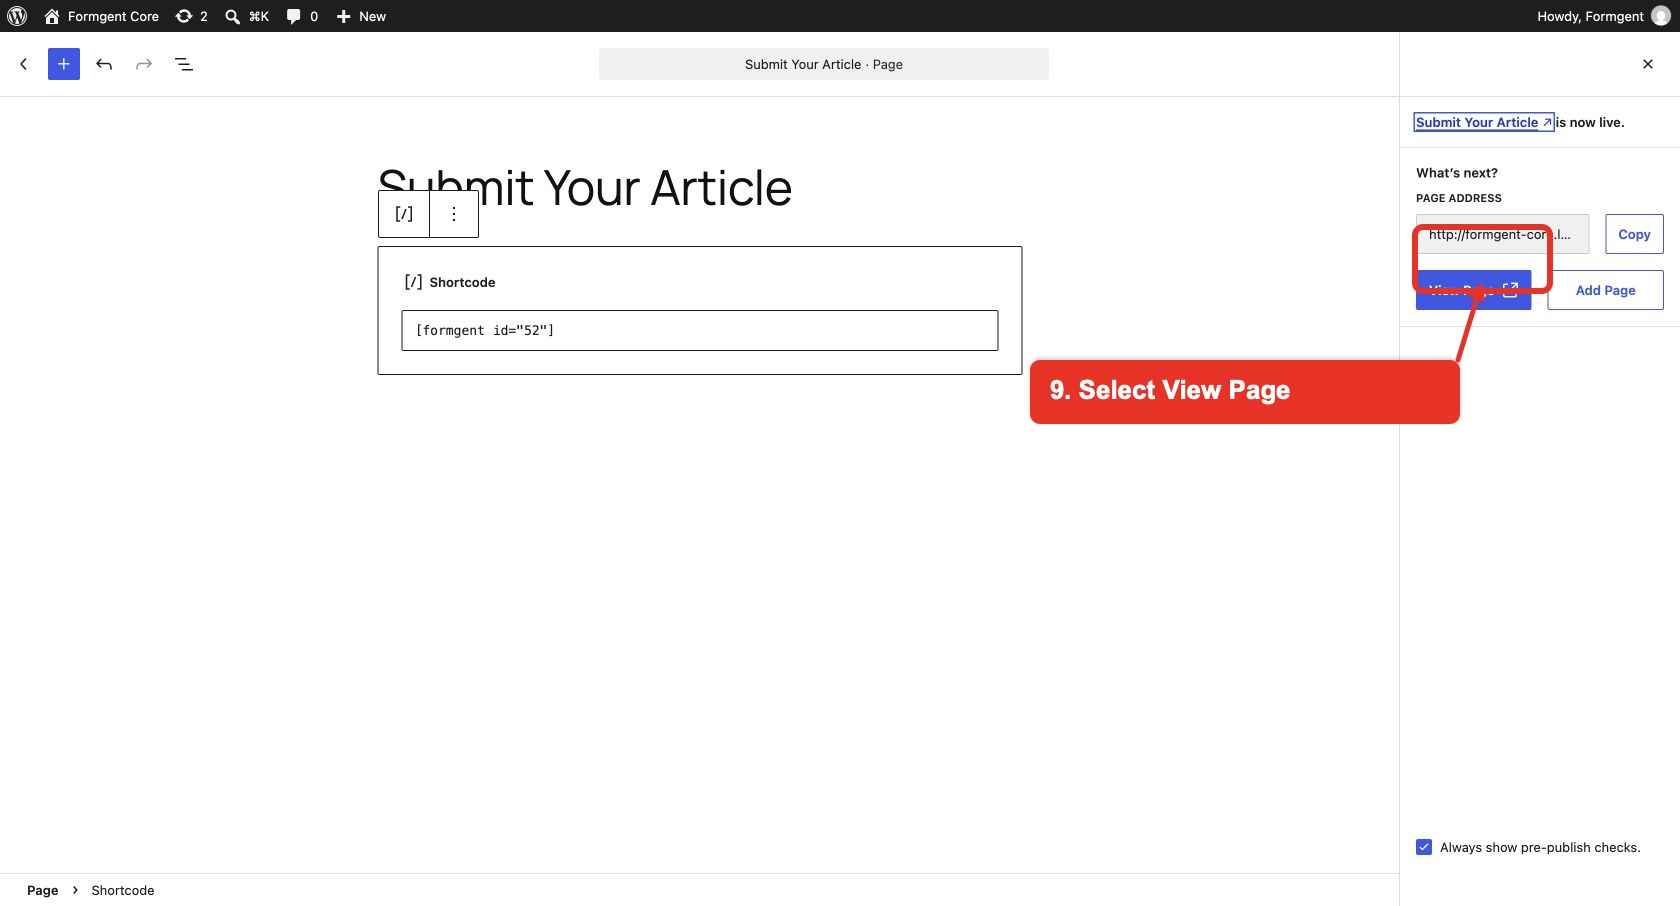
9.7 Open the published page
When WordPress confirms that the page is live, select View Page.
9.8 Check the form as a visitor
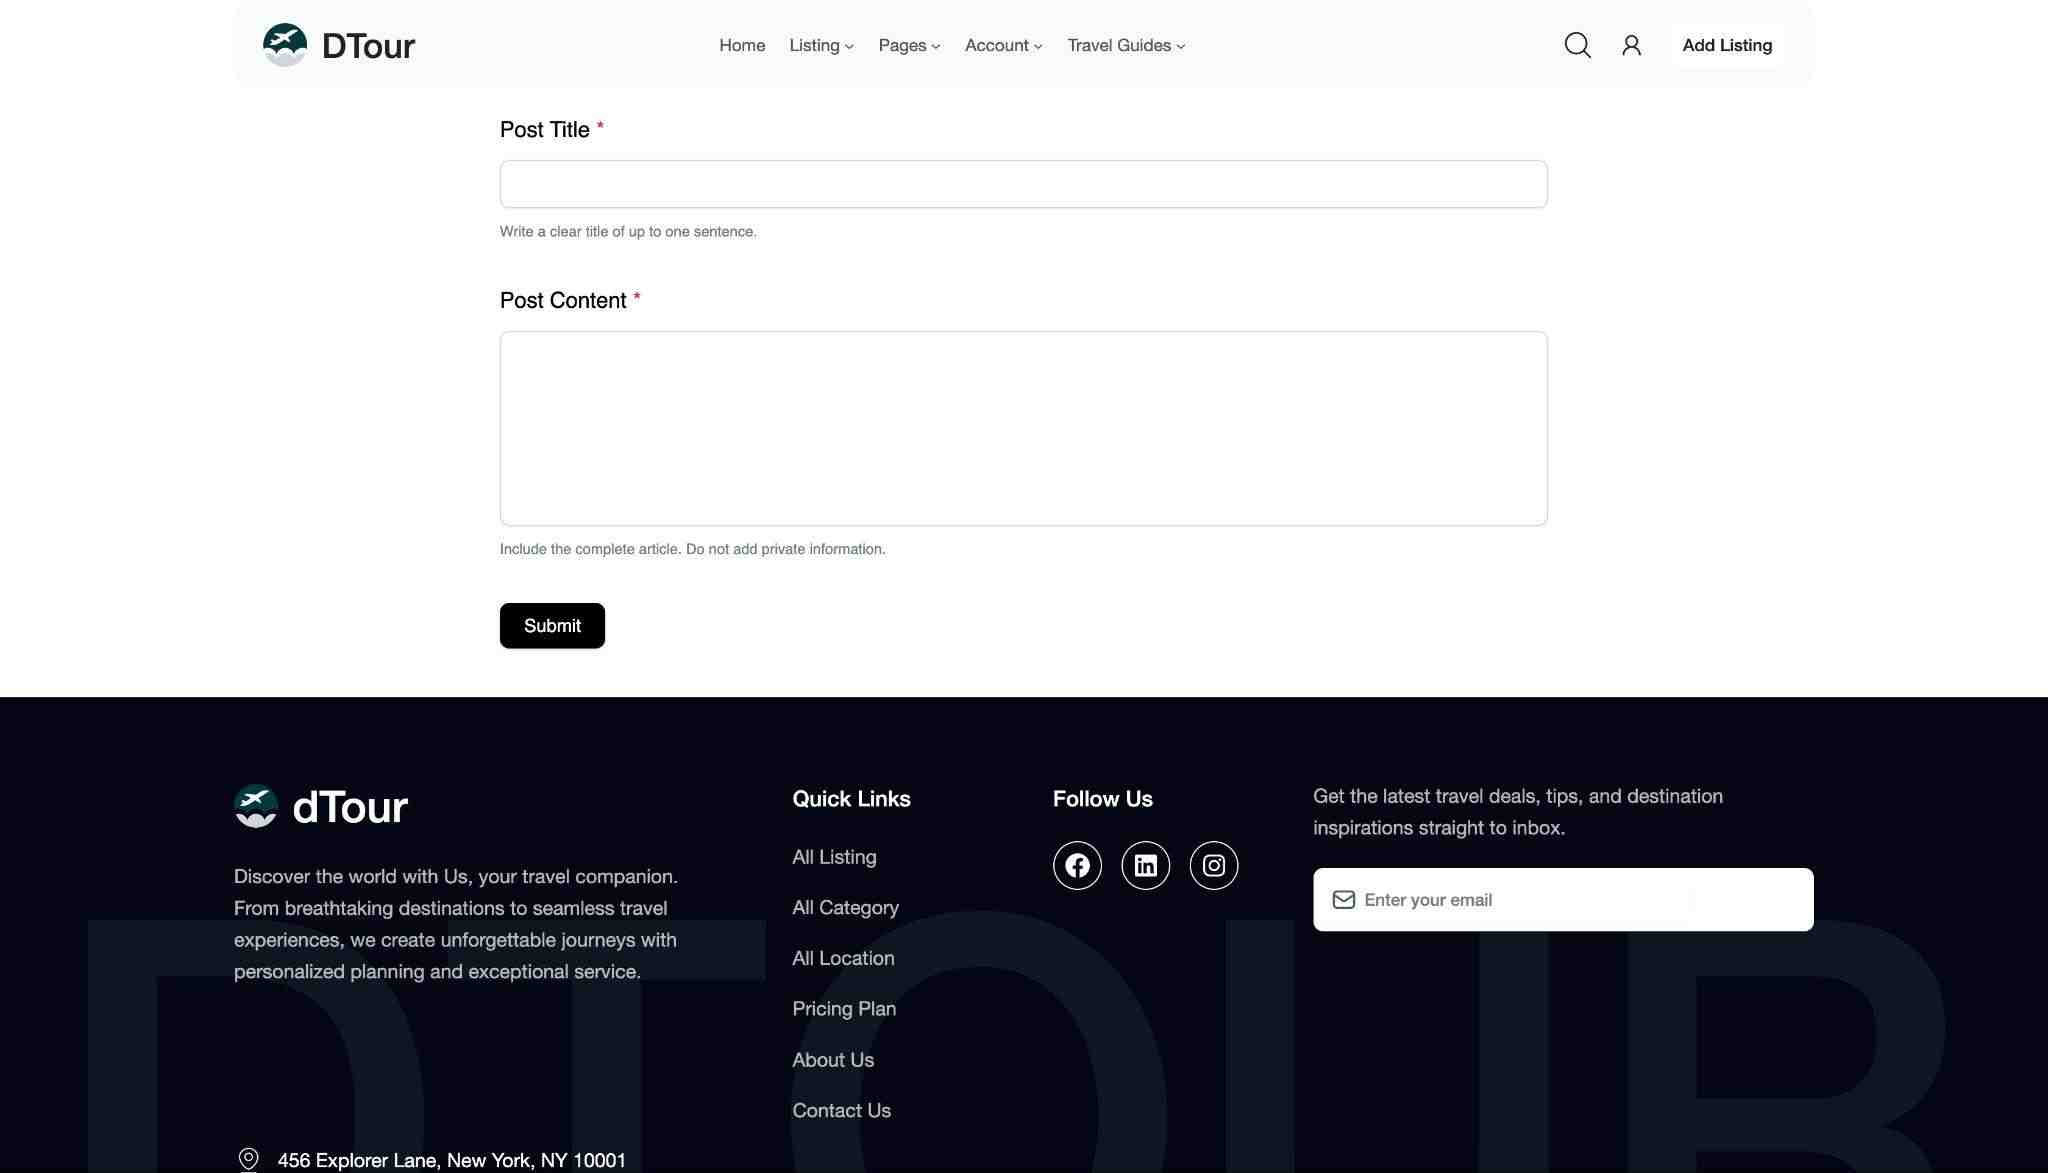
- Confirm that the page title, form fields, and Submit button are visible.
- Open the same page in a private or incognito window.
- Check the form again while logged out.
If the form does not appear, return to the page editor and compare the shortcode with the one shown in FormGent → All Forms. Also confirm that the form is published.
Add a short note above the form. Tell writers what you accept and what happens after they submit. If your team needs email alerts, set up a FormGent email notification and send a separate test email.
Your note can cover:
- accepted topics;
- content and image rules;
- whether submissions are edited;
- whether every submission will be published;
- the expected review time;
- how you use the contributor’s contact details.
Use a confirmation message that explains the next step. For example: “Thanks. Your article was received and will be reviewed before publication.” Avoid promising publication.
Test the full workflow
A form can accept an entry even when the post feed does not create a post. Test the complete process before you invite writers.
- Open the page while logged out.
- Enter a unique title, such as Submission Test – YYYY-MM-DD – 01.
- Add a short piece of test content.
- Complete any other required fields.
- Submit the form.
- Check for the success message.
- Open FormGent → Entries.
- Confirm that the entry is Completed.
- Open Posts → All Posts.
- Check the new post’s title, content, author, category, and status.
Use a new title for every test. A unique title prevents you from opening an older post and mistaking it for the latest result.
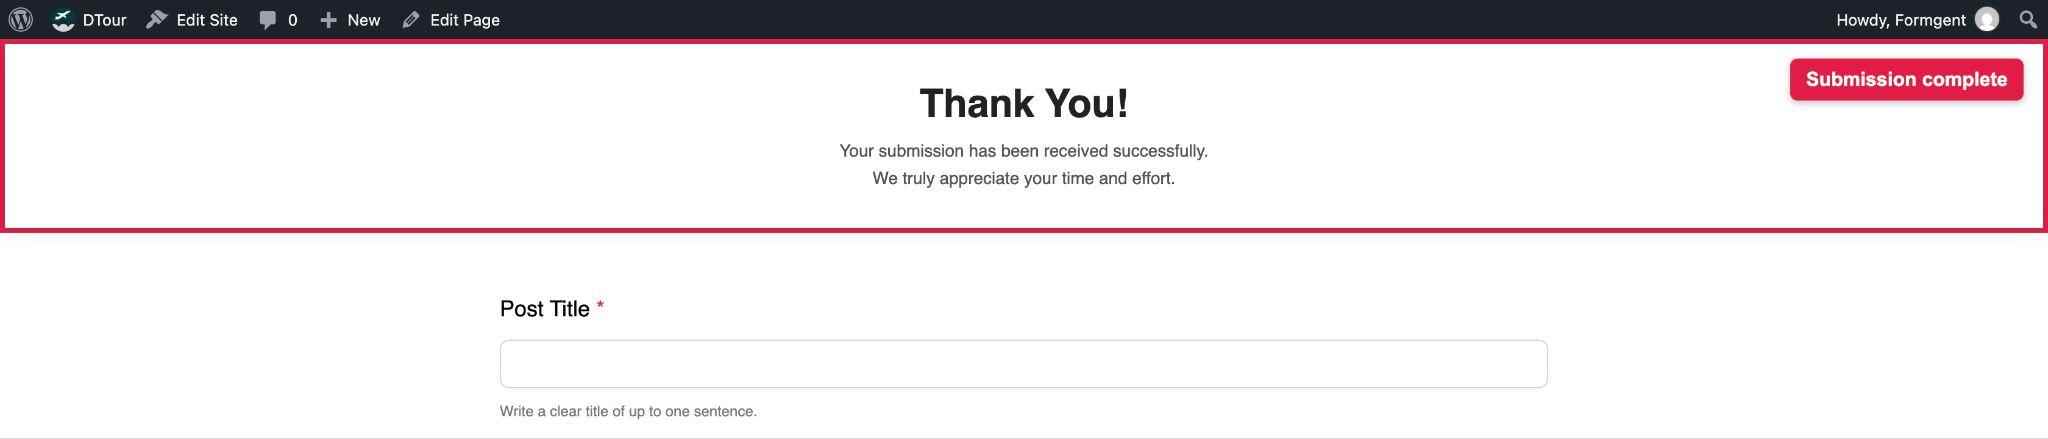
The message confirms Stage 1. Continue to the entry and post checks before you call the test successful.
Check the FormGent entry
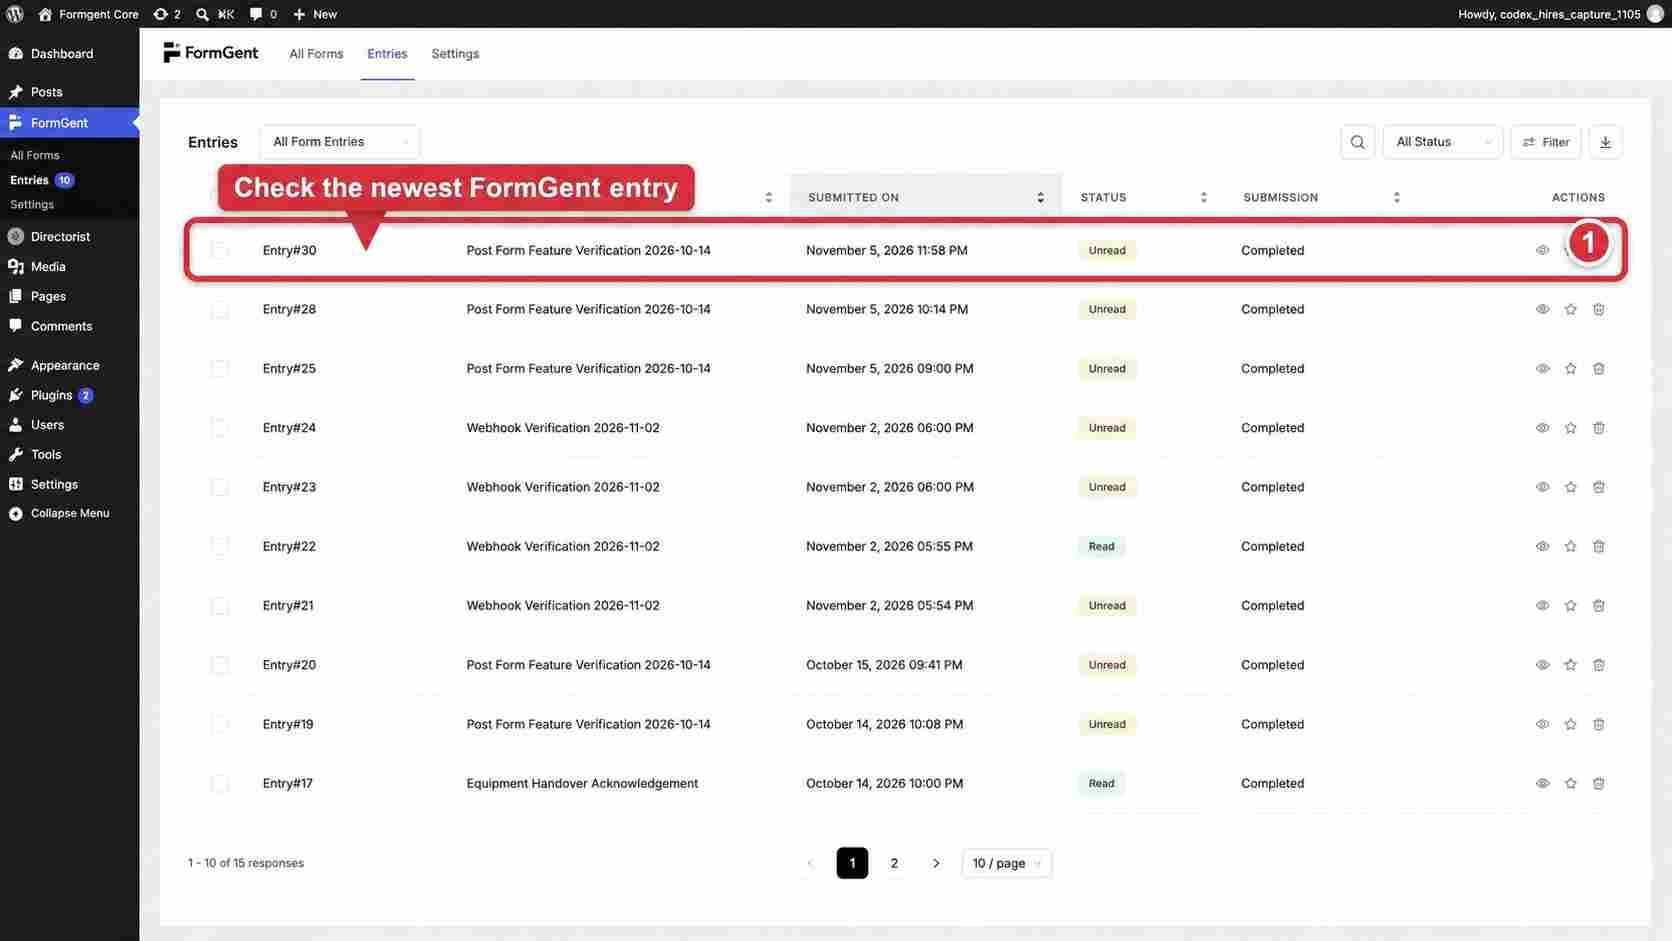
Go to FormGent → Entries. Find the newest response for your form.
Its submission status should be Completed. Open it if you need to compare the saved answers with the WordPress post.
Check the WordPress post
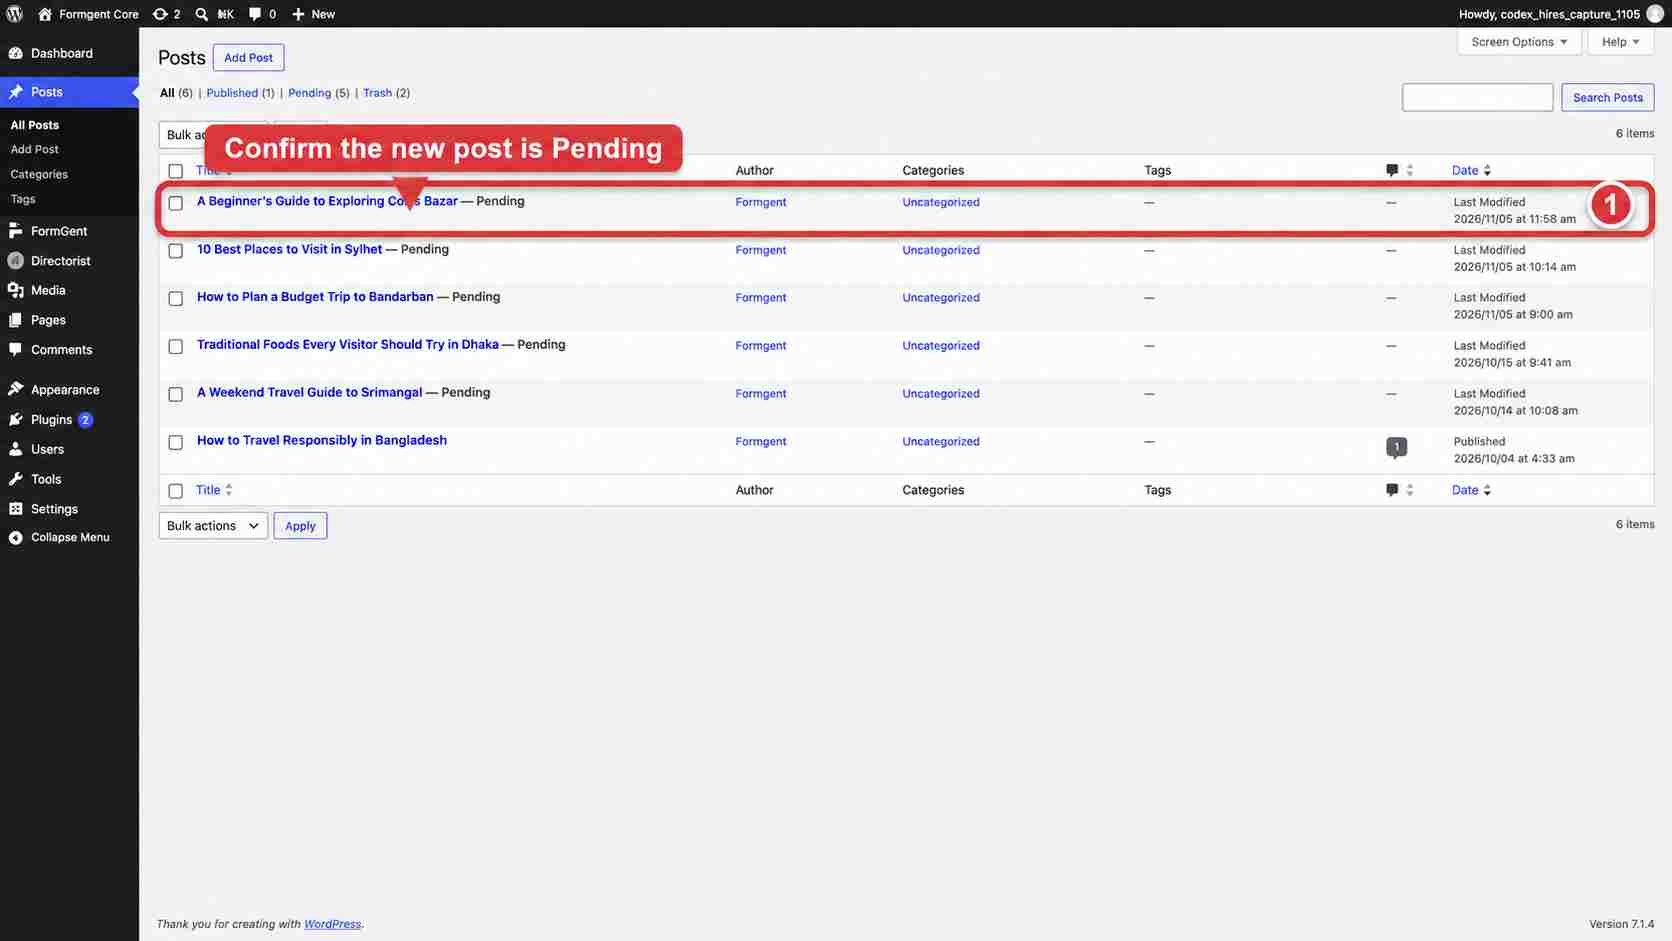
Go to Posts → All Posts. Search for the title you used in the form.
The post should be Pending. Open it and check the mapped content before you publish it.
Run a few more tests
| Test | What should happen |
| Leave the title empty | The form asks for a title |
| Submit while logged out | A post is created when Guest posting is on |
| If you added an image field, upload an allowed image | The upload finishes and the image appears where you mapped it |
| If you added an image field, upload a blocked or large file | The form rejects the file |
| Submit twice | FormGent creates two entries and two posts |
| Turn off the feed | FormGent may save the entry, but it does not create a post |
| Change the status to Draft | The next post is saved as Draft |
Record the result of each test. For a team site, a simple launch sheet with the test date, tester, expected result, actual result, entry ID, and post ID makes later troubleshooting much easier.
Use this release test record
| Test detail | Value to record |
| Test date and tester | Who ran the check and when |
| Browser state | Logged out or logged in |
| Unique submission title | The exact title used in the form |
| Form result | Success or validation error |
| Entry result | Entry ID and status |
| Post result | Post ID and status |
| Mapping result | Title, content, author, taxonomy, and image checked |
| Notification result | Email received or not received, if configured |
Keep this record when you change the form, feed, plugin versions, theme, post type, or server settings. These changes can affect different parts of the workflow.
What happens after someone submits?
The process has four simple parts:
- FormGent saves the form response.
- The active feed creates the WordPress post.
- An editor checks the post.
- The editor publishes, edits, or rejects it.
The FormGent entry and WordPress post are separate records. The entry keeps the original response. The post is the working copy that your editor prepares for publication. Make editorial changes in the WordPress post.
You can use FormGent’s single-entry view to read the original response.
Give editors a repeatable review process
A generated post is a starting point, not a publishing decision. Before publishing, an editor should check:
- whether the submission fits the site’s topic and rules;
- the title, structure, spelling, and links;
- personal or confidential information;
- image quality, permission, and alternative text;
- the assigned author, category, tags, and featured image;
- plagiarism or copied material when the risk is relevant;
- the final permalink and publication status.
If the post should not be published, decide whether your team will delete it, keep it as a private editorial record, or contact the contributor. Apply the same policy consistently.
Decide which record your team edits
Use the FormGent entry as the original submission record. Use the WordPress post as the editorial working copy.
Editing the FormGent entry should not be treated as a way to update the generated post. If an editor changes the article, make that change in the WordPress post.
Add an editor notification carefully
An email notification can alert the editorial team when a form is submitted. Send the message to a shared editorial address when more than one person manages the queue.
Test the notification separately from post creation. A post can be created even if WordPress email delivery has a problem, and an email alone does not prove that the post exists.
Useful ways to extend the basic form
Start with the verified title-and-content setup. Add one feature at a time, then submit another test.
| Extension | When it helps | What to check |
| Post Excerpt | Editors need a proposed summary | Confirm the excerpt appears in the correct WordPress field |
| Featured Image | Contributors may propose one main image | Restrict file types and size; confirm the upload and featured-image result |
| Fixed category or tag | Every response belongs to the same topic | Use an existing term and confirm it appears on the post |
| Meta field | A theme or plugin reads a specific custom value | Confirm the exact meta key and how the site displays it |
| Conditional feed | Only some responses should create posts | Test one response that should run and one that should not |
| Custom post type | The form creates events, listings, or another public content type | Confirm the post type appears in the selector and test its fields and taxonomies |
Optional controls can depend on the selected post type, theme, plugin, and field configuration. Do not add several advanced mappings at once. A one-change, one-test approach makes failures easier to find.
Examples beyond guest articles
The same structure can support other editorial workflows:
| Use case | Suggested fields | Editorial result |
| Community news | Headline, story, location, contact email | Pending post for a local editor |
| Customer story | Title, story, company, permission agreement | Pending testimonial or story post |
| Event proposal | Event name, description, date, organizer email | Pending event post when a suitable public post type is available |
| Resource submission | Resource name, description, source URL | Pending resource post for link and quality review |
These examples still need their own field mappings and tests. A custom post type must be public and available through the WordPress REST API to appear in FormGent’s post-type list.
Keep a public submission form safe
Review every post
Do not publish public submissions automatically unless your workflow has another strong review system. Pending status gives an editor time to check the content.
Review links as well as text. A harmless-looking article can contain promotional, misleading, or unsafe destinations.
Limit image uploads
If you accept images, allow only the file types you need. Set a sensible file size limit.
FormGent checks the allowed file type and the limit set in the field. The WordPress server upload limit still applies. See the FormGent file upload guide for more details.
Ask for one proposed featured image unless the article truly needs several files. Fewer uploads make permissions, review, storage, and moderation easier to manage.
Add spam protection
Turn on honeypot protection. You can also use Google reCAPTCHA, hCaptcha, or Cloudflare Turnstile from FormGent’s Security and Protection settings.
Spam tools can block many automated submissions. An editor still needs to check submissions from real people.
Do not rely on CAPTCHA alone. Required fields, clear topic rules, Pending status, limited uploads, and human review protect different parts of the workflow.
Ask about content rights
If people send photos or articles for publication, add a short agreement. Ask them to confirm that they have permission to share the content.
The wording should match your publishing process. Ask a legal professional for help if you need terms for a specific country or type of content.
Give editors only the access they need
Writers do not need dashboard access to use the form. Give editors the smallest WordPress role that allows them to do their work.
Collect less personal information
Ask only for information your team needs. Do not place a contributor’s private email, phone number, or internal note inside a field mapped to public post content.
Explain how contributors can contact you about their submission. Set a retention policy for rejected entries that fits your site’s legal and operational needs.
Prepare for duplicate submissions
A visitor may click twice, reload the page, or resubmit after missing the confirmation message. Before publishing, search Entries and Posts for the title and email address. Keep the strongest record and handle duplicates according to your editorial policy.
Common problems
When something goes wrong, check the workflow in this order:
- No success message: Check the required fields and form validation.
- Success message but no entry: Check the form and entry-storage setup.
- Entry exists but no post: Check the Post/CPT feed, guest setting, mappings, and conditions.
- Post exists but looks wrong: Check the mapped fields, author, status, and taxonomy settings.
This sequence helps you identify the exact stage where the process stopped.
Quick diagnosis table
| What you see | Most likely stage | What to check first |
| Validation error and no success message | Form validation | Required fields, field rules, file type, file size, and CAPTCHA |
| Success message but no visible entry | Entry storage or admin filter | Correct form, Entries filters, response status, and recent submissions |
| Completed entry but no post | Post/CPT feed | Feature availability, feed status, guest option, conditions, post type, and mappings |
| Post exists with missing content | Field mapping | Title, content, excerpt, image, and meta destinations |
| Post cannot be found in the public site | Post status | Pending, Draft, or Private filters in WordPress admin |
| Correct post but no editor email | Notification or mail delivery | Notification settings, recipient, spam folder, and WordPress mail delivery |
FormGent saved the entry, but no post appeared
Check these items:
- The Post/CPT feed is active.
- Post Title and Post Content are mapped.
- Guest posting is on for logged-out visitors.
- A conditional rule is not stopping the feed.
- The selected post type still exists.
- Post/CPT Submission is available in your FormGent setup.
A saved entry shows that FormGent accepted the response. The post feed must also run before WordPress creates the post.
The post has the wrong author or status
Open the feed and check Post Author and Post Status. Save the feed and submit a new test.
The new settings apply to future posts. They do not change older posts.
The post has a generic title
Map Post Title to the correct Single-Line Text field. Make that field required.
If FormGent does not receive a mapped title, it may use a fallback title based on the response ID.
The category or tag is missing
Create the term in WordPress first. Then select it in Taxonomy Mapping and save the feed.
Submit a new test. Also check that the term belongs to the post type you selected.
The featured image is missing
Check that:
- The form has a File Upload field.
- The field allows the image’s file type.
- The image finished uploading.
- The field maps to Featured Image.
- The file is below the form and server limits.
Editing the entry did not change the post
This is expected. The entry and the post are separate records.
To make changes to the article, edit its WordPress post.
Frequently asked questions
Can guests submit posts without an account?
Yes. Turn on Guest posting in the Post/CPT feed. Use Pending or Draft status so an editor can review the post.
Guest posting, post authorship, and WordPress accounts are separate. A logged-out visitor can submit the form while the generated post is assigned to a site-controlled WordPress user.
Can FormGent publish a post automatically?
Yes. Publish is available as a post status. Pending is safer for most public forms because an editor can check the post first.
If you use Publish, test your spam protection, field rules, links, uploads, and conditions first. Automatic publication removes the normal editorial checkpoint.
Can the form create a custom post type?
Yes. The custom post type must be public and available through the WordPress REST API. It should then appear in FormGent’s post type list.
The fields and taxonomies you can use depend on how that post type was registered.
Test a custom post type separately. Confirm its title, content, status, author, taxonomies, and any custom display fields before opening the form to visitors.
Can a writer edit the post later?
The basic Create post setup does not provide a writer dashboard.
FormGent includes an Update post action for a selected existing post. The basic workflow in this guide creates new posts; it does not create a private contributor dashboard.
What do I need before starting?
Use an active FormGent setup with Post/CPT Submission available. Open the form settings and confirm that you can create or edit a post feed before building the rest of the workflow.
Should the form ask for an email address?
Ask for an email address when your team may need to contact the writer. Explain why you collect it and how you will use it.
The email address does not have to become the public post author.
Keep the email in the entry unless there is a clear reason to store it elsewhere. Do not map it into a public post field.
Why do I have an entry but no WordPress post?
The form response was accepted, but the post feed did not complete its work. Check that Post/CPT Submission is available, the feed is active, Guest posting matches the visitor’s login state, the post type still exists, the required mappings are present, and no condition stopped the feed.
Should contributors choose their own category?
For the basic workflow, use an existing fixed category only when it fits every submission. Otherwise, let an editor choose the category during review. The taxonomy controls in this setup should not be treated as a way for visitors to create new terms.
What should I test after changing the form?
Submit a new response with a unique title. Check the success message, completed FormGent entry, generated WordPress post, mappings, status, author, taxonomy, image, and notification used by your workflow.
Pre-launch checklist
Before you share the form, confirm that:
- FormGent is active and Post/CPT Submission is available.
- The Post/CPT feed is active.
- Post Title and Post Content are required and mapped correctly.
- Guest posting matches your access plan.
- New posts use Pending or Draft status.
- A team-controlled WordPress author is selected.
- Spam protection and file limits are ready.
- The page explains accepted topics, editing, privacy, and review expectations.
- Private contact details are not mapped to public post fields.
- The confirmation message does not promise publication.
- A logged-out test created both a FormGent entry and a WordPress post.
- The post has the correct title, content, status, author, and fixed terms.
- Any image, meta, custom post type, condition, or notification was tested separately.
- An editor knows who will review new submissions.
- Your team has a process for rejected, duplicate, and unsafe submissions.
Start with the simplest version
Begin with a required title and content field. Map them to a new post, choose Pending, and select a team-owned author.
Test the form while logged out. Check both the FormGent entry and the WordPress post.
Add more fields only when your publishing process needs them. After any change to the mappings, access rules, or post status, run the test again.
Once the basic workflow works, add only the fields your editorial process needs. Each extra field should have a clear destination, owner, and review purpose.
The strongest workflow is not the one with the most settings. It is the one your contributors can complete, your editors can verify, and your team can troubleshoot without guessing.


Leave a Reply