WordPress Form Webhooks: How to Send and Verify Form Data
-
- Tips and Tricks Automation
- 13 mins read

A WordPress form webhook sends form data to another app automatically. With the FormGent Pro webhook settings, you can send a new entry to a CRM, an automation tool, or your own app. You do not need to copy the entry by hand.
Setting up the webhook is the first part. You also need to check the data that FormGent sends and confirm that the other app receives it. This guide shows you how to do that with a POST request in JSON format. You will also learn how conditional sending works and how to confirm the result in both FormGent and the receiving app.
This guide uses FormGent 1.12.4 and FormGent Pro 1.5.0. If your screen looks slightly different, look for the same settings names as you follow the workflow.
What is a WordPress form webhook?
A WordPress form webhook is a message sent from your website to another app. The message is sent when someone submits a form. It contains the form data and goes to a web address supplied by the receiving app.
The basic flow looks like this:
- A visitor submits a WordPress form.
- The form plugin checks and saves the response.
- The plugin sends the data to the webhook URL.
- The receiving app returns a status code and processes the data.
A form plugin can send collected data to an external service by making a request through the WordPress HTTP API. The receiving app then decides what to do with that data. For example, it may create a CRM contact, add a task, or start an automation.
A webhook and a REST API are related, but they are not the same. Through an API, an application can request data or modify existing information. A webhook sends data after a specific event, such as a form submission. The receiving app does not need to check your site again and again for new entries.
When does your WordPress form need a webhook?
Use a webhook when the receiving app accepts web requests but your form plugin does not connect to it directly. A webhook works well for one-way tasks such as:
- Sending a new lead to a CRM.
- Passing an application to an internal system.
- Starting a workflow in Zapier, Make, or n8n.
- Sending a support request to a help desk.
- Updating a custom application after a form is submitted.
A webhook gives you more freedom, but you need to check the data and make sure it arrives. The table below compares your main options.
| Connection method | Best for | Main tradeoff |
| Direct integration | Quick setup for an app that your form plugin already supports | Works only with the supported apps, fields, and actions |
| Webhook | Sends data to almost any app that accepts web requests | You need to check the data and the delivery result |
| Automation tool | Connects several apps with visual steps | May add another service and subscription cost |
| Custom integration | Handles complex rules or data that must move both ways | Needs development and regular maintenance |
Choose a direct integration when it already does everything you need. Choose a webhook when you want to send data straight to another app. Use an automation tool when you need to change the data, add different paths, or run several actions.
What you need before creating the webhook
Before you open the form settings, check what the receiving app needs. Prepare the following:
- The webhook URL that will receive the data.
- The HTTP method, such as POST.
- The data format, usually JSON or form data.
- The field names and value types the app expects. For example, it may need email as text and first and last names as separate values.
- Any secret key or login token required by the app.
- A test page or request log where you can see the data that arrives.
- Fake test information, so you can check the setup without using a real customer’s personal data.
- An HTTPS URL for live form data.
You also need a working FormGent form with FormGent Pro active. Keep your Pro license connected so you can receive product updates and support.
Webhooks are included with FormGent Pro. With FormGent Free, you can still build forms and save submissions, and the Webhooks area gives you an upgrade option when you are ready to connect another app. Activate FormGent Pro before collecting any submissions that need to be forwarded. If you do not have a form yet, follow the guide to create your first FormGent form.
The example below uses Name, Email, and Text fields. The Name field also shows how JSON can contain values inside another value.
Choose the request method and data format
Follow the receiving app’s documentation when you choose the method and format.
Which HTTP method should you use?
POST is a common choice when you want to send a new form entry. This guide uses POST.
| Method | Typical purpose |
| GET | Retrieve data |
| POST | Create or submit data |
| PUT | Replace a resource |
| PATCH | Update part of a resource |
| DELETE | Remove a resource |
GET, PUT, PATCH, and DELETE are also available on the webhook screen. The receiving app may not accept all of them. Choose the method listed in that app’s documentation. This walkthrough uses POST only.
Should you use JSON or form-encoded data?
Many apps accept JSON. JSON can also keep related values together. The other format in FormGent is labelled Form. Some receiving apps require Form data instead of JSON.
This guide uses JSON. The Name field arrives as a group with separate first_name and last_name values. If the receiving app expects one name value, you may need to join or map those values there.
How to send FormGent submissions with a webhook
The steps below use POST, JSON, and All fields.
1. Create or open the form
Open an existing FormGent form or create a small form for testing. Name, Email, and Text fields are enough.
Publish or update the form, then add it to a test page. A separate test form keeps sample entries away from your live forms.
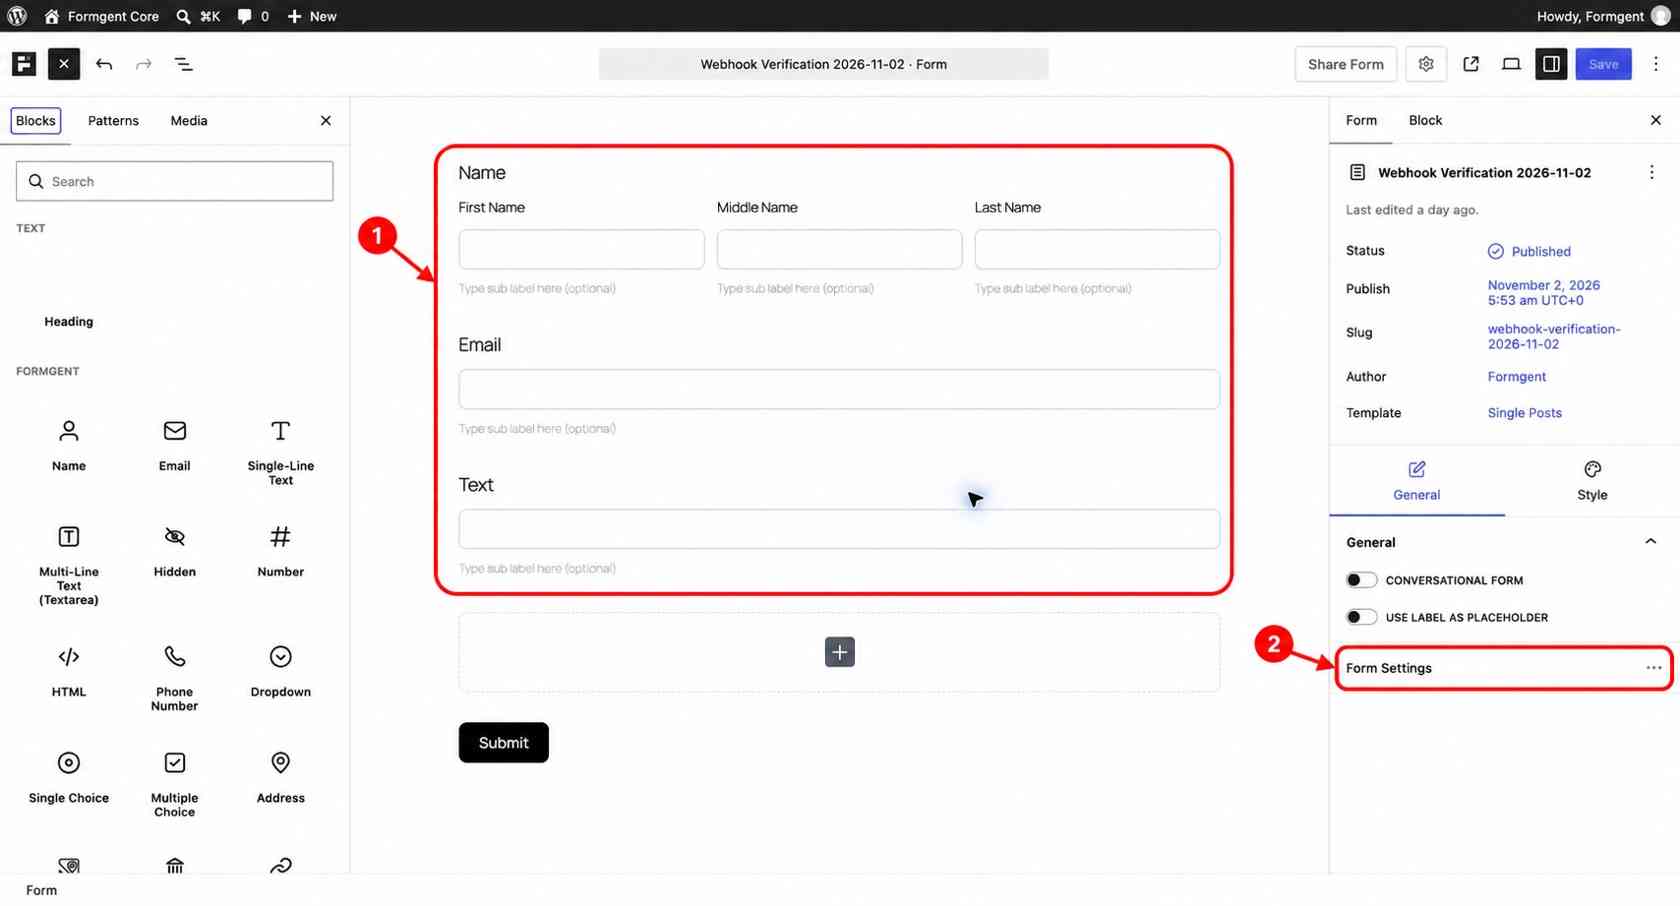
Marker 1 shows the fields that will be included in the test. Marker 2 shows where to open Form Settings.
Next: Check the fields at marker 1, then open Form Settings at marker 2.
2. Open the Webhooks settings
In the form editor, open Form Settings. Under Advanced, select Webhooks.
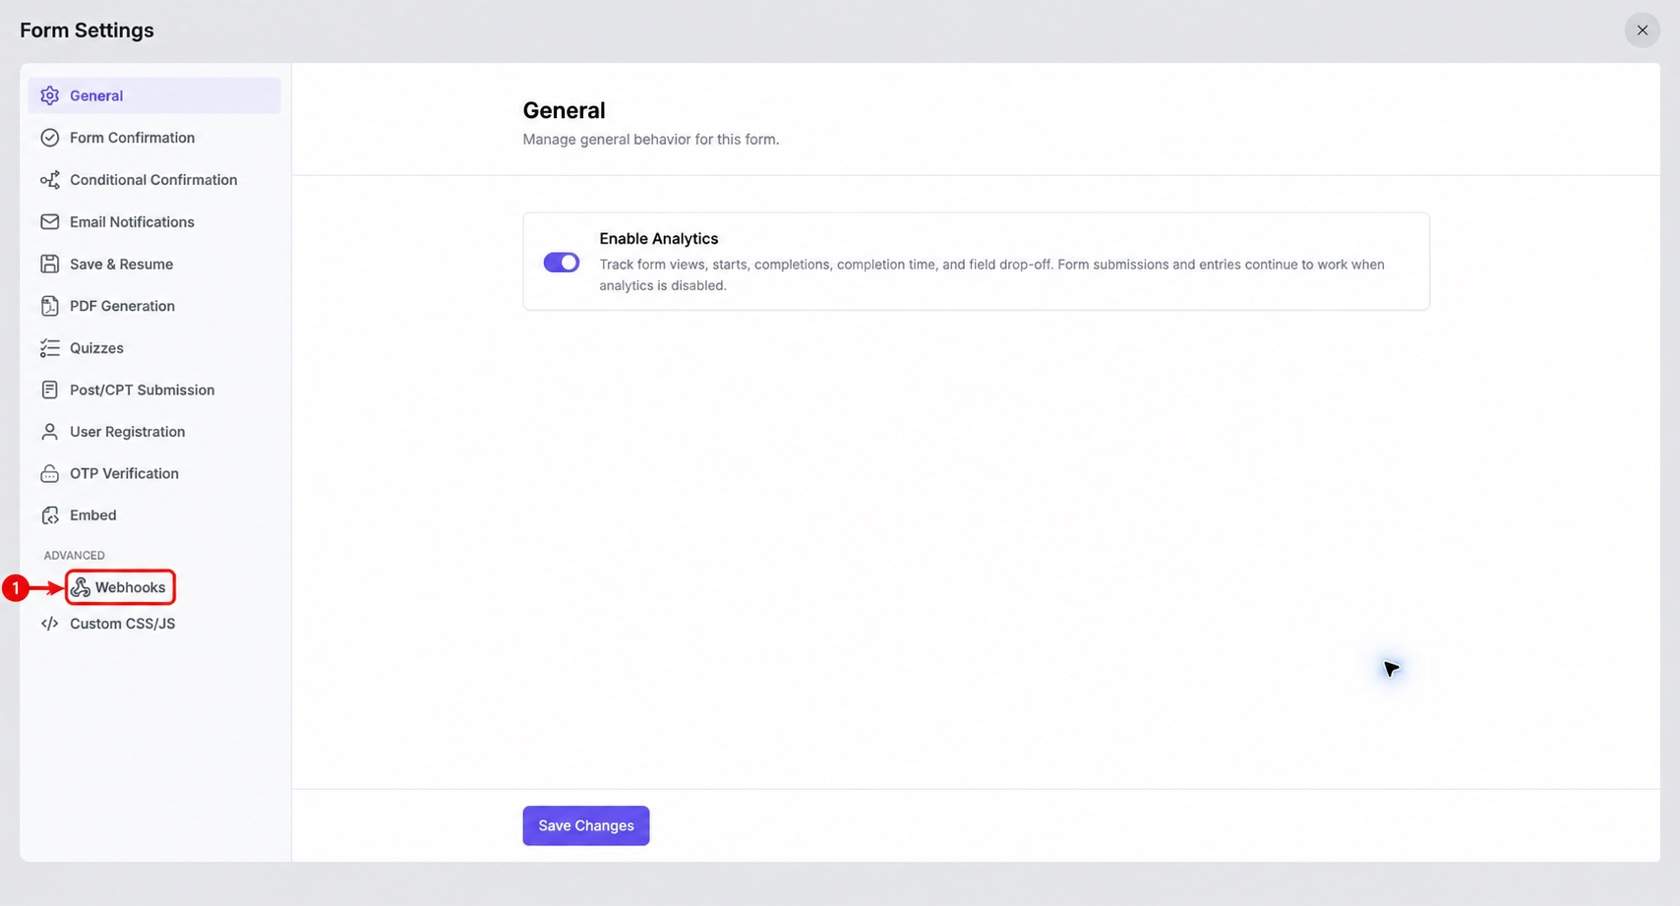
Marker 1 points to the Webhooks menu. Select it to open the webhook list.
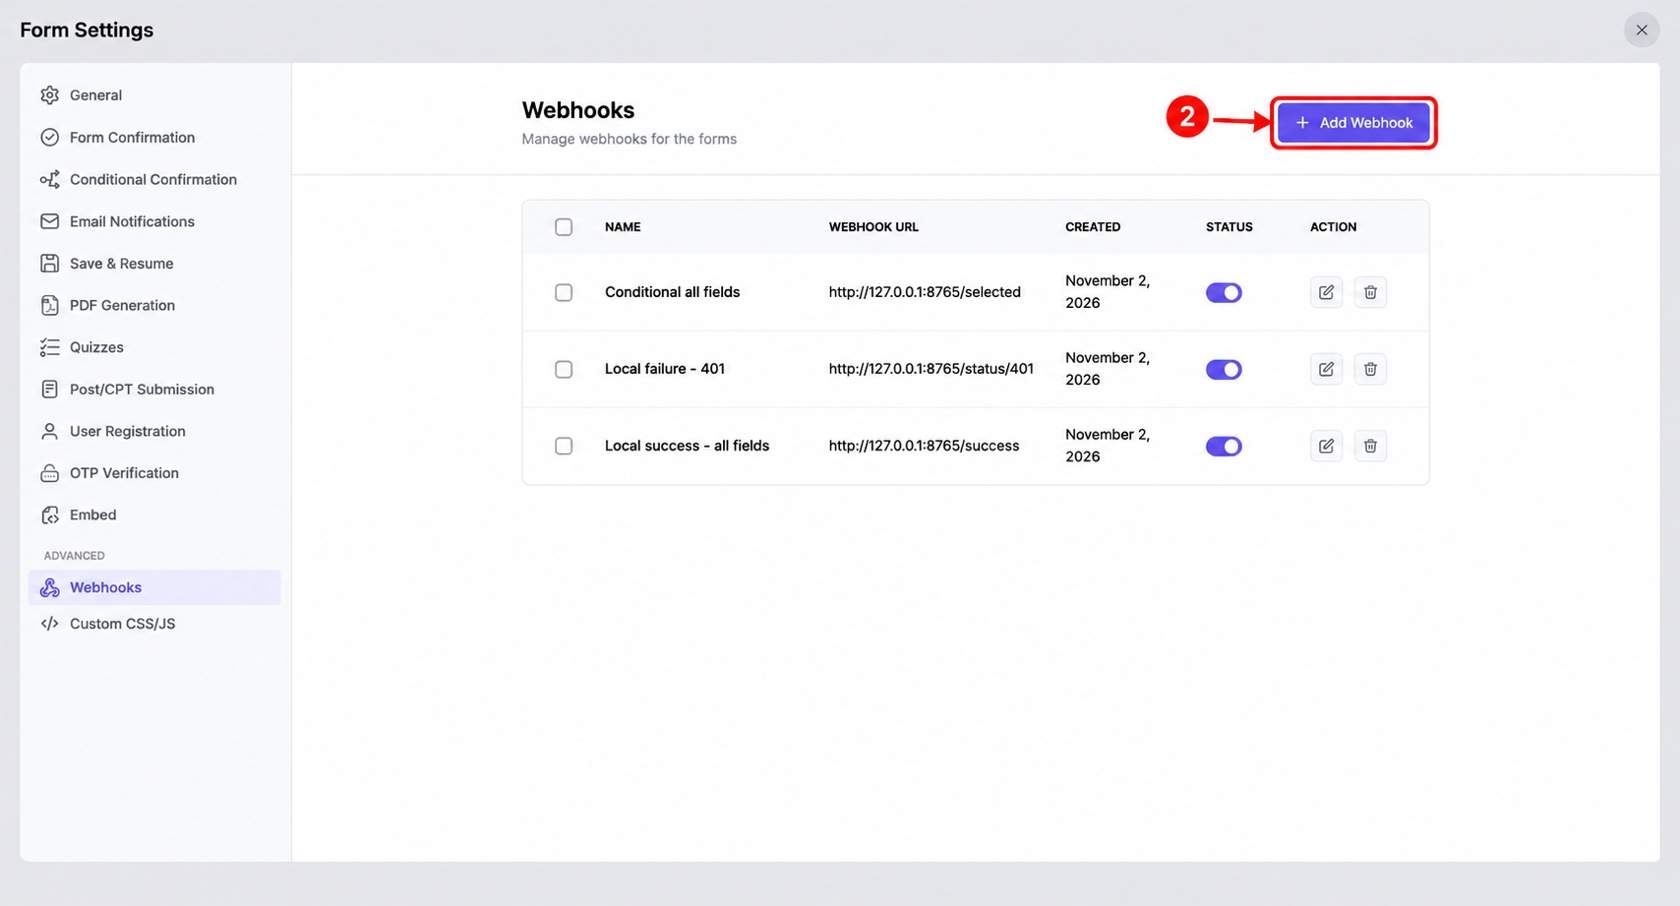
Marker 2 points to the purple Add Webhook button.
Next: Select Webhooks at marker 1, then click Add Webhook at marker 2.
You can add more than one active webhook to a form. Use a clear name for each one, such as “CRM lead test” or “Internal API production.”
3. Enter the webhook name and request URL
Enter a clear name in the field at marker 1. Then paste the webhook URL supplied by the receiving app into the field at marker 2.
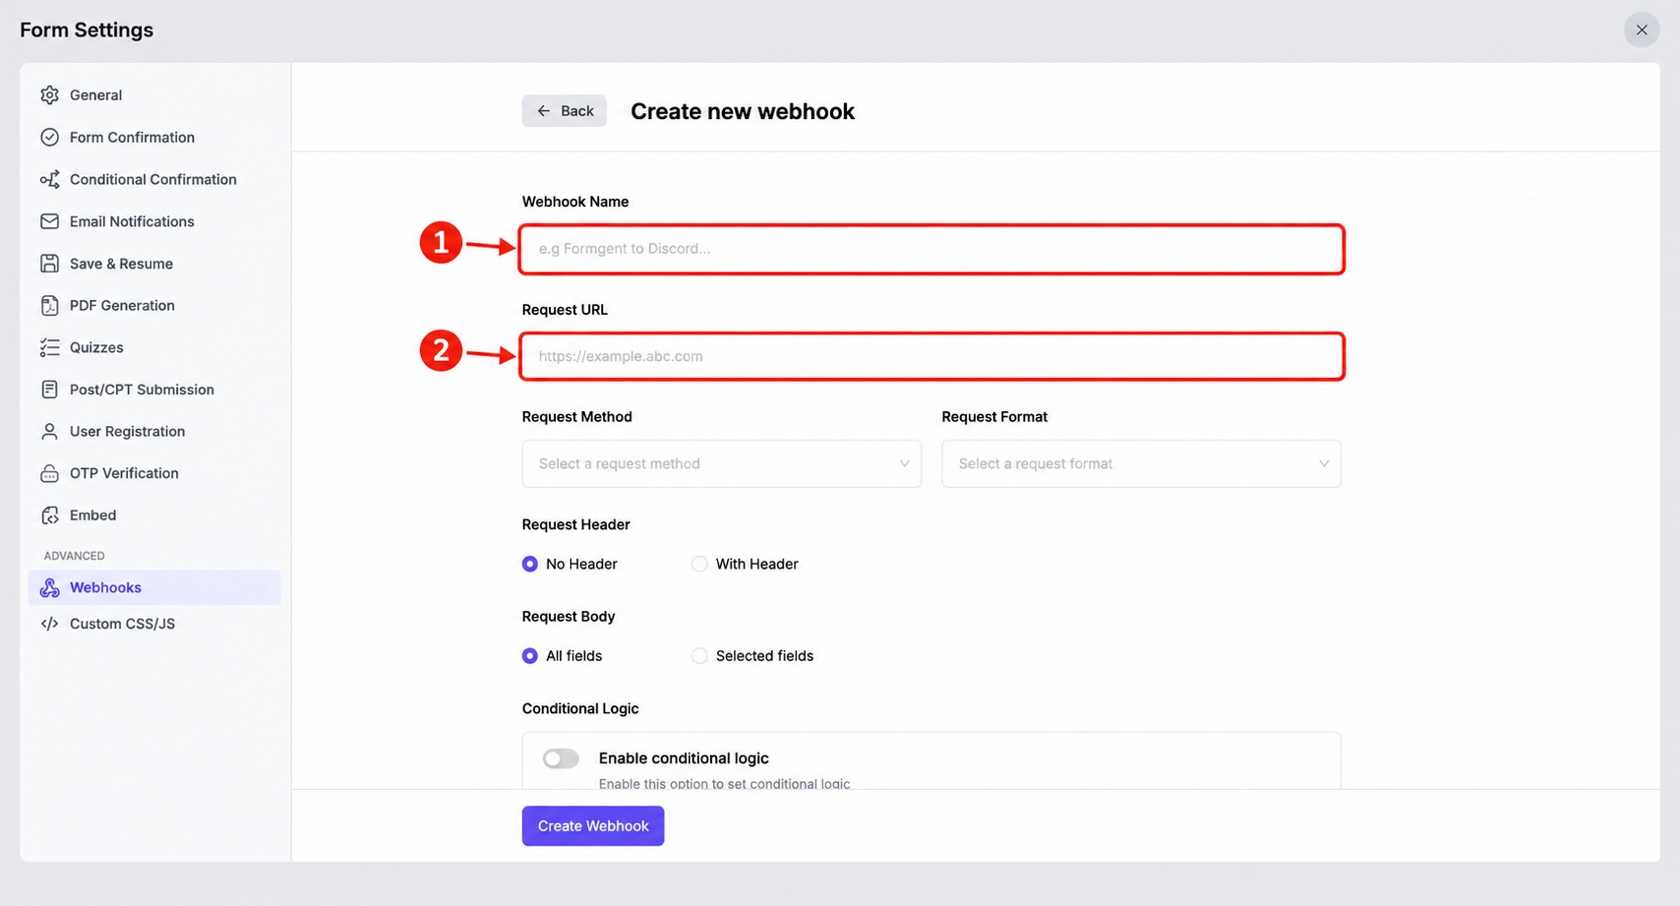
The screenshot uses blank example fields so it does not expose a real endpoint. In your setup, complete both marked fields before moving on.
Next: Complete marker 1, then marker 2. Keep both values in place for the next step.
Check the URL carefully. A normal dashboard page is usually different from a webhook URL. If the URL contains a secret key, keep it hidden in screenshots.
For your first check, use a safe test URL or a test version of the receiving app. Find out how the service stores your data and how long it keeps it.
4. Select POST, JSON, and All fields
Use these settings for this workflow:
- Request Method: POST
- Request Format: JSON
- Request Body: All fields
This walkthrough uses No Header and All fields for a simple setup. FormGent also includes With Header and Selected fields for destinations with additional requirements. When you use those options, send a test entry first and confirm the header and payload in the receiving app before going live.
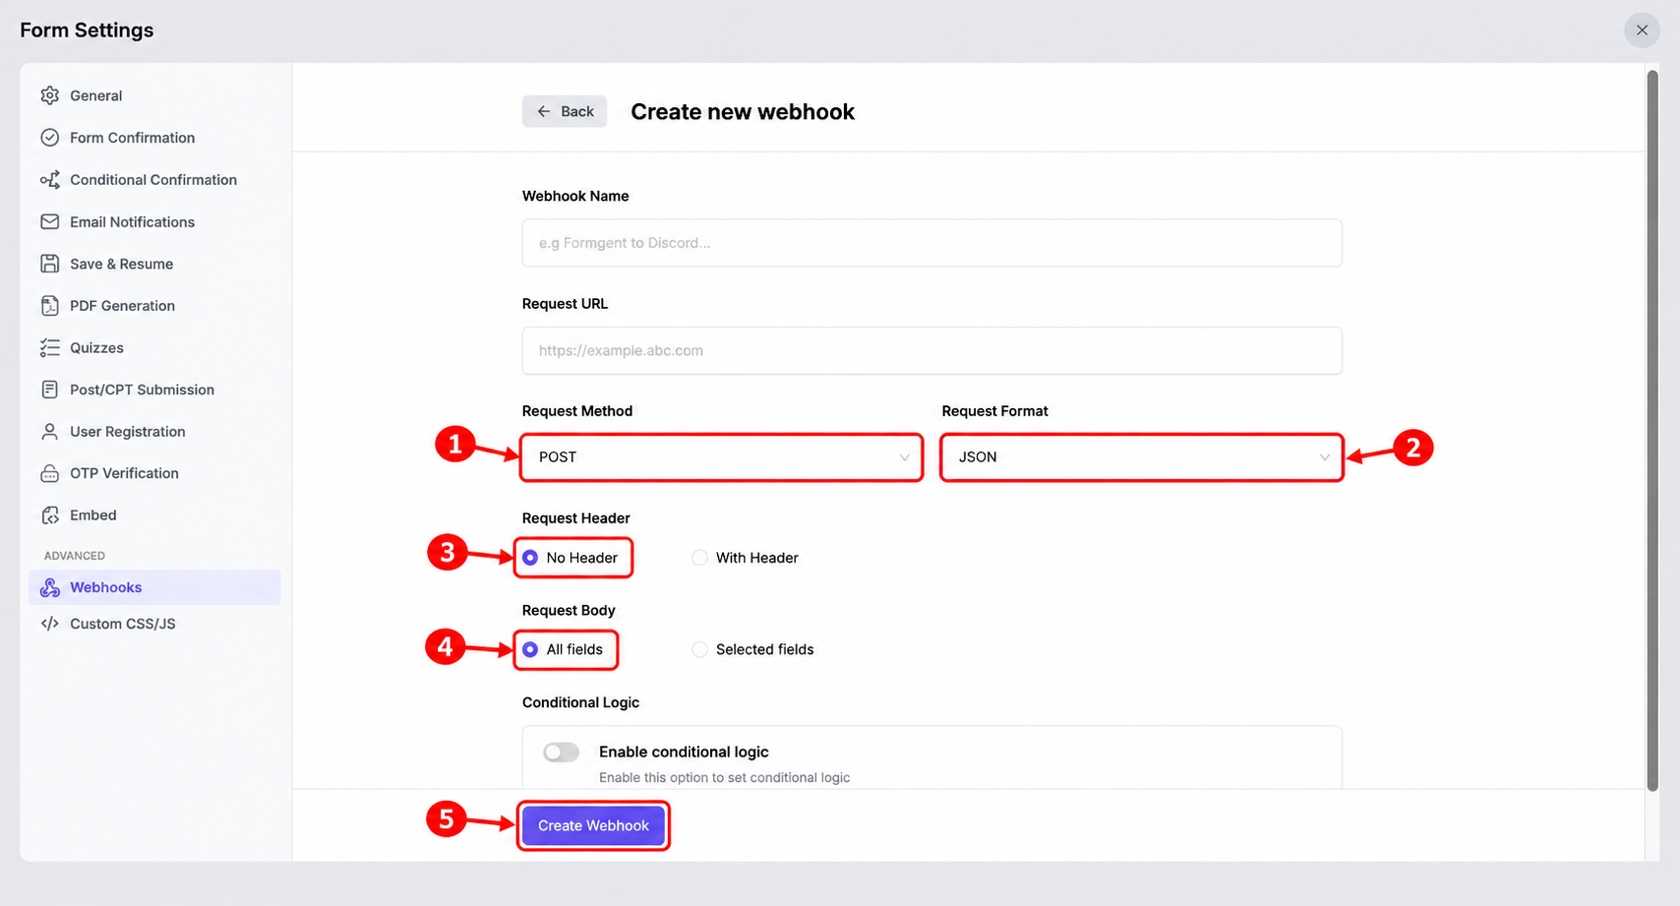
The markers show the exact order: 1 POST, 2 JSON, 3 No Header, 4 All fields, and 5 Create Webhook. The screenshot leaves the example name and URL blank for privacy; keep the values you entered in Step 3.
Next: Confirm markers 1–4, then click Create Webhook at marker 5.
5. Create and activate the webhook
Create the webhook. Go back to the webhook list and make sure its status switch is on.
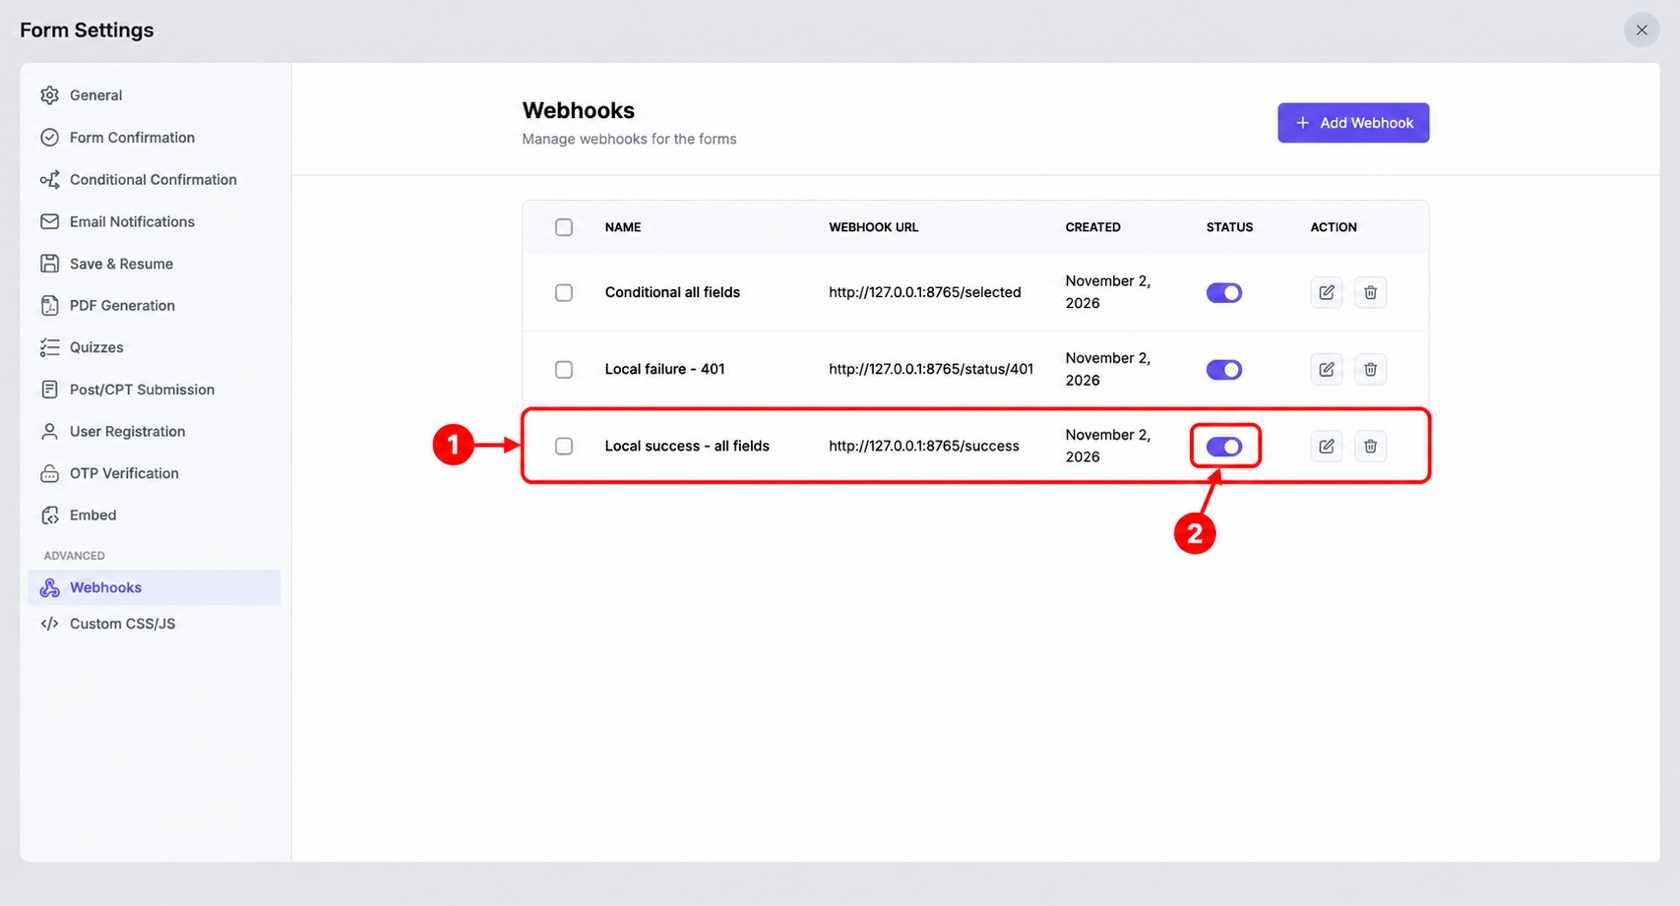
Marker 1 shows an example test webhook in the list. Marker 2 shows its active Status switch.
Next: Find your webhook like marker 1, then confirm that its switch looks like marker 2.
If a form sends data to several apps, check each webhook separately so you can confirm every destination.
6. Submit safe test data
Open the page that contains the form and submit a sample entry. Use a fake name and email, such as [email protected].
Add a value that is easy to find in the receiving app, such as Webhook test 2026-11-02 12:00. Write down the submission time too.
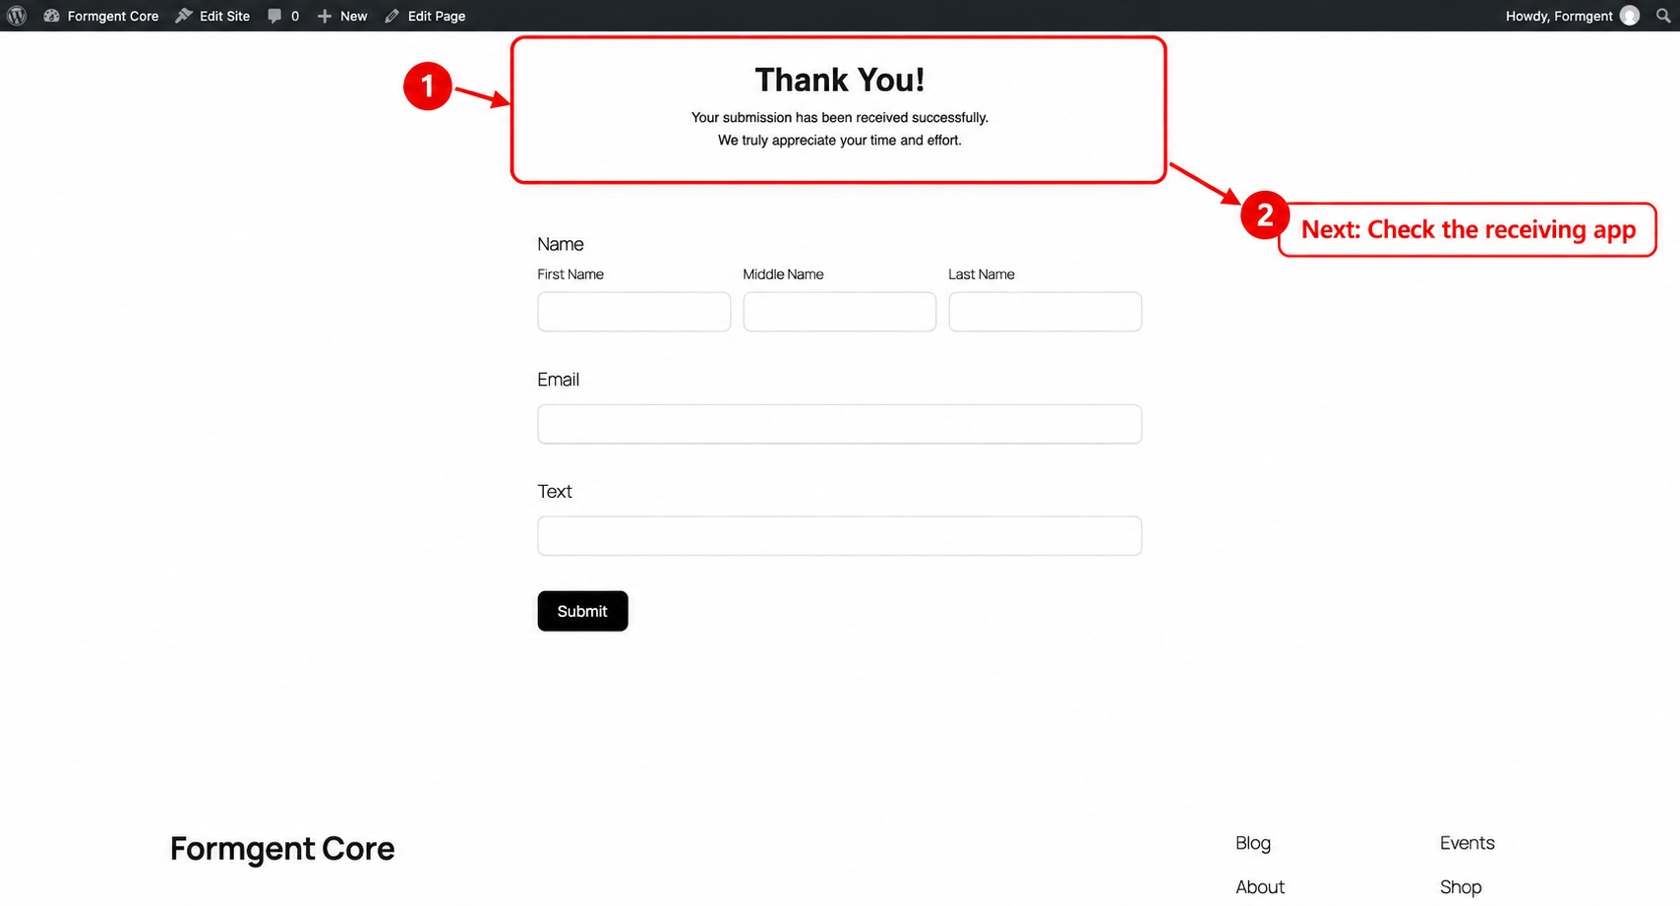
Marker 1 shows the FormGent success message. Marker 2 shows the next action.
Next: After marker 1 appears, follow marker 2 and check the receiving app for the same sample entry.
This message confirms that FormGent accepted the form entry. Complete the check by opening the receiving app and confirming the expected result there.
Check the webhook data in the receiving app
Open the request log in the receiving app and find your sample entry. Check these three details:
- The request arrived.
- The method is POST.
- The content type is application/json.
When you choose All fields, the JSON has two main parts: submission_info and fields. Here is an example with fake information:
{
“submission_info”: {
“form_id”: 71,
“status”: “publish”,
“is_read”: 0,
“is_completed”: 1,
“completed_at”: null,
“ip”: “::1”,
“created_by”: 1,
“device”: “OS X”,
“browser”: “Chrome”,
“browser_version”: “156.0.0.0”,
“created_at”: “2026-11-02 11:54:56”
},
“fields”: {
“name”: {
“first_name”: “Webhook”,
“last_name”: “Tester”
},
“email”: “[email protected]”,
“text”: “Success payload 2026-11-02”
}
}
The submission_info part contains details about the saved entry. The fields part contains the answers from the form. Each answer uses the field name as its key.
Notice where the first name appears. It is not at the top level. The receiving app must read fields.name.first_name. Always check the JSON before you map fields in another app.
The All fields option can also send an IP address and details about the browser or device. Keep the payload focused by collecting only the information the receiving app needs. If you configure Selected fields, confirm the received JSON with a test entry before going live. If you do not need to save visitor IP addresses, FormGent’s first-steps settings guide explains the global Disable IP Logging option.
The JSON can change when you add fields, rename field keys, or update the plugin. Check it again after any important change.
Send the webhook only when a condition matches
Conditional logic lets you choose when a webhook should run. For example, you can send only qualified leads, send requests to different departments, or require consent before sharing data.
In the webhook configuration:
- Turn on conditional logic.
- Choose the form field you want to check.
- Choose how FormGent should compare the answer, such as “is” or “is not.”
- Enter the value that should match.
- Save the webhook.
Example conditional rule
Use this rule as a simple test:
Send this notification if Text is Send Selected.
Check the rule with two sample entries:
| Submitted Text value | Form result | Webhook result |
| Do Not Send | Submission succeeded | No request received |
| Send Selected | Submission succeeded | Request received |
The condition controls only the webhook. It does not block the form entry. If the answer does not match, the form still works, but that webhook does not send anything.
If you add several rules, choose All when every rule must match. Choose Any when one matching rule is enough. Try one matching answer and one nonmatching answer before you go live.
How to confirm successful webhook delivery
FormGent saves the form entry first and then sends the webhook to the receiving app. Check both stages to confirm the complete workflow:
- In FormGent, confirm that the entry was saved.
- In the receiving app, confirm that the request arrived.
- Check that the app created the expected contact, task, or other result.
If the receiving app returns an HTTP error, update the URL, credentials, method, or payload. Then submit a fresh test entry and check the result again. The saved FormGent entry remains available while you correct the connection.
These signals help you follow the delivery path:
| Signal | What it confirms | Next confirmation |
| Visitor success message | FormGent accepted the form entry | Open the receiving app |
| Completed entry | FormGent stored the response | Find the matching webhook request |
| Request visible in the other app | The app received the request | Check the expected action or record |
| Expected record or action exists | The complete test produced the intended result | Monitor future live submissions |
Review the saved form submission, then check what happened in the receiving app.
How to troubleshoot a WordPress form webhook
Send one sample entry with a unique value. Then follow it from FormGent to the receiving app.
Check the delivery path
- Confirm the webhook is active.
- Check the full webhook URL again.
- Make sure the receiving app accepts the HTTP method you chose.
- Make sure it accepts JSON or the format you chose.
- If conditional logic is enabled, submit a value that definitely matches.
- Look for your unique value and submission time in the request logs.
- Compare the received JSON with the format required by the app.
If nothing arrives, ask your web host whether it blocks requests leaving your website. A firewall, domain name problem, or HTTPS certificate error can also stop the request.
Use the HTTP status to find the problem
HTTP response codes tell you what happened to a request. The exact code is more useful than a general “webhook failed” message.
| Result | Likely meaning | What to check next |
| No request visible | The webhook is off, a condition did not match, the URL is wrong, or the request was blocked | Status switch, condition, URL, web host, and receiving app logs |
| 400 or 422 | The app rejected the data | Required fields, value types, and JSON structure |
| 401 or 403 | A secret key is missing, incorrect, or not allowed | Login details, secret key, and app permissions |
| 404 | The webhook URL or record does not exist | Main URL, path, test or live version, and record ID |
| 405 | The app does not accept this HTTP method | App documentation and FormGent method setting |
| 415 | The app does not accept this data format | JSON versus form data |
| 429 | Too many requests were sent in a short time | App limits and when you can try again |
| 500-599 | The receiving app or one of its services failed | App logs, service status, and a later retry |
| 2xx but no expected record | The request arrived, but the app did not finish the next step | App logs, field mapping, data checks, and duplicate rules |
FormGent treats the final HTTP status code from 200 through 399 as a successful webhook response. Complete the check by confirming that the receiving app created the expected contact, task, or other record.
Quick checks for a smooth setup
- Use fake customer data for the first check.
- Make sure you copy the actual webhook URL instead of the dashboard address.
- Check the receiving app’s requirements, then select either JSON or Form data accordingly.
- Check the JSON keys instead of relying only on visible field labels.
- Map nested values such as fields.name.first_name correctly.
- Test both matching and nonmatching conditional rules.
- Confirm the result in the receiving app after the form shows its success message.
- Use a unique sample value so the entry is easy to find in logs.
Security and production checklist
A successful basic test does not always mean the webhook is ready for real data. Before you go live:
- Use an HTTPS webhook URL.
- Use a form that collects only the information the other app needs, or confirm a working Selected fields setup before using it with live data.
- Check the exact JSON created by your installed version.
- Make sure saving IP addresses and other visitor details follows your privacy rules.
- Keep secret keys and private URLs out of screenshots, support tickets, and public pages.
- Remember that header names and values entered in FormGent are saved with the webhook configuration. Restrict WordPress and database access, and replace exposed keys.
- Limit WordPress access to webhook settings.
- Decide how long to keep request logs that contain personal information.
- Check the data format and allowed values in the receiving app.
- Make sure a repeated request does not create duplicate contacts, tasks, or other records.
- Watch the receiving app for errors and check the webhook after important changes.
The OWASP webhook security guide has more advice for the app that receives the request. You can also use the WordPress form security checklist to review HTTPS, spam protection, data checks, file uploads, user access, and saved entries.
If the destination needs an Authorization header, confirm with a test entry that the header arrives before you send live data. This walkthrough focuses on a setup that uses No Header.
What this FormGent workflow covers
This guide covers:
- A POST request with a JSON body.
- All-fields JSON containing submission_info and fields.
- Nested Name data.
- Multiple active webhooks on one form.
- Conditional delivery with matching and nonmatching submissions.
- The difference between a completed form entry and successful webhook delivery.
This focused walkthrough uses POST, JSON, No Header, and All fields. For other methods, custom headers, selected-field mapping, or Form data, follow the receiving app’s requirements and confirm the result with a test submission.
Frequently asked questions
How do I confirm that a FormGent webhook worked?
The FormGent success message confirms that the form entry was accepted. To complete the check, open the receiving app and confirm that it created the expected result.
Can one FormGent form send more than one webhook?
Yes. You can add several active webhooks to one form. Give each one a clear name and check each receiving app separately.
Can I send a webhook only for certain form answers?
Yes. Add conditional logic and choose the answer that should trigger the webhook. If the answer does not meet the condition, the form submission still succeeds, but the webhook is not triggered.
Should I send JSON or form-encoded data?
Use the format required by the receiving app. This guide uses JSON because it can keep related values together. Some apps require form data instead.
How can I test a WordPress webhook safely?
Use a test URL, fake data, a unique value, and request logs. Check how the service stores your data and how long it keeps it. Move to real personal data only after the full test works as expected.
Check the receiving app, not only the form
A reliable webhook setup has three parts: set up the request, check the JSON, and confirm the result in the receiving app.
For the FormGent workflow in this guide, use POST, JSON, and All fields. Submit fake data and check the JSON. If you add a condition, try one answer that matches and one that does not. The success message confirms the FormGent entry, and the receiving app confirms the webhook result. Check both before you go live.
Start with a test form and test URL. Move to the live setup only after you can see both the request and the expected result in the other app.


Leave a Reply